
~ digitalchk / docs / chatbot-chk
Chatbot Chk adds a chat to your site that answers from your own content and hands the conversation to a person when the visitor asks for one. The AI comes with your license from Digital Checkmark, or from your own key. Every conversation stays in your own database, and your team replies from WordPress or from an installable app.
How it works
Answers from your site
The bot reads your pages and, if you choose, your blog posts, plus text and web pages you add. One button, “Read and optimize my site”, reads everything, removes duplicates and keeps it in sync: a page that is published, edited or deleted reaches the bot within minutes. For each question it sends the AI only the passages that matter.
The visitor’s language
It answers in the language the visitor writes in, including Arabic, Chinese, Russian and other alphabets, and right to left where it applies. Your texts for visitors have a version per language of the site, translated with AI on demand, and the plugin itself can be translated to a new language with AI.
It speaks first
Proactive messages open the conversation when a visitor shows interest: after some seconds on a page, after scrolling part of it, or when the visitor is about to leave. Each one shows once per visit, and never to someone who is already chatting.
A person when asked
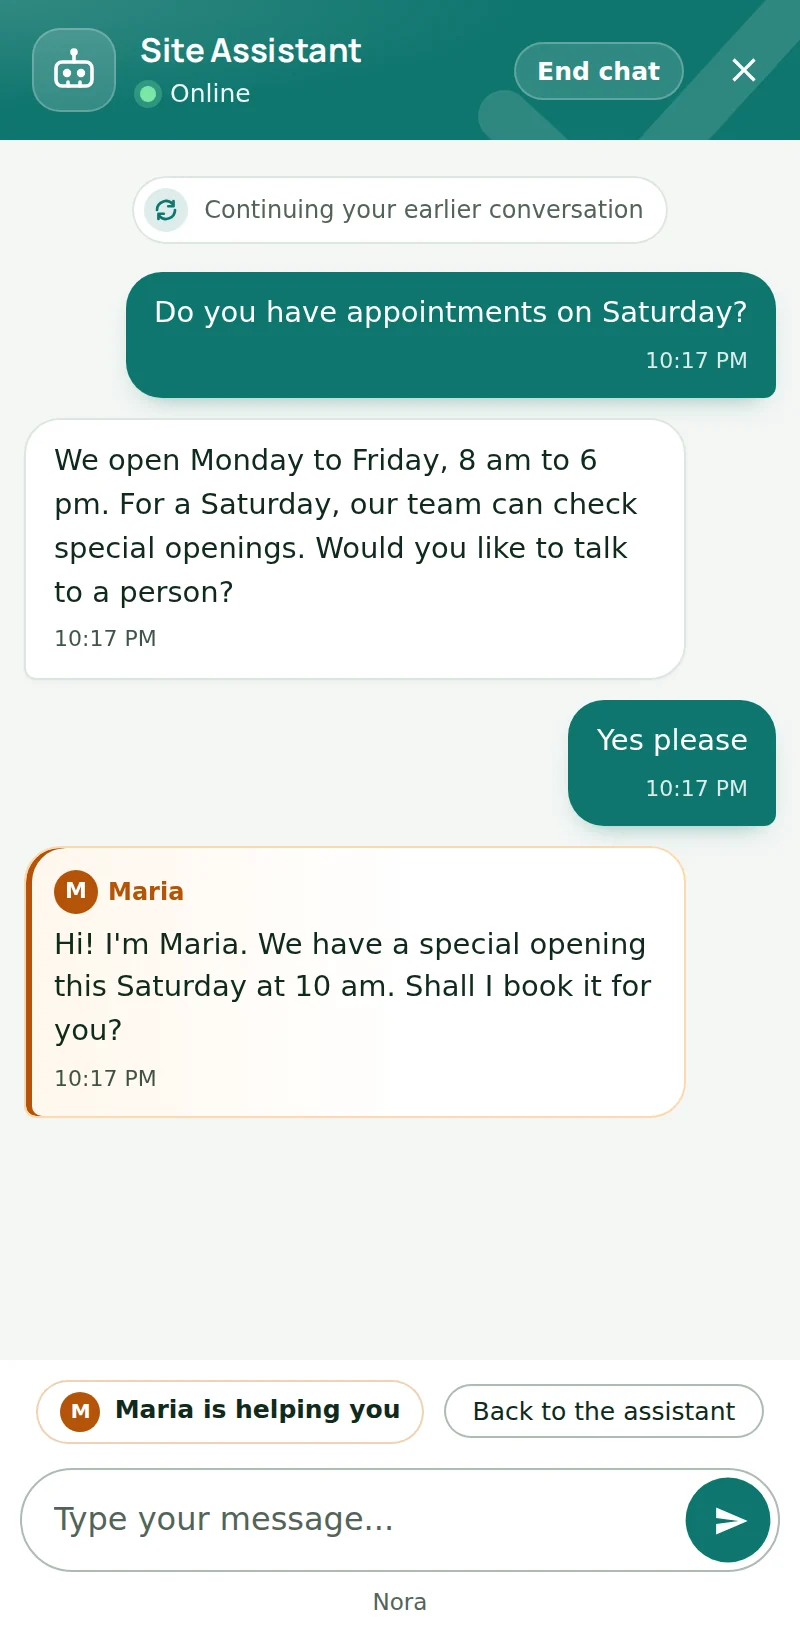
“Talk to a human” appears only when someone will really be notified: the Support queue with agent alerts, the email summary, Telegram, or (Pro) Slack, a Teams channel or a webhook listening for “A visitor asks for a person”. Agents get an email (and, with Pro, a push notification), and the visitor sees who takes the conversation.
Live (Pro)
See who is on the site right now, on which page, where they came from and whether the bot is helping them. Write to a visitor first and the chat opens on their screen with your message. You can also get an alert, by push or email, the moment a visitor starts talking to the bot.
Business hours
Outside your hours, or while every agent is set to Away, the visitor leaves an email and is told the reply will arrive there.
Support console
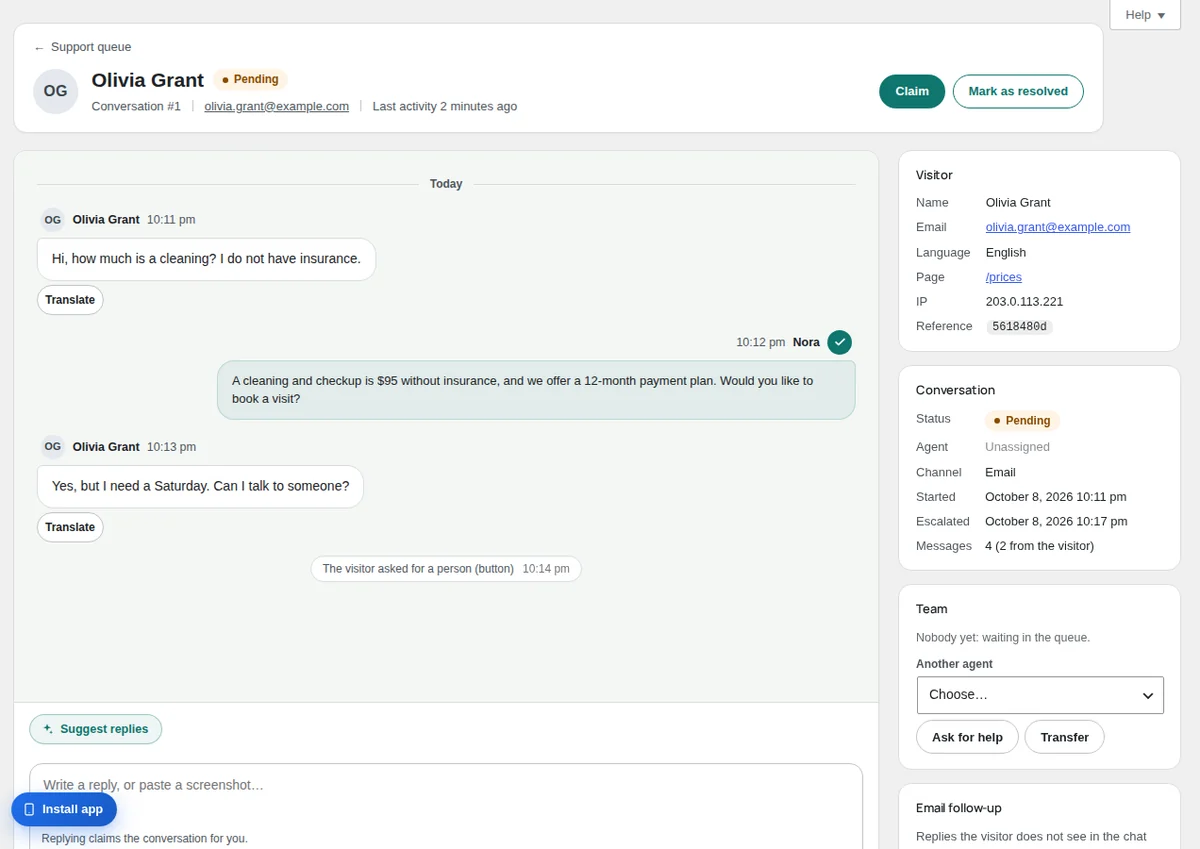
Real-time transcript, claim, resolve, transfer, ask a colleague for help and return to the queue. Saved replies with “/” shortcuts, file attachments and, with Pro, AI helpers: suggested replies, translation and polishing.
Lead capture
Seven shapes, from silent (an address typed in the chat) to required from the start. Every address is checked for format, disposable domains and mail servers, and with Pro the mailbox itself is checked.
Results
Ratings from one to five stars, the share of chats the AI answered alone in the last 30 days, and an “Ask the AI” panel for questions about recent conversations.
Telegram (every plan)
Your own bot writes to you or to your team’s group when a visitor asks for a person, leaves their email or rates a chat (you pick the events), with Take, Resolve and Open in Support buttons. Reply to that message and the visitor gets your answer in the chat; what the visitor writes next arrives as a reply. Each person links their own Telegram account (Users > Profile > Telegram) and answers as themselves; someone in the chat without a linked account can read but not answer. Reply with /take or /resolve to any message about a chat, /chats lists the open chats and /help says what you can do. Only text reaches the visitor from Telegram: send files from Support. With several visitors at once, each line starts with the chat number and the visitor’s name. A visitor who ends the chat and comes back gets a new alert. The site talks to Telegram directly, with no Digital Checkmark server in between.
Slack (Pro)
Connect a channel with one button. Each request for a person, or every new chat, arrives with Take, Resolve and Open buttons, and the conversation continues in the thread: what the visitor writes appears there, and a reply in the thread reaches the visitor. A new contact or a rating of that chat arrives as a line in the thread. “Send test” posts a message in the channel to check it. A visitor who ends the chat and comes back starts a new thread. The Slack token stays on the Digital Checkmark server.
Microsoft Teams (Pro)
The chat events you choose (the same as webhooks) arrive in a Teams channel as a card with the contact, the page and the visitor’s last messages, and a button that opens the conversation in Support. Each card can mention up to 5 people with @ by their Teams email, so Teams alerts them on their phone; the Teams card lists who is mentioned, with an x to remove each one. Teams does not let a card mention the whole channel: for that, each person turns on the channel’s notifications. You connect it by pasting the address of a Teams Workflows flow; it takes two minutes.
HubSpot (Pro)
Each contact from the chat is created or updated in your HubSpot by email, with a note saying where they wrote from and a link to the conversation. When the chat is resolved, the whole conversation is added to the contact. It uses a HubSpot Service Key; the free HubSpot CRM is enough.
Integrations
Contacts go to Leads Chk with their page, language and a link to the conversation. With Pro, webhooks send the events you choose to Zapier, Make, n8n, your CRM or a Slack channel.
Plans
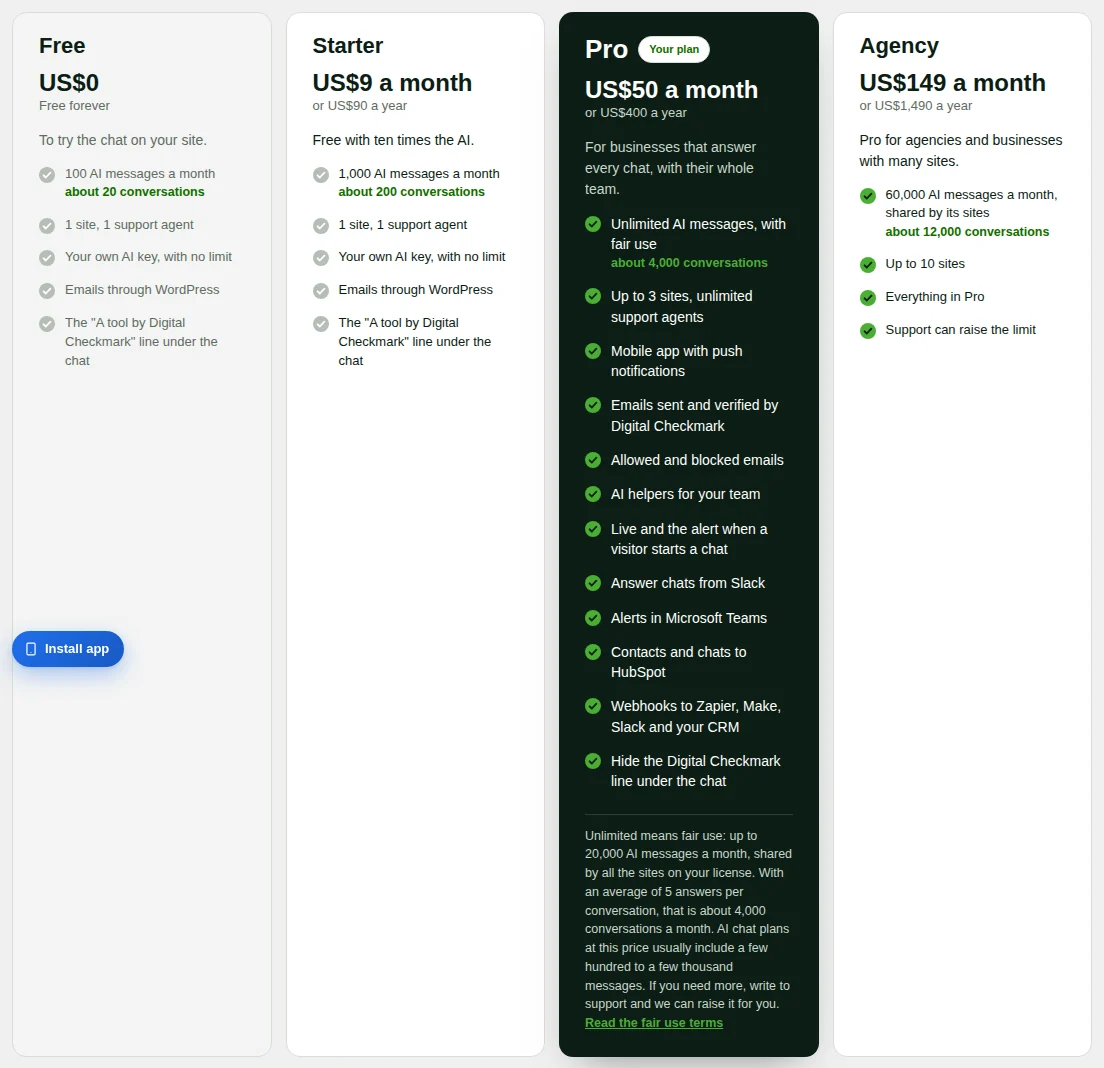
Chatbot Chk has four plans. They differ in how many AI messages by Digital Checkmark you get each month, how many sites and agents you can use, and the Pro features. Limits and prices change, so this guide does not list them: the plugin’s Chatbot Chk > Plans screen always shows the current ones, the plan your site is on and this month’s AI messages.
Free
The AI by Digital Checkmark with a monthly number of messages, or your own AI key with no limit from us. One site and one support agent, emails sent by WordPress, and the “A tool by Digital Checkmark” line under the chat. Activate it on License with your email and a 6-digit code.
Starter
Everything in Free with more AI messages a month. Paid monthly or yearly.
Pro
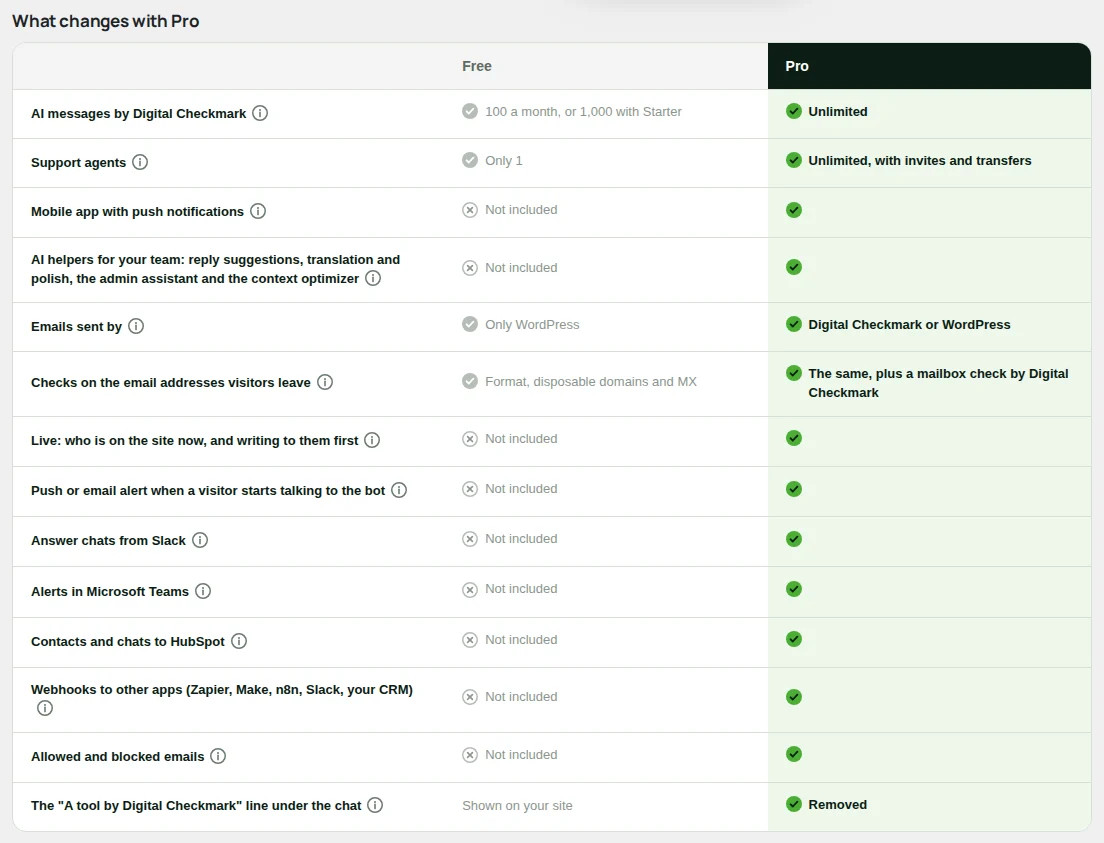
Several sites, unlimited AI messages with fair use shared by them, and every feature: unlimited agents with invites and transfers, the mobile app with push notifications, Live and the alert when a chat starts, Slack, Microsoft Teams, HubSpot, webhooks, allowed and blocked emails, emails sent and verified by Digital Checkmark, the AI helpers for your team, and the option to hide the Digital Checkmark line.
Agency
Everything in Pro for more sites, with a monthly number of AI messages shared by them. Support can raise the limit.
Every plan, Free included, answers from your pages, posts and documents, replies in the visitor’s language, has the Support console, business hours, saved replies, the Sandbox, email alerts, ratings, file attachments, contacts and Leads Chk, proactive messages, Telegram alerts and replies, and can run the chat on this site or on another site such as Wix, Shopify, Squarespace or plain HTML (see The chat on another site). The list “Included in every plan”, on the Plans screen, is the full one.
Messages and sites
- One answer, one message. Each answer the chat gives counts as one AI message. The count starts again on the first day of each month (UTC). On a license with several sites, the messages are shared by all of them. Messages answered with your own AI key do not count.
- Notices. On the plugin’s screens you get a notice at 80% and another at 100% of the month’s messages. Chatbot Chk > License shows the use at any time.
- When they run out. On Free, Starter, Agency and AppSumo, the bot stops answering with AI until the next month: visitors see your “When the AI can’t answer” message and can leave their email. On Pro, the bot keeps answering within fair use; see the fair use terms.
- Sites. Each license allows a number of sites. Chatbot Chk > License shows how many are in use; “Deactivate on this site” frees one for another site.
Pro trial and AppSumo
Pro trial. A site on Free can try every Pro feature for a few days, with no card: press the “Try Pro free for” button on the Pro card of the Plans screen. It is once per site and per email. During the trial, emails go through WordPress. When it ends, the site goes back to Free on its own, with everything saved, unless you choose a plan before.
AppSumo. An AppSumo license has the features of Pro with a monthly number of AI messages by Digital Checkmark, or your own AI key with no limit. Emails go through WordPress, not through Digital Checkmark.
How to change plan
- Open Chatbot Chk > Plans. If the site has no license yet, activate the Free plan on License first.
- On the plan you want, choose monthly or yearly. Yearly costs less.
- Pay on Stripe’s page. Your card goes only to Stripe; this site never sees it.
- Back on Plans, the new plan turns on within a minute (the page checks again on its own), with the same license key and nothing to reinstall.
With a plan already paid, each other card has a “Change to” button (“Change to Starter”, “Change to Pro”, “Change to Agency”): Stripe settles the difference and emails you the receipt for it. If a plan cannot be paid on the screen, “Get Chatbot Chk Pro” takes you to write to us; after we move your license, press “Check now” on License to see it at once.
How to cancel or manage your subscription
- Open Chatbot Chk > Plans.
- Under your plan, press “Manage my subscription”. It opens Stripe’s page.
- There, change the card, download invoices, switch between monthly and yearly, or cancel.
After you cancel, your plan stays on until the end of the period you paid (“Cancelled. Pro stays on until” a date) and then the site goes back to Free with everything saved. If a payment fails, Stripe tries again for a few days; update your card there to keep your plan.
Requirements
- WordPress 5.8 or newer
- PHP 7.4 or newer, and PHP 8.2 or newer for push notifications and the installable app
- A Chatbot Chk license (the free one is enough), or your own key for an OpenAI-compatible chat service
Publishing it
There is no shortcode. The bubble appears on its own on the pages you choose under Branding: all pages, only the pages you select, or all except the ones you select.
Any button or link can open the chat. Give it data-chk-open, and optionally data-chk-message with a first message that is written in the box but not sent, or link it to #chat. A link such as /contact/#chat opens the chat when that page loads.
Attribution. On the Free and Starter plans the plugin shows a small “A tool by Digital Checkmark” line at the foot of the chat window and under every email it sends. With Pro it is a switch in Branding, on by default: turn it off to hide it. Its link carries rel=”nofollow”.
Setup
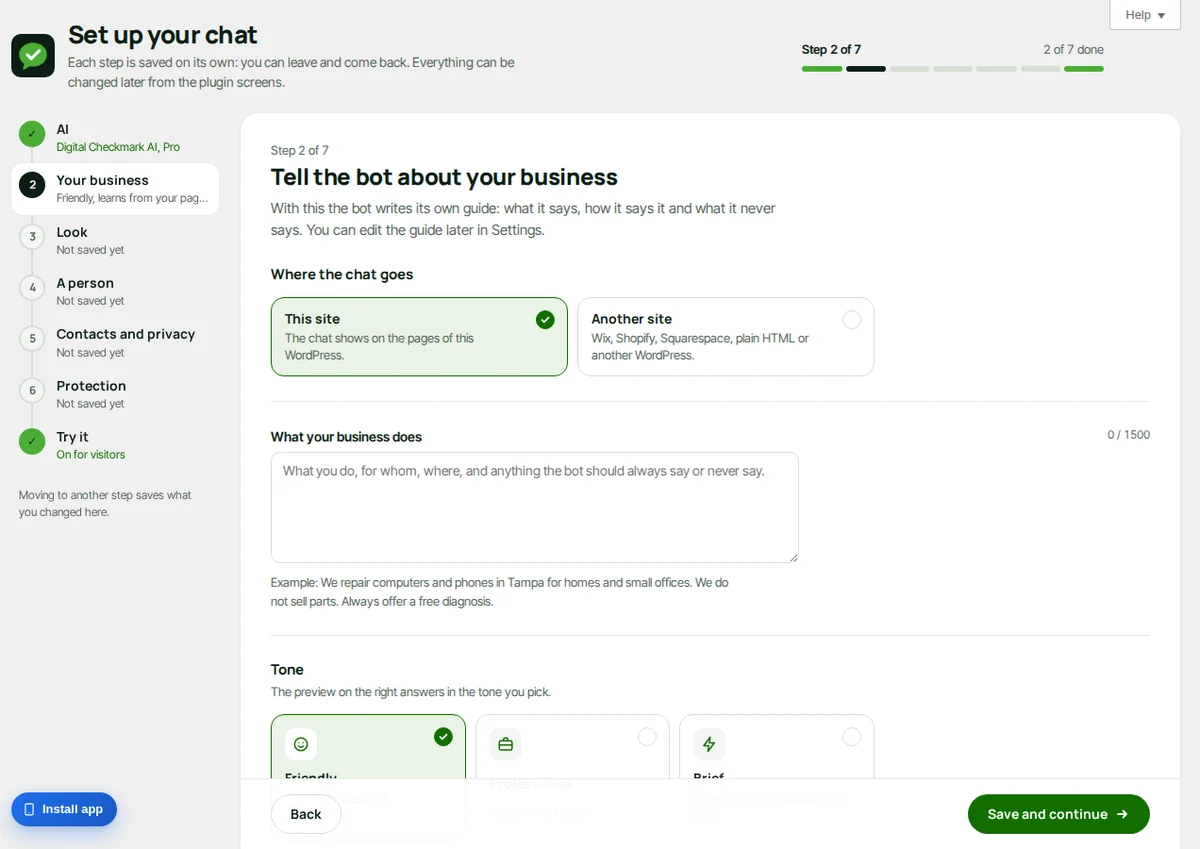
Right after you activate the plugin, the setup assistant opens and takes you through seven steps with a live preview of the chat: the AI, your business, the look, what happens when a visitor asks for a person, contacts and privacy, protection and limits, and a test. Each step is saved on its own, so you can leave and come back. The chat stays hidden from visitors until you turn it on in the last step; turning it on empties the page caches the plugin knows and checks that the chat shows on your site (see If something does not work). You can run the assistant again from Settings.
This is the quick path. Each step links to the section that explains its screen in full.
Activate it Required
Under License, activate it for free with your email and the code we send you, or enter your license key. The AI then comes from Digital Checkmark. If you prefer your own AI key, choose it under Settings > Where the AI comes from; it works on any plan and has no monthly limit from us. See License and Settings.
Give it your content Required
Under Context, press Read and optimize my site. It reads every published page and post, cleans duplicates and keeps everything in sync. Add texts, web pages and documents (PDF, Word, TXT, Markdown or CSV) the bot can answer from. See Context.
Brand the chat Recommended
Under Branding, set the name, colors, avatar, welcome text, teaser, the pages where the chat shows and your proactive messages. Under Languages, write or translate with AI the texts visitors see in each language of your site. See Branding, Proactive messages and Languages.
Protect it with Cloudflare Turnstile Recommended
Under Settings, add a Turnstile site key and secret. The check runs once per conversation before the first message reaches the AI, and most visitors never see anything. See Settings.
Set up your team Optional
Under Agents, add support agents. They land on Support when they log in and have no other admin rights. Free and Starter include 1 support agent; Pro and Agency, unlimited. Set your business hours under Settings > Availability and follow-up. With Pro, turn on Live in Support > Live on the site to see visitors and choose when you get an alert for a new chat. See Agents, Support and Live on the site.
Install the app (optional, Pro)
Under Mobile app, install the Support Inbox on a phone or computer and turn on push notifications. See Mobile app.
Connect other tools Optional
Under Integrations, connect Telegram on any plan to get the alerts and answer from your phone. Choose what happens to the addresses left in the chat in Leads Chk and, with Pro, connect Slack, Microsoft Teams and HubSpot, or add webhooks. See Integrations and Telegram.
The chat on another site
The chat can run on a site that does not use WordPress (Wix, Shopify, Squarespace, plain HTML) or on another WordPress. One WordPress with the plugin, one site: this WordPress becomes the office where your team answers, and the chat shows on the other site.
- Under Branding > Where the chat goes, choose Another site, type its address (for example
shop.example.com, orshop.example.com/es/if the site starts in a section) and save. - Copy the line of code that appears and paste it on every page of that site, in the code of its header or footer (Wix: Settings > Custom code; Shopify:
theme.liquid; Squarespace: Code injection). - Under Context, press Read with that site’s name: the bot reads its pages (up to 100, same domain, respecting robots.txt) and keeps them up to date. In the setup assistant you can do all of this from step 2: choose Another site, type its address and press Save and continue; the step stays open and reads that site’s pages, and the last step and the final screen show the line to paste with Copy code. The site’s name for the bot and for visitors comes from its home page title; change it under Branding if you like.
- Press Check again under the code: it opens the other site, finds the code and checks that the chat can answer.
Everything else stays here: Support, agents, the app, Slack, Teams, HubSpot, webhooks, contacts, plans and settings. The chat no longer shows on this WordPress’s pages, it only answers that domain (and this WordPress), and a copied code does nothing on other sites. The license counts the other site as this site, on every plan. Put that site’s privacy policy in Settings > Privacy policy URL, so the chat’s privacy notice links to it. If you use Cloudflare Turnstile, add that domain to the hostnames of your Turnstile widget in Cloudflare, or the check will not load there. To go back, choose This site: the bot learns from this WordPress’s pages again as before.
Support
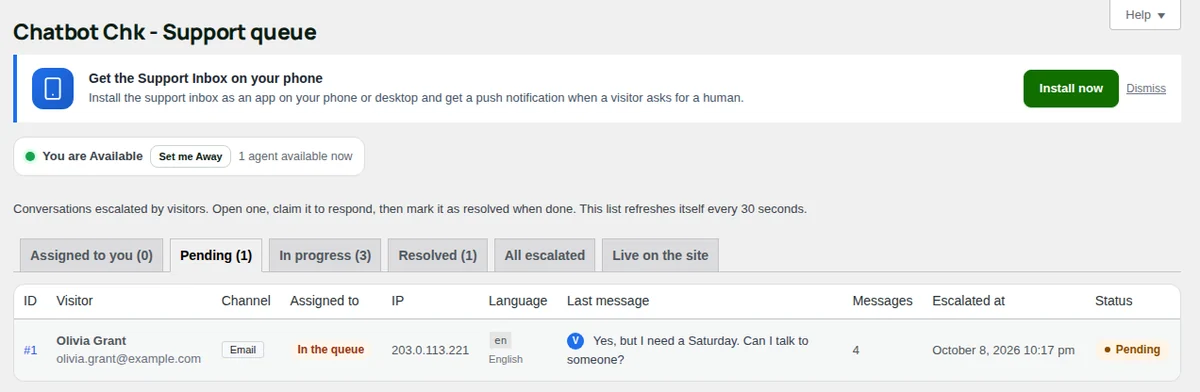
Chatbot Chk > Support is where your team answers the visitors who asked for a person. Administrators and support agents can open it; agents land here when they log in. The list refreshes itself every 30 seconds, and an open conversation every 20 seconds, so you can leave it open.
The queue
The tabs split the chats that went to a person. The number in brackets is how many each one holds.
- “Assigned to you”: the open chats you took, help in or were invited to. Support opens here when you have any.
- “Pending”: a visitor asked for a person and nobody took the chat yet. Otherwise Support opens here.
- “In progress”: someone on the team took it.
- “Resolved”: chats marked as resolved, with the visitor’s stars when they rated the help.
- “All escalated”: every chat that ever went to a person. An agent allowed to see everything gets “All conversations” here instead, with the chats that only talked to the bot too.
- “Live on the site”: who is on your site right now (Pro). See Live on the site.
Each row shows the visitor’s name and email when they left them, how they asked for a person, who has the chat (“In the queue” when nobody), the language, the last message (V visitor, B bot), the time and the status. Administrators also see the IP. A chat marked “Offline: reply by email” was opened while nobody was available: your reply also goes to the visitor’s email. A number you cannot click belongs to another agent.
If a visitor with the team waits without an answer, the assigned agent gets a push notification and an email; a chat nobody took, or a wait three times as long, alerts the whole team. It is checked every 5 minutes, during business hours. Set the minutes in Settings > Availability and follow-up under “Wait alert (minutes)”.
Available or Away
The bar at the top says “You are Available” or “You are Away” and how many agents are available now. Press “Set me Away” when you step out and “Set me Available” when you are back. What Away changes depends on “Agent presence” in Settings > Availability and follow-up: only the business hours count, or Away counts too, or a person also needs a Chatbot Chk screen open in the last 10 minutes. When nobody counts as available, the bar says so and visitors leave their email instead of waiting.
A conversation
Click a chat’s number to open it. Opening a chat does not take it. The visitor writes on the left; the bot and your team write on the right, people with a “Human” label. Gray lines in the middle are events: who joined, transferred or resolved it, a rating, an email sent. On the right, the cards show the visitor (name, email, language, the page they wrote from, a reference) and the conversation (status, agent, channel, times and messages).
Claim it
Press “Claim” at the top. The chat is assigned to you, the rest of the team sees you have it, and the visitor sees that you joined. If two people press it at once, only one gets it. Replying to a chat nobody took also claims it.
Reply
Write in the box and press “Send reply”, or Ctrl + Enter. The visitor sees your message in the chat. The note above the box tells you when your reply does something more:
- On a resolved chat, sending a reply opens it again and the bot stops answering that visitor.
- On a chat that is still with the bot (when agents may reply to any conversation), your reply takes it over: the bot stops answering.
- On a chat assigned to someone else, your reply still reaches the visitor.
Saved replies and files
Press “Saved replies”, or type / at the start of the box, to insert an answer your team saved. See Saved replies.
To send a file, press “Attach”, paste a screenshot into the box or drag files onto it. Up to 5 files per reply: images, PDF, text, CSV, Word, Excel and PowerPoint. A reply can be files only. Turn this on or off and set the size limit in Settings > Human escalation under “Files in support chats”. Every plan.
Let the AI help (Pro)
With Pro, buttons around the reply box use the AI on your draft. Each change shows “Undo” for a moment, so you can get your text back.
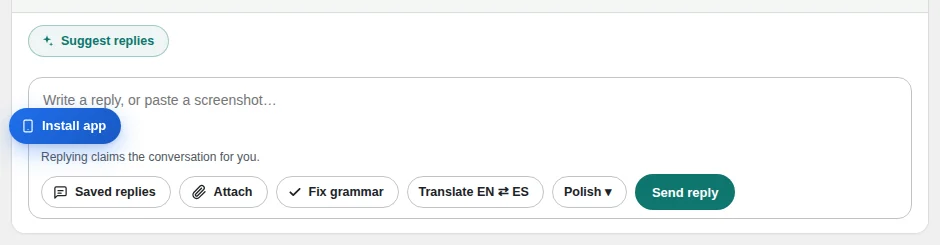
- “Suggest replies”: three possible answers written from the conversation and your site’s content. Press “Use this reply” to put one in the box, edit it and send it. “Suggest other replies” asks for three more.
- “Fix grammar”: corrects grammar, spelling and punctuation, in the same language.
- “Translate EN ⇄ ES”: translates your draft from Spanish to English or from English to Spanish, and corrects it.
- “Polish”: rewrites your draft “Shorter”, “Longer”, “More professional” or “Warmer and friendlier”. Or type your own instruction in the box at the top of the list and press Enter.
- “Translate”: under each visitor message, shows it in your language. “Show original” goes back.
The AI never sends anything on its own: you always press “Send reply”.
Ask a colleague for help
The “Team” card on the right shows who has the chat and who is helping.
- Pick a person in “Another agent”.
- Press “Ask for help”. They get a push notification and an email.
- They open the chat and press “Join conversation” (or “Decline”). The visitor sees them join, and both of you can reply. You keep the chat.
A helper leaves with “Leave conversation”. If you have the chat and a helper is in it, you can leave too: the chat goes to them (with several, choose who in “Hand over to”).
Transfer it or return it to the queue
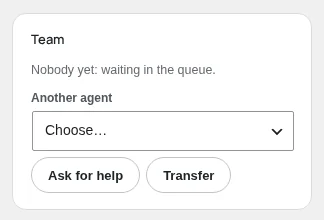
- Transfer: pick a person in “Another agent” and press “Transfer”. The chat is theirs, they get a push notification and an email, and the visitor sees who takes over.
- Back to the queue: press “Return to queue”. Nobody has the chat, every agent gets a notification and the visitor is told the next available person will reply.
Only the person who has the chat or an administrator can do this, unless the agents are allowed to manage any conversation (see below). Free and Starter include one support agent besides the administrators (see Plans), so the list of people is short there.
Mark it as resolved
Press “Mark as resolved” and confirm. The bot answers that visitor again. If the satisfaction survey is on (Settings > Human escalation), the visitor is asked to rate the help from 1 to 5 stars, and the rating shows in the chat, in the list and on Agents.
Email follow-up
The “Email follow-up” card appears when the visitor left an email. Replies the visitor does not see in the chat (they closed the page, for example) are emailed to them after 2 minutes. “Email the transcript to the visitor” sends them the whole conversation now. Both emails are in the visitor’s language and carry a link to reopen the chat on any device. Turn them on or off in Settings > Availability and follow-up under “Email follow-up”; the transcript can also go out on its own when a chat is resolved.
With Pro, the “Notifications” card turns on push notifications on the device you are using: press “Turn on notifications”, then “Send a test notification”.
What agents can see
Administrators see every conversation, the IP and the Conversations screen. Support agents see only Support, Saved replies and the app. Under Chatbot Chk > Agents, “What agents can see” decides what else they can read: “Only their own: the shared queue, their chats and the ones they are invited to” (the default), the team’s chats too, or everything, including chats that only talked to the bot. Reading is always read-only. Two more switches there let agents reply to any conversation (which takes it over from the bot) and resolve, hand over or return to the queue any conversation.
Conversations
Chatbot Chk > Conversations is the log of every chat on your site: the ones the bot answered alone and the ones that went to a person. Only administrators see it. Use it to read what visitors ask, check how the bot answered, export the list and clean up old chats. To answer a visitor, use Support.
Overview
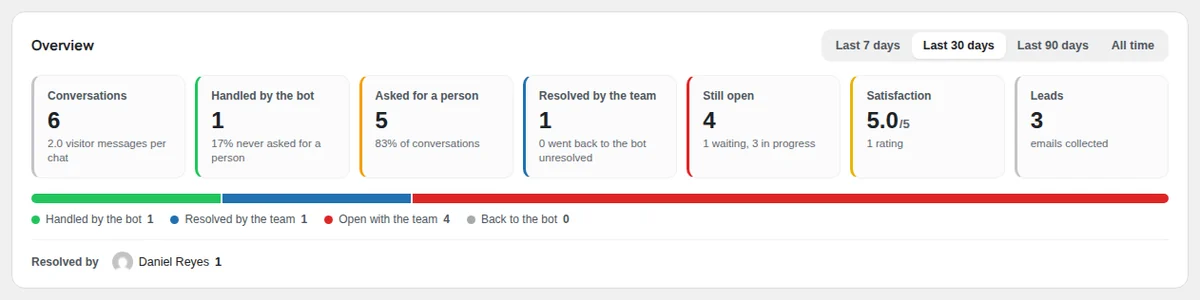
At the top, “Overview” sums up a period: “Last 7 days”, “Last 30 days” (the default), “Last 90 days” or “All time”.
- “Conversations”: how many chats, and how many messages each visitor wrote on average.
- “Handled by the bot”: chats that never asked for a person.
- “Asked for a person”: chats that went to your team.
- “Resolved by the team”: chats your team resolved, and how many went back to the bot unresolved.
- “Still open”: chats waiting in the queue or in progress.
- “Satisfaction”: the average rating, from 1 to 5, and how many ratings.
- “Leads”: emails collected.
A colored bar shows the same split, and “Resolved by” counts the chats each person resolved. Below it, a row shows the share of chats the AI answered alone in the last 30 days, on every plan.
Find a conversation
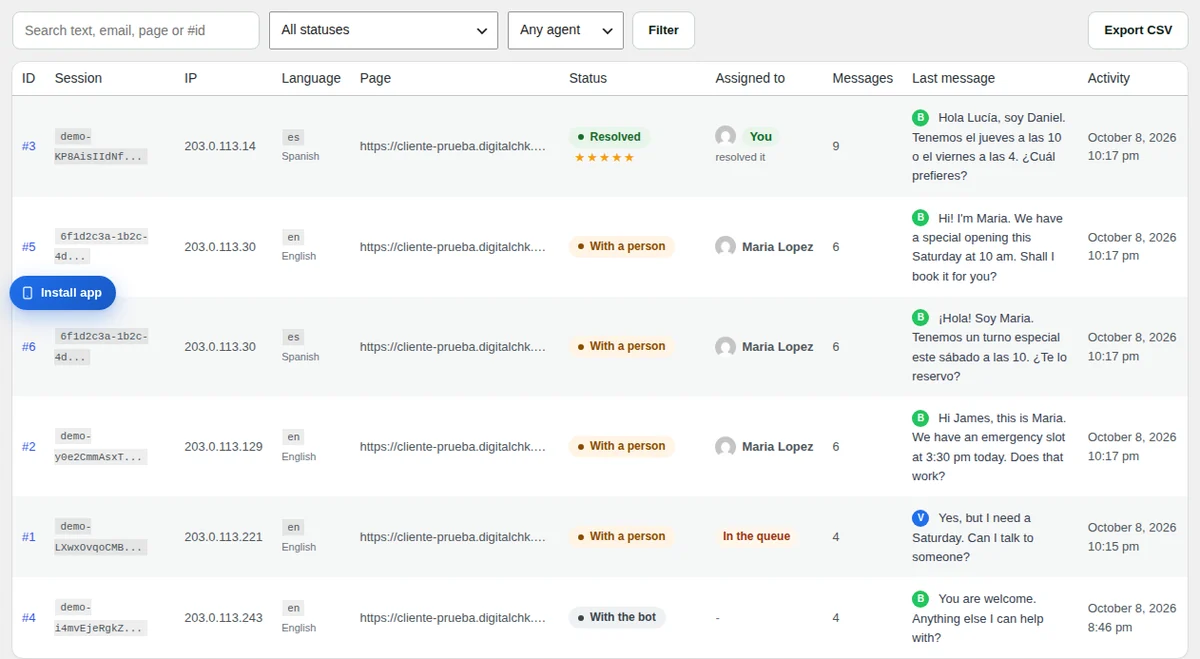
- Type in “Search text, email, page or #id”: words the visitor or the bot wrote, the visitor’s email or name, part of a page address, or a chat number such as
#42. - Choose a status: “Handled by the bot”, “With the team (open)”, “Offline: waiting for an email reply” or “Resolved”.
- Choose a person in “Any agent” to see only the chats assigned to them.
- Press “Filter”. “Clear filters” shows everything again.
The table shows 20 chats per page: the number, the session, the IP, the language, the page, the status (“With the bot”, “With a person” or “Resolved”, with the stars when rated), who has it, the messages, the last message and its time.
Open one
Click the chat’s number. You see the same view as in Support, without the reply box, plus what each bot answer cost: the AI model, the tokens in and out and the time it took, and the totals in the “Conversation” card. A chat that went to a person has “Open in Support” at the top, to reply from there.
Export the list
“Export CSV” downloads the list with the filters you applied (up to 5,000 chats): number, start, last activity, language, page, status, assigned person, messages, the visitor’s email and name, and the rating. It holds the list, not the messages.
Delete conversations
- One chat: open it, press “Delete” and confirm. Its messages and files go with it.
- The old ones: “Purge old now” deletes the chats older than your retention period right away.
- All of them: “Delete all conversations” deletes every chat and message.
Deleting cannot be undone. A deleted chat also loses its Live row, its pending deliveries to webhooks, Teams, Slack and HubSpot, and its Telegram links. What already reached those tools stays there.
Retention
The “Retention:” line says after how many days without activity a chat is deleted on its own, once a day. Change it in Settings > Logs under “Log retention (days)”, or in the setup assistant (“Keep conversations for”, in the step about protection and limits). Keep it as short as your work allows: see Privacy.
Ask the AI (Pro)
On Conversations and Support, a round button at the bottom right opens “Ask the AI”. Ask about your recent chats in your own words (“What are the biggest user concerns right now?”, “Which pages drive the most conversations?”) and it answers from the same figures. Agents can use it too.
Saved replies
Chatbot Chk > Saved replies keeps the answers your team sends often, so nobody types them again. The list is shared: every administrator and support agent can use it, add to it and change it. Every plan.
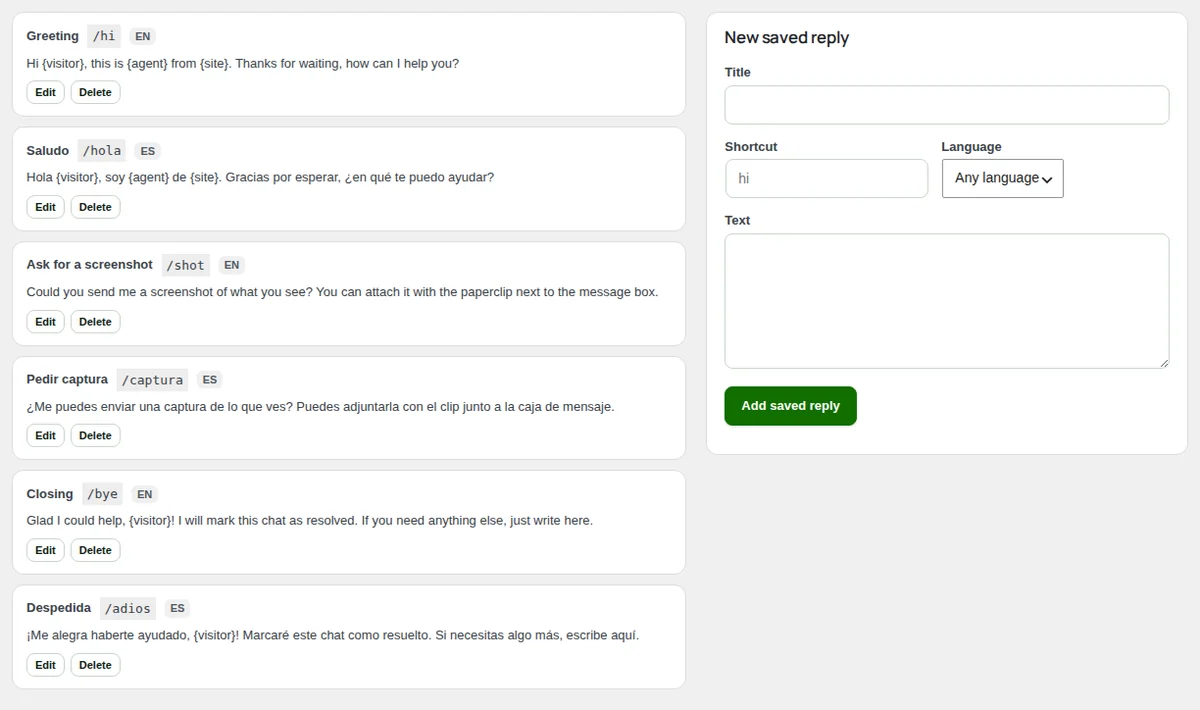
The list starts with six examples, in English and Spanish: a greeting, asking for a screenshot and a goodbye. Edit them or delete them.
Add a saved reply
- Under “New saved reply”, write a “Title” (up to 80 characters). It is what you search for.
- Optionally, write a “Shortcut”: lowercase letters, numbers,
-or_, up to 20 characters. Withhi, typing/hiin a reply finds it. - Choose the “Language”: “Any language”, “English” or “Spanish”.
- Write the “Text” (up to 3,000 characters). These placeholders are filled in when you insert it:
{visitor}(the visitor’s name),{agent}(your first name) and{site}(the site’s name). - Press “Add saved reply”.
If the visitor left no name, {visitor} is simply left out, so Hi {visitor}, becomes Hi,.
Use it in a conversation
In a conversation in Support, either:
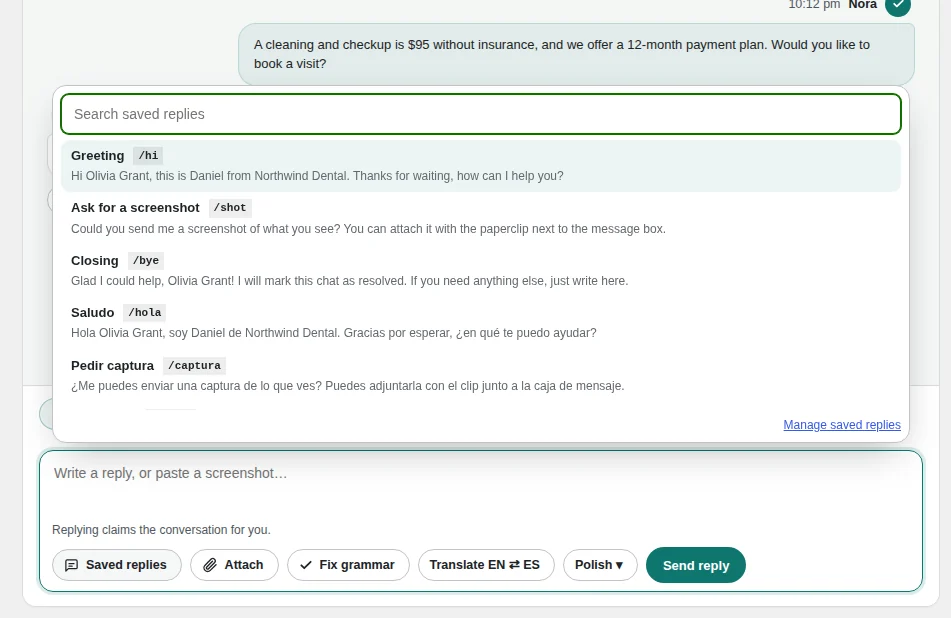
- press “Saved replies” next to the reply box, search and click one, or
- type
/at the start of the box, followed by the shortcut or a word of the title or text (/hi,/bye).
Move with the arrow keys, press Enter to insert and Esc to close. With /, the reply replaces what you typed; with the button, it goes where your cursor is. Edit it if you like, then press “Send reply”. “Manage saved replies”, at the foot of the list, opens this screen.
Edit or delete one
Press “Edit” on its card, change it and press “Save changes” (“Cancel” leaves it as it was). “Delete” removes it for the whole team, after you confirm.
Replies per language
A reply set to the visitor’s language comes first in the list, then the ones for “Any language”, then the rest. You can mark a reply as English or Spanish only; for visitors in other languages, write the reply in their language and leave “Any language”.
Live on the site (Pro)
The “Live on the site” tab, under Chatbot Chk > Support, shows who is on your site right now: the page, where they came from and whether they are talking to the bot or to a person. From there you can write to a visitor first, and choose an alert for the moment a visitor starts talking to the bot. It is part of Pro: on other plans the tab explains it and links to “See plans”.
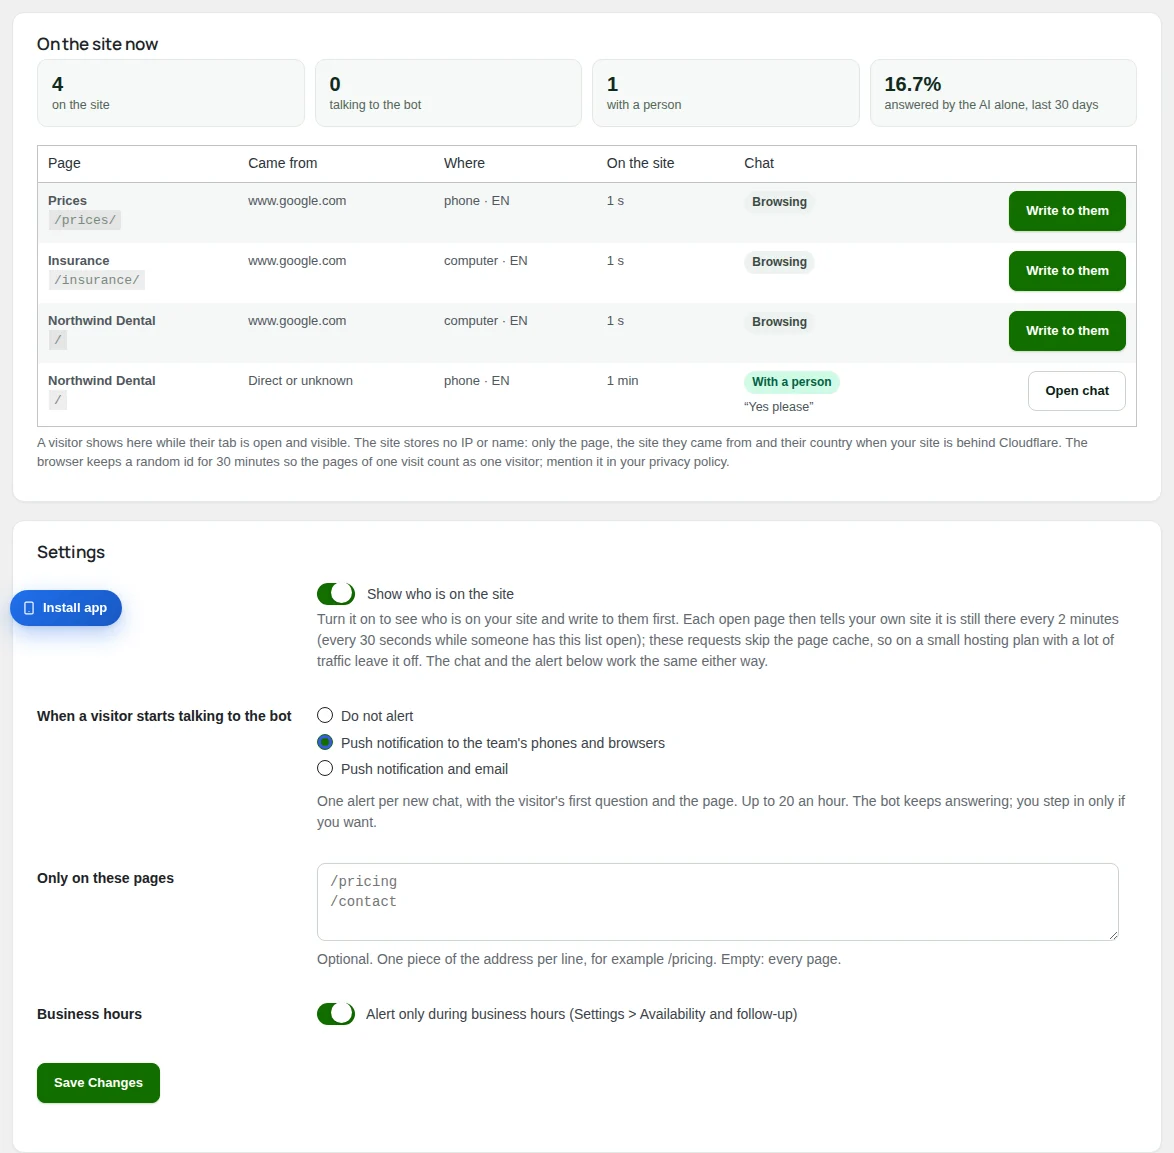
Turn it on
Live is off until an administrator turns it on.
- Open Chatbot Chk > Support and the “Live on the site” tab.
- Under “Settings”, tick “Show who is on the site”.
- Press Save Changes.
While it is on, each open page of your site tells your site it is still there every 2 minutes (every 30 seconds while someone has this list open). Those requests skip the page cache: on a small hosting plan with a lot of traffic, leave it off. The chat and the alert below work the same either way.
See who is on the site
At the top: how many visitors are “on the site”, “talking to the bot” and “with a person”, and the share of chats the AI answered alone in the last 30 days. The list updates itself every 10 seconds.
- “Page”: the page they are on, with its address.
- “Came from”: the outside site that sent them, or “Direct or unknown”.
- “Where”: the country (only when your site is behind Cloudflare), the device and the language.
- “On the site”: how long they have been on the site.
- “Chat”: “Browsing”, “Talking to the bot”, “With a person” or “Chat ended”. If you can reply to that conversation in Support, you also see the last thing the visitor wrote.
“Open chat” opens their conversation in Support. A visitor shows while their tab is open and visible, and leaves the list about a minute and a half after closing it. Your own team never appears.
Write to a visitor first
- Press “Write to them” on the visitor’s row. It shows while they browse, talk to the bot or after their chat ended.
- Write your message (for example “Hi! Can I help you with anything?”) and press “Send”.
- “Sent. The chat opens on their screen.” The chat opens on the visitor’s page with your message, assigned to you, and the bot stops answering. Press “Open chat” to continue in Support.
Administrators can always write first. Agents can when “Agents can reply to any conversation, including chats still with the bot” is on under Chatbot Chk > Agents. If the visitor already left, you see “That visitor has left the site.”; if someone else has the chat, “Another agent is already handling this chat.”.
Get an alert when a visitor starts talking to the bot
Under “Settings”, “When a visitor starts talking to the bot” decides who hears about a new chat while the bot is still answering:
- “Do not alert”.
- “Push notification to the team’s phones and browsers”: the default.
- “Push notification and email”: also an email to every administrator and agent.
Each alert carries the visitor’s first question and the page, with a link to the conversation. There is one per new chat and up to 20 an hour for the whole site. The bot keeps answering: you step in only if you want, by replying in Support. A chat that already went to a person does not alert.
- “Only on these pages”: one piece of the address per line, for example
/pricing. Empty: every page. - “Business hours”: alert only during your business hours (Settings > Availability and follow-up). On by default.
Press Save Changes. The alert works even with “Show who is on the site” off. Push notifications only reach the devices where they are on: install the app from Chatbot Chk > Mobile app, or press “Turn on notifications” in a conversation.
Privacy
Live stores no IP address and no name. It keeps the page, the outside site the visitor came from (without its search terms), the country when your site is behind Cloudflare, the device and the language. The browser keeps a random id for 30 minutes, so the pages of one visit count as one visitor. The rows are deleted minutes after the visitor leaves. Mention Live in your privacy policy: see Privacy.
Context
Chatbot Chk > Context holds everything the bot knows about your business: the pages and posts of your site, your documents, text you write and pages from other sites. For each question the bot searches this content by its words and sends the AI only the passages that matter. Everything on this screen works on every plan; only the AI review of the optimizer needs Pro.
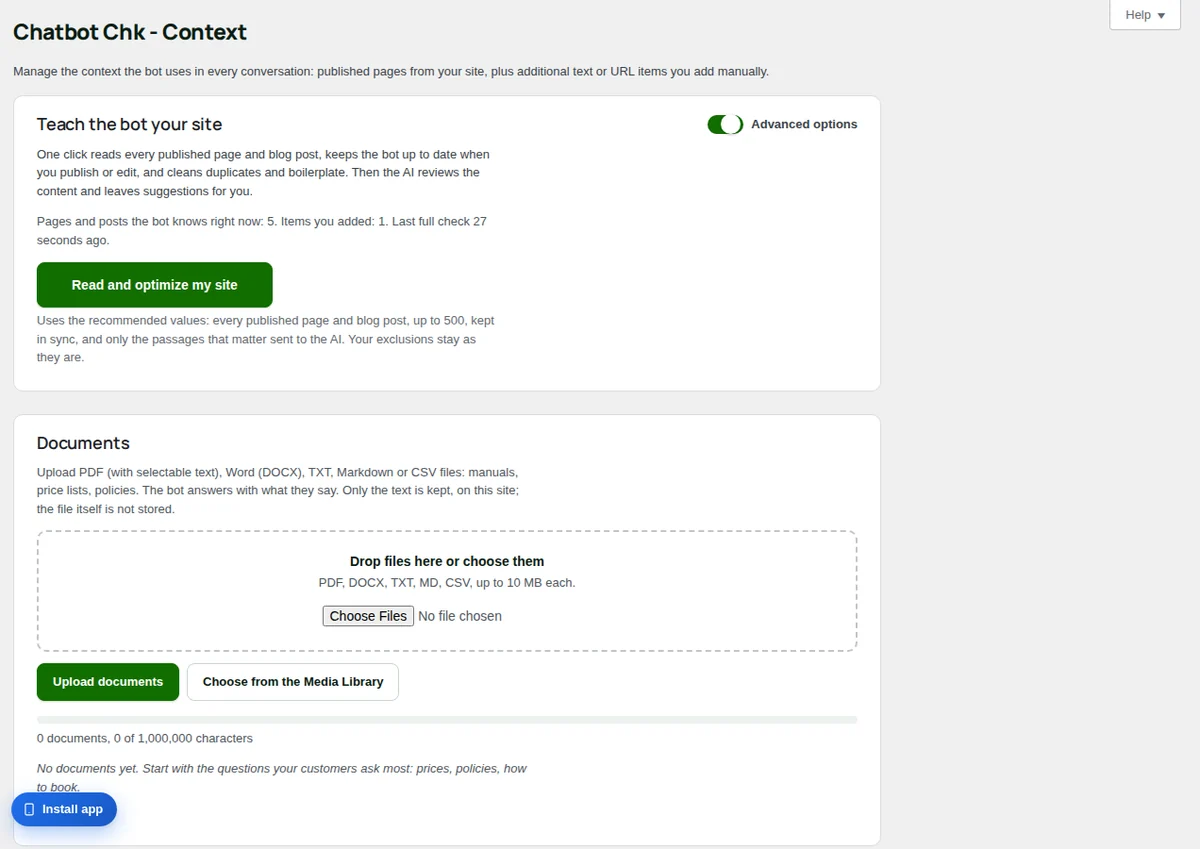
Read and optimize my site
The first card, “Teach the bot your site”, does the whole job with one button. Press “Read and optimize my site” and watch a single progress bar:
- It sets the recommended values: “Use site content” and “Blog posts” on, “Max pages” at 500, “Context mode” on Retrieval and “Keep in sync” on. Your exclusion words and categories stay as they are.
- It reads every published page and blog post.
- It removes duplicates and boilerplate (copyright lines, Skip to content and the like) and applies that cleanup.
- With Pro, the AI reviews the content and leaves suggestions. It changes nothing: open “See the AI suggestions” and edit or delete those items yourself if you agree.
“Stop” ends it at any point and keeps what was read. The line above the button says how many pages and posts the bot knows, how many items you added, how many documents there are and when the last full check ran. If it says “Learning from the site is off.”, the bot is not using your pages: press the button to turn it on.
If you changed “Max pages”, “Context mode” or “Blog posts” by hand, the button puts them back to the recommended values. “Max chars / page” and “Context budget (tokens per request)” are not touched.
With the chat on another site, this card is replaced by one with that site’s name and a Read button that reads up to 100 of its pages. See The chat on another site.
What it reads
- Published pages and, when “Blog posts” is on, published blog posts, in every language of the site.
- Up to “Max pages” of them (500 at most), the most recently edited first.
- Each page up to “Max chars / page” characters (6,000 by default). The rest of a longer page is cut.
- Only pages and posts. Other kinds of content (products or events from other plugins, for example) are not read: add them as web pages or documents.
It never reads drafts, private or password-protected pages, pages whose address or title contains one of your exclusion words, or posts in a category you left out. The bot uses the passages in the visitor’s language first and adds another language when that one does not have the answer.
Keeping it in sync
With “Keep in sync” on, a page or post that is published, edited, unpublished or deleted reaches the bot about a minute later, and every night a full check reads everything again and removes what is no longer there. Changing any content option (pages, posts, categories, exclusion words, limits) starts a full check in the background right away. Web pages you added are read again in the background, up to 10 an hour, the oldest first; Square booking pages once a day.
Documents
The “Documents” card takes PDF (with selectable text), Word (DOCX), TXT, Markdown and CSV files: manuals, price lists, policies, FAQs. The text is read on your site and kept there; the file itself is not stored. Each CSV row becomes one line (“Column: value”), so a price list is searched row by row.
To add documents:
- Drag the files onto “Drop files here or choose them”, or click it to pick them. You can send several at once.
- Press “Upload documents”. Or press “Choose from the Media Library” to use files you already uploaded to WordPress.
- Read the result line of each file. “Added. The bot can use it now.” means it is ready.
The table lists each document with its pages, characters and date. “View text” opens the text the bot uses: correct it and press “Save text” (the document gets an “edited” tag). “Replace” swaps in a new version of the file. “Turn off” stops the bot from using it without deleting it; “Turn on” brings it back. “Delete” removes its text; you would need to upload the file again. Above the table, a counter shows the documents and the characters used against the total.
“Limits” opens the three limits. Change them and press “Save limits”.
| Limit | Default | Range |
|---|---|---|
| “MB per file” | 10 | 1 to 100, never more than your server accepts in one upload |
| “Pages per PDF” | 500 | 1 to 5,000 |
| “Characters for all documents” | 1,000,000 (about 250 pages) | 10,000 to 5,000,000 |
A CSV is read up to 20,000 rows; split a bigger one. Common problems and what to do:
- A scanned PDF (an image) has no text to read: upload a PDF with selectable text, or a DOCX.
- A PDF with a password: save a copy without the password.
- Old DOC files: save them as DOCX or PDF. Excel files (XLS, XLSX): save the sheet as CSV.
- “This file is already in the list.”: that same file was uploaded before.
- A document that would pass the total: delete one or raise “Characters for all documents”.
Documents are for what customers ask about, not for databases or archives: the bot finds passages by their words, it does not add up or filter records. Very large totals make each search slower on small hosting plans.
Advanced options
Turn on the “Advanced options” switch on the first card to see the fine settings, the manual sync, the items you add and the optimizer. The switch is your own view: other administrators keep theirs. Under “Site content (opt-in)”, change what you need and press Save Changes.
| Option | What it does |
|---|---|
| “Use site content” | “Include published pages as bot context”. Off, the bot uses only your text, web pages and documents. |
| “Max pages” | How many pages and posts it reads, from 1 to 500. |
| “Max chars / page” | How much of each page it keeps, from 500 to 50,000 characters (6,000 by default). |
| “Context mode” | Retrieval sends only the passages that matter (recommended). Full sends all the context with every message: slow and expensive, kept for old setups. |
| “Context budget (tokens per request)” | How much context goes with each message in Retrieval mode, from 300 to 20,000 (2,500 by default, about 10,000 characters). |
| “Exclude pages matching (one per line)” | Words that keep a page out when they appear in its address or title. It starts with privacy, terms, cookie, legal, privacidad, terminos and aviso-legal. |
| “Keep in sync” | Updates the bot when content changes and checks everything every night. |
| “Blog posts” | “Also learn from published blog posts”, and “Leave out these categories” for automatic or time-bound posts. With Polylang, a category left out is left out in every language. |
Below the form, “Sync published pages now” has the “Sync site pages now” button: it reads your pages with a progress bar, counters (inserted, updated, skipped, failed) and a live log. Pages that did not change are skipped. “Cancel” stops it. When it ends, reload the page to see the new rows.
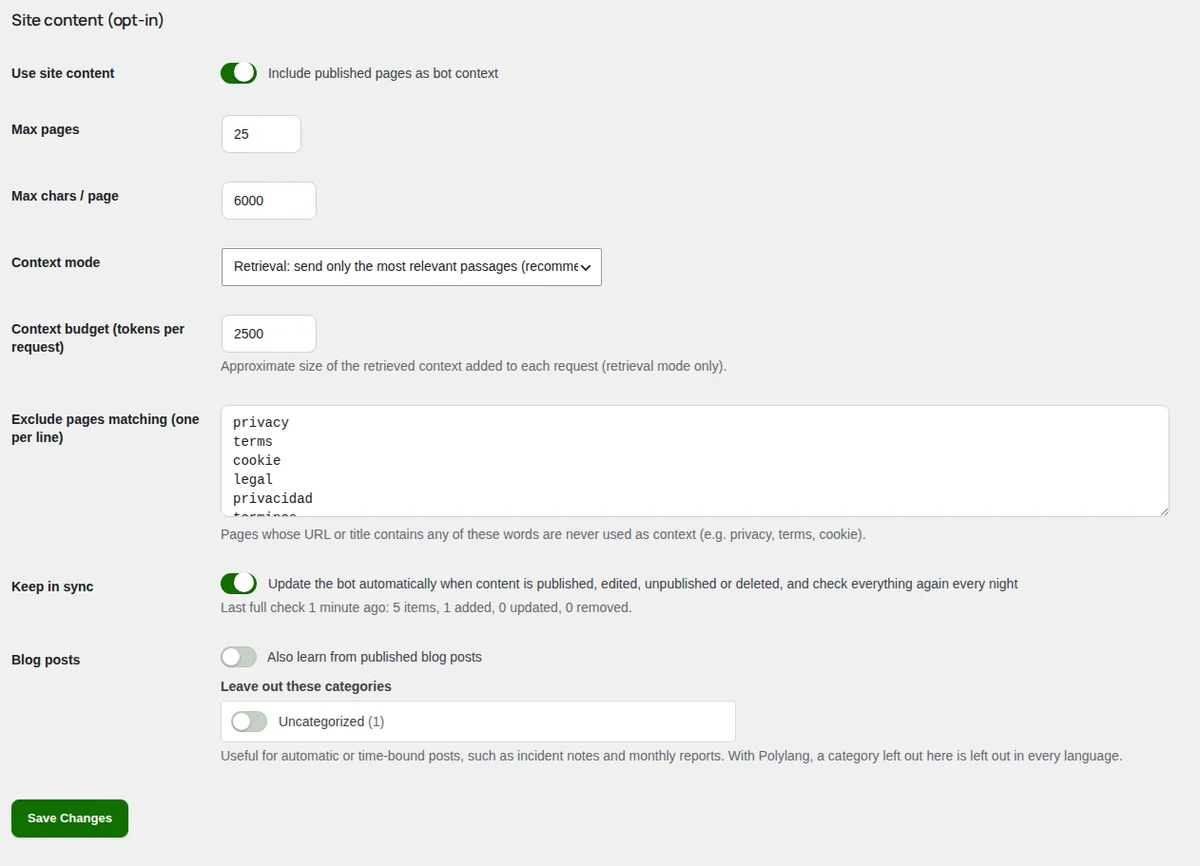
Excluding pages
To keep a page out of the bot’s reach, use one of these:
- For good: add a piece of its address or a word of its title to “Exclude pages matching (one per line)” and save. Watch out for short words: legal also leaves out a page called Legal services.
- Blog posts by category: check the category under “Leave out these categories”.
- For now: press “Disable” next to the page in “Existing items”. The bot stops using it, but the next time the page changes it comes back on. “Delete” is the same: the next check reads the page again.
- Private content: a page with a password is never read.
Adding text and web pages
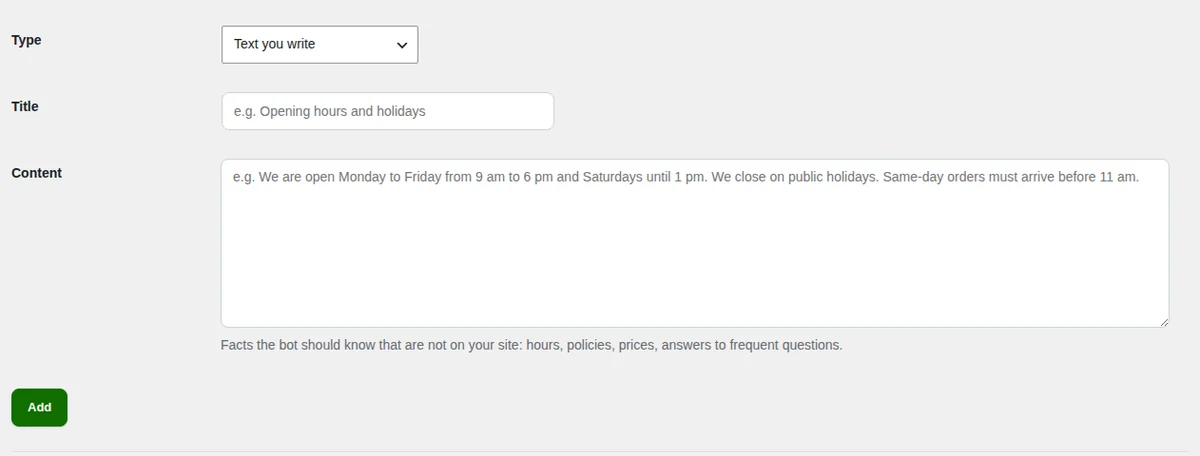
With “Advanced options” on, go to “Additional context items” and “Add item”.
To add a text:
- Under “Type”, choose “Text you write”.
- Write a “Title” with the words your customers would use, for example Opening hours and holidays.
- Write the facts under “Content”: hours, policies, prices, answers to frequent questions.
- Press “Add”.
To add a page from another site (a booking platform, a help center, a supplier’s page):
- Under “Type”, choose “A web page or a whole site”.
- Type the “Address”. It must be public and start with https://.
- Under “What to read”, choose “Only this page”, or “The whole site from here (same domain)” with “Up to” a number of pages (25 by default, 200 at most). The reader follows links on the same domain, respects robots.txt and your exclusion words, and skips files such as PDF or images. Each page becomes its own item.
- Press “Add” and watch the bar. “Stop” keeps the pages read so far.
“Existing items” lists what you added and the pages read from your site, with their type, title, source and status. A web page shows when it was last read and how many characters it had, “Not fetched yet.” or why the last reading failed. “Disable” and “Enable” switch an item off and on; “Delete” removes it.
Pages built with JavaScript and Square bookings
Some site builders (Square Online, Wix and similar) draw the text in the visitor’s browser, so the page arrives with no text. The bot says so instead of adding an empty page: “This page is built with JavaScript and cannot be read. Paste its text as an item (Text you write) or upload it in Documents.”
If you take bookings with Square, add your booking page, the one that lists your services. Its address looks like https://book.squareup.com/appointments/…/location/…/services: open your booking site and copy it from the address bar. The bot reads every service with its options, length and price, plus the address and the cancellation policy, and reads it again once a day, so price changes reach it the next day. On a Square Online site, the notice suggests this.
The optimizer
The “Optimizer” cleans the items in “Existing items” (not the documents). It has two modes:
- Logic, on every plan, takes about two seconds. It trims empty space and boilerplate and finds near duplicates: 85% or more of the same text and the same title or address. The shorter copy goes.
- AI, with Pro, finds the same content said in other words, the same page in two languages, items with little content (only a phone, for example) and pages that could say more. It works in batches of 8 items, 5 to 30 seconds each, and gives each finding a confidence.
To run it:
- Check “Run logic optimizer (free, fast)”, “Run AI semantic analysis (Pro)” or both.
- Press “Analyze & preview”. Nothing changes yet. The log shows the progress, and “Findings (sorted by confidence)” lists each finding with its source, type, confidence, item and suggestion.
- Press “Apply logic changes (remove duplicates, trim boilerplate)” and confirm. Only the logic findings are applied, and only on items that did not change since the preview.
- For the AI findings, edit or delete the items yourself in “Existing items”. The AI never changes anything on its own.
The optimizer report
After you apply, the “Optimizer report” appears at the top of Context with the “Applied” tag:
- “Entries” and “Characters”: before and after.
- “Reduction”: the share of characters saved.
- “What changed”: how many items were trimmed and how many duplicates were removed.
- “What we did”: the list of actions.
- “Duplicate clusters”: the item kept, the ones removed (“Would remove”) and their “Similarity”.
- “Trimmed entries”: each item with its characters “Before”, “After” and “Saved”.
The report shows once; reload the page and it is gone. If it says “Preview only.”, nothing was changed: review it and press “Apply changes”.
How to give the bot more context
When the bot says it does not know something your business does know, the answer is missing from Context or is hard to find. Go step by step.
Read your site
Press “Read and optimize my site” and wait for the line “Pages and posts the bot knows now”. If a page you need is not counted, check the next step.
Check what is left out
Turn on “Advanced options”. Look at “Exclude pages matching (one per line)” for words that catch good pages, at “Max pages” if your site is big, at “Blog posts” and at the categories left out. Save, and the bot reads again in the background.
Write what is not on your site
Under “Add item”, choose “Text you write” and add the facts customers ask about and your pages do not say: hours and holidays, prices, payment, cancellations, areas you serve. One topic per item, with a clear title.
Add pages from other sites
If the answers live on another site (your booking platform, a help center, a marketplace profile), add it with “A web page or a whole site”. The bot keeps it up to date. With Square bookings, add the page that lists your services (see Pages built with JavaScript and Square bookings).
Upload your documents
Under “Documents”, upload your price list as CSV, your manuals as PDF or DOCX and your policies. Check in “View text” that the text came out right.
Use your customers’ words
The bot finds passages by their words. Use the words people type (price and cost, appointment and booking), put the topic in the title, and keep each item to one subject. If a long page loses its last part, raise “Max chars / page”.
Test it in the Sandbox
Open Chatbot Chk > Sandbox, ask the question and open “System prompt sent to the model” to see which passages the bot received (see Sandbox). If the right passage is there but the answer is short, raise “Context budget (tokens per request)” a little, for example from 2,500 to 4,000. If it is not there, go back to step 3 or 6.
Tell the bot how to use it
Context holds the facts. How the bot uses them (what to recommend, what never to say, its tone) goes in the “System prompt” under Chatbot Chk > Settings.
Branding
Chatbot Chk > Branding sets how the chat looks and where it shows: its texts, color, avatar, the small greeting above the button, the pages where it appears and the look of the Support Inbox app. Everything here works on every plan; only hiding the Digital Checkmark line needs Pro. One Save Changes button at the end of the form saves all of it. The “Proactive messages” card below the form has its own button.
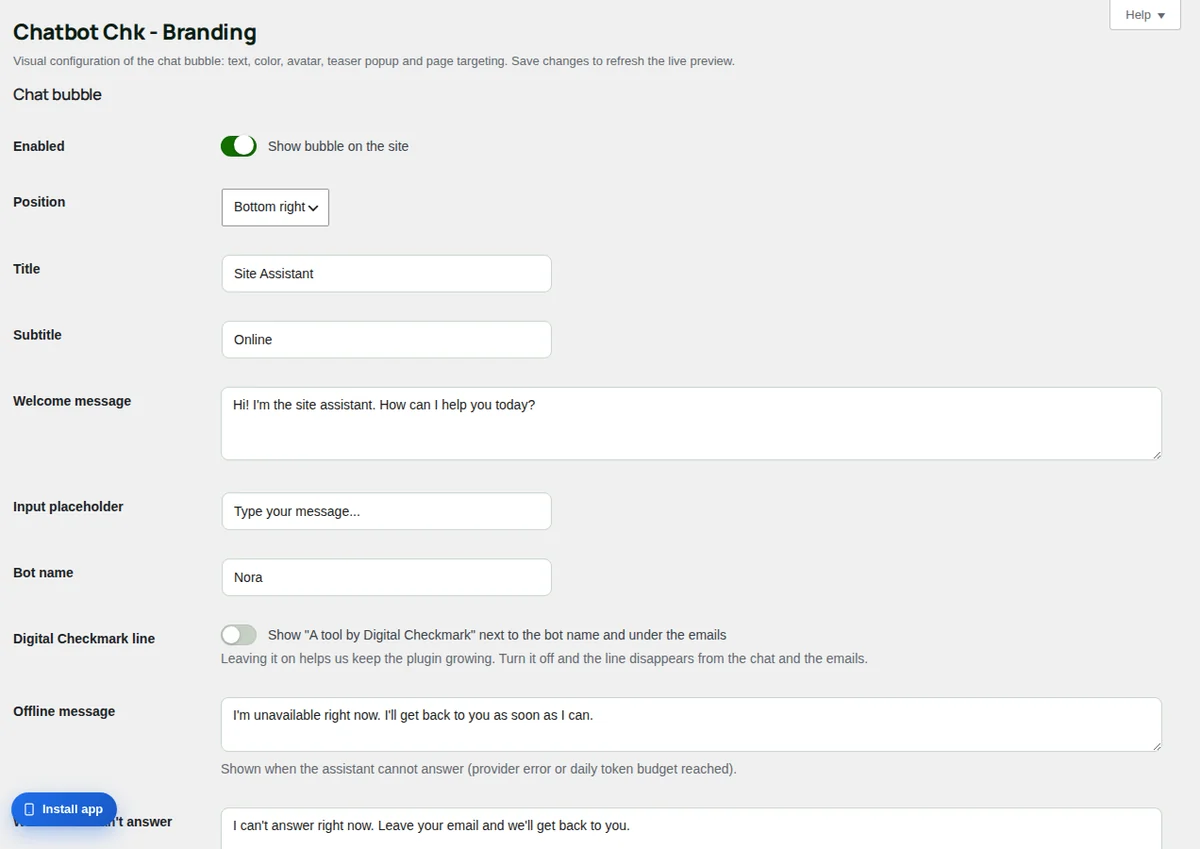
Chat bubble
- “Enabled”: “Show bubble on the site”. Off, visitors do not see the chat; you can still test it in the Sandbox.
- “Position”: “Bottom right” or “Bottom left”.
- “Title” and “Subtitle”: the header of the chat window.
- “Welcome message”: the bot’s first message when the chat opens.
- “Input placeholder”: the hint inside the message box.
- “Bot name”: the name shown next to the bot’s replies.
- “Digital Checkmark line”: shows “A tool by Digital Checkmark” next to the bot name and under the emails. On the Free and Starter plans it is always shown; with Pro you can turn it off.
- “Offline message”: shown when the assistant cannot answer because of a provider error or because the daily token budget ran out.
- “When the AI can’t answer”: the bot’s reply when this month’s AI messages are used up, the AI service does not respond or the license is not active. The email form, and the button to talk to a person when someone can answer, appear below it. Leave it empty to use the default text, already translated.
- “Theme color”: the main color of the chat. The text on it switches between white and dark so it stays readable.
- “Avatar URL (optional)”: the address of your own image, used only with “Use image uploaded by me”.
The texts you write here are the version in your site’s main language. Give them a version in each other language under Chatbot Chk > Languages (see Languages).
To change the look in a few minutes:
- Write the “Bot name”, “Title” and “Welcome message”.
- Pick the “Theme color” of your brand.
- Choose an avatar under “Bot avatar”.
- Look at the “Live preview” at the bottom, and press Save Changes.
Bot avatar
Under “Avatar mode”, choose “Use a preset icon (recommended)” and click one of the seven icons under “Preset icon” (a robot, a chat bubble, a shield and others). They are drawn by the plugin, look sharp at any size and load nothing from outside. Or choose “Use image uploaded by me” and paste the address of your image in “Avatar URL (optional)”: upload it to the Media Library first and copy its address there.
Teaser (popup message)
A small message that appears above the chat button after a few seconds to invite the visitor to open the chat. It closes when the chat opens or after the time you set.
- “Enabled”: “Show teaser after X seconds”.
- “Appears after (seconds)”: from 0 to 120.
- “Teaser message”: the text, for example a question about what your customers usually need.
- “Auto-close (ms)”: how long it stays, in milliseconds (10000 is 10 seconds), from 1 to 300 seconds.
To greet visitors on specific pages or after something they do, use proactive messages instead (see Proactive messages).
Alerts for visitors
- “Sound”: a soft sound when a reply arrives and the visitor is in another tab or closed the chat. The tab title also shows (1) New message until they come back.
- “Browser notifications”: after asking for a person, the visitor gets a button to be notified when someone replies. The browser asks for permission only when they press it.
Both are on from the start.
Where the chat goes
Choose where visitors see the chat:
- “This site”: the chat shows on the pages of this WordPress.
- “Another site”: for a site that does not run WordPress (Wix, Shopify, Squarespace, plain HTML) or another WordPress. Type “Its domain” and, if you like, “Its name” (otherwise it is taken from its home page when the bot reads it), and save.
With another site, this WordPress becomes the office: your team answers from here and the bot learns from that site’s pages. After saving, the block shows the line of code to paste on every page of that site, with “Copy code”, a link to “Teach the bot that site’s pages” and a check that finds the code on that site (“Check again” runs it again). The full steps are in The chat on another site.
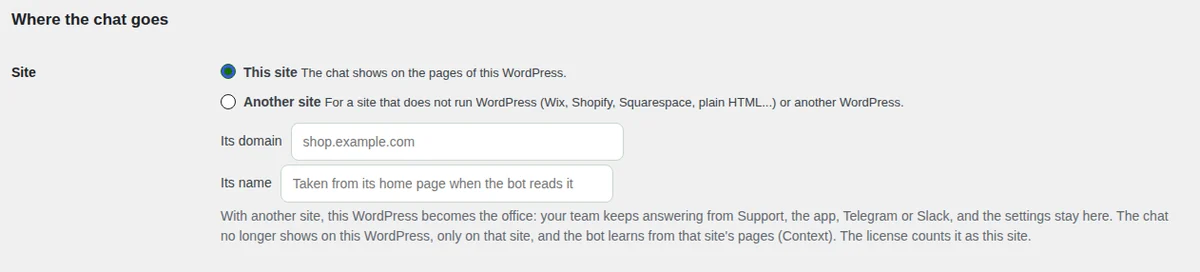
Where the bubble is shown
Under “Visibility”, choose:
- “All pages”: everywhere. Check “Hide on homepage” to leave the home page out.
- “Only on selected pages”: only on the pages you check.
- “All EXCEPT selected”: everywhere but the pages you check.
“Pages” lists the published pages; with more than 12, type in “Filter pages…” to find one. With Polylang the list shows the main language, and the translations of a checked page follow the same rule. With the chat on another site, these rules apply to this WordPress only: there the chat shows on every page with its code.
To show the chat only on your prices and contact pages:
- Under “Visibility”, choose “Only on selected pages”.
- Under “Pages”, check those two pages.
- Press Save Changes.
Support Inbox app (installable)
How the Support Inbox looks when your team installs it on a phone or computer (the app comes with Pro; see Chatbot Chk > Mobile app):
- “App name”: shown when installing, in the app switcher and on the splash screen. Up to 45 characters; empty uses “Chatbot Chk – Support Inbox”.
- “Short name”: the label under the icon on the home screen. Up to 12 characters fit on most phones.
- “Theme color”: the title bar of the app. “Same as the chat bubble color” keeps it matched to the chat.
- “Background color”: the splash screen while the app opens. White by default.
- “App icon”: press “Choose icon” and pick a square PNG or JPG of at least 512 x 512 px, with a solid background (iPhone shows transparent areas as black). The icons are created when you save. “Remove” goes back to the built-in chat icon in the theme color.
“Preview” shows the icon on a home screen and the app window. Installed apps pick up changes when the browser refreshes the app, which can take up to a day; reinstalling applies them at once.
Live preview
At the bottom, “Live preview” shows the same chat visitors see, with your settings. It changes as you type the title, subtitle, welcome message, placeholder and bot name, and as you pick the color, avatar and position. Other changes show after saving.
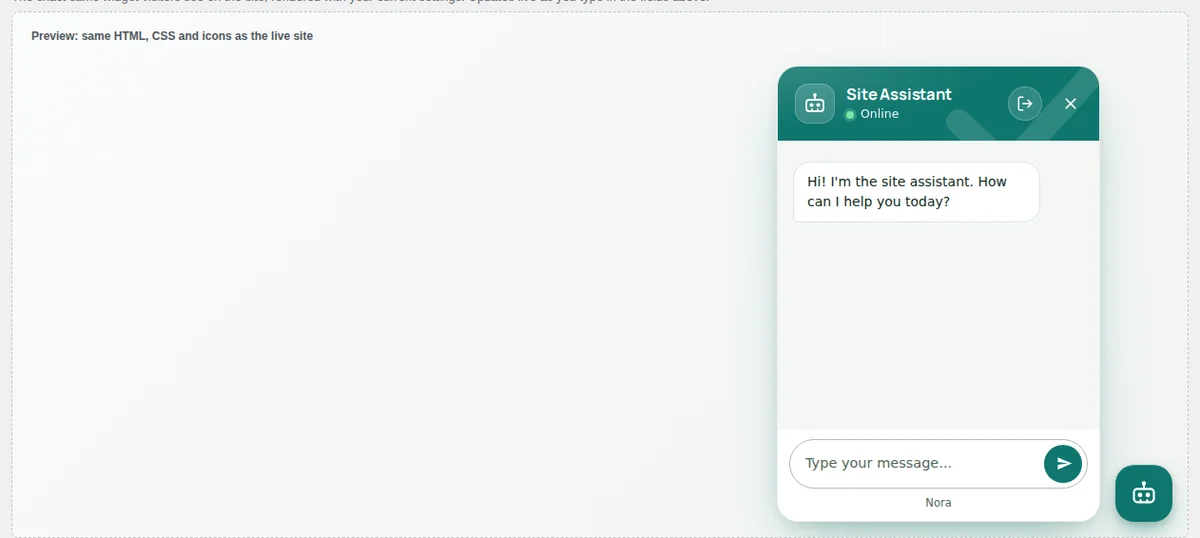
Proactive messages
Proactive messages start the conversation for you when a visitor shows interest: after some time on your prices page, after reading most of an article, or when they are about to leave. They live in the “Proactive messages” card at the bottom of Chatbot Chk > Branding, work on every plan, and you can have up to 10.
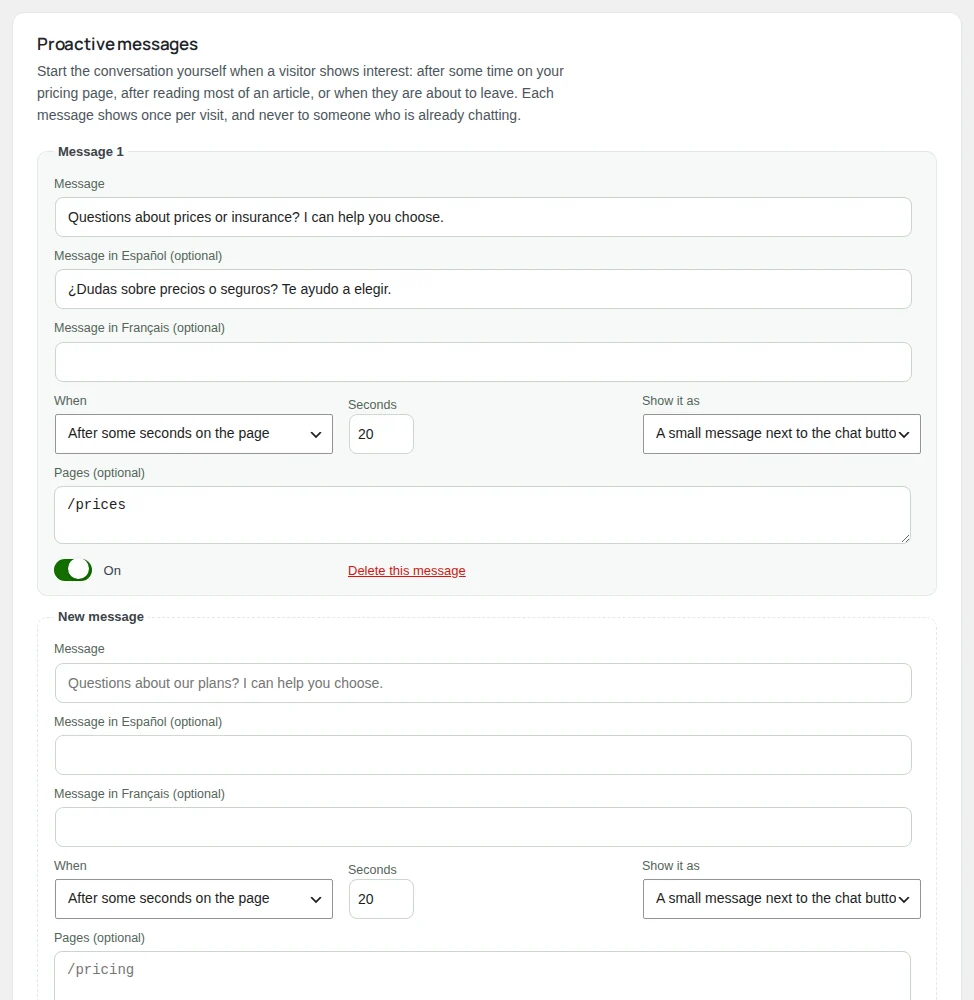
When a message shows
Under “When”, each message has one of three triggers:
| After some seconds on the page | the message shows after the “Seconds” you set, from 1 to 600, on the same page. |
| After scrolling part of the page | the message shows when the visitor has scrolled the “Percent of the page” you set, from 5 to 100. |
| When the visitor is about to leave | the message shows when the mouse leaves the window through the top, toward the tabs or the address bar. Only on computers: phones have no such signal, so it never fires there. |
And it follows these rules:
- Each message shows once per visit, and only one proactive message per page view.
- It never shows over an open chat, or to a visitor who already has a conversation.
- “Pages (optional)” limits it to some pages: one piece of the address per line, for example /pricing or /es/precios. It shows on every page whose address contains that piece. Empty means every page.
- “On” turns the message on or off without deleting it.
How it shows
Under “Show it as”, choose:
- “A small message next to the chat button”: the same small message as the teaser, which the visitor can press to open the chat.
- “The chat window, open (computers only)”: the chat opens with your message as the bot’s first line. On phones it shows as the small message instead, so it never covers the page.
In each language
If your site has more than one language (Polylang, WPML or the ones you added under Chatbot Chk > Languages), each message has a “Message in” box for each other language, all optional. Each visitor sees the message in the language of the page; a language left empty shows the first message. With one language, write the message in the language of the pages where it shows.
How to create a proactive message
Open the card
Go to Chatbot Chk > Branding and scroll to “Proactive messages”. The last block, “New message”, is empty and ready.
Write the message
Type it in “Message”, up to 300 characters. Make it about the page, for example a question about your plans on the prices page. Fill in the other languages if you have them.
Choose when
Under “When”, pick the trigger, and type the seconds or the percent of the page.
Choose how and where
Under “Show it as”, pick the small message or the open chat. Under “Pages (optional)”, write the pieces of the address, one per line, or leave it empty for every page. Check that “On” is checked.
Save
Press “Save proactive messages”. The page caches the plugin knows are emptied, so visitors get the change right away, and a new empty “New message” block appears for the next one.
Try it
Open that page in a private window of your browser, so you are a new visitor with no conversation, and wait for the trigger.
To change a message, edit its fields and press “Save proactive messages”. To remove one, press “Delete this message” in its block and confirm: your other changes on the card are saved too. A message left without text is removed when you save.
| Idea | When | Pages (optional) | Show it as |
|---|---|---|---|
| Help choosing a plan | After 20 seconds on the page | /pricing | Small message |
| Questions after an article | After scrolling 70% of the page | /blog | Small message |
| Last chance before leaving | When the visitor is about to leave | /book | The chat window, open |
Languages
The bot already answers each visitor in the language they write in. Chatbot Chk > Languages is for the rest: the languages of your site, a version of your own chat texts in each one, and the plugin itself in a new language. It works on every plan. Translating with AI needs an active license or your own AI key (under Chatbot Chk > Settings).
Languages of this site
The first card lists the site’s languages, each with its code:
- “Main”: the main language of WordPress (Settings > General). Your texts in Branding and Settings are in this language.
- “From your translation plugin”: a language that comes from Polylang or WPML. Add or remove it there.
- A language you added here has an × to remove it.
To add one, pick it under “Add a language” and press “Add”. You can have up to 30. Without Polylang or WPML, add the languages your visitors use: the chat follows the language of each page and of each visitor.
Your chat texts in each language
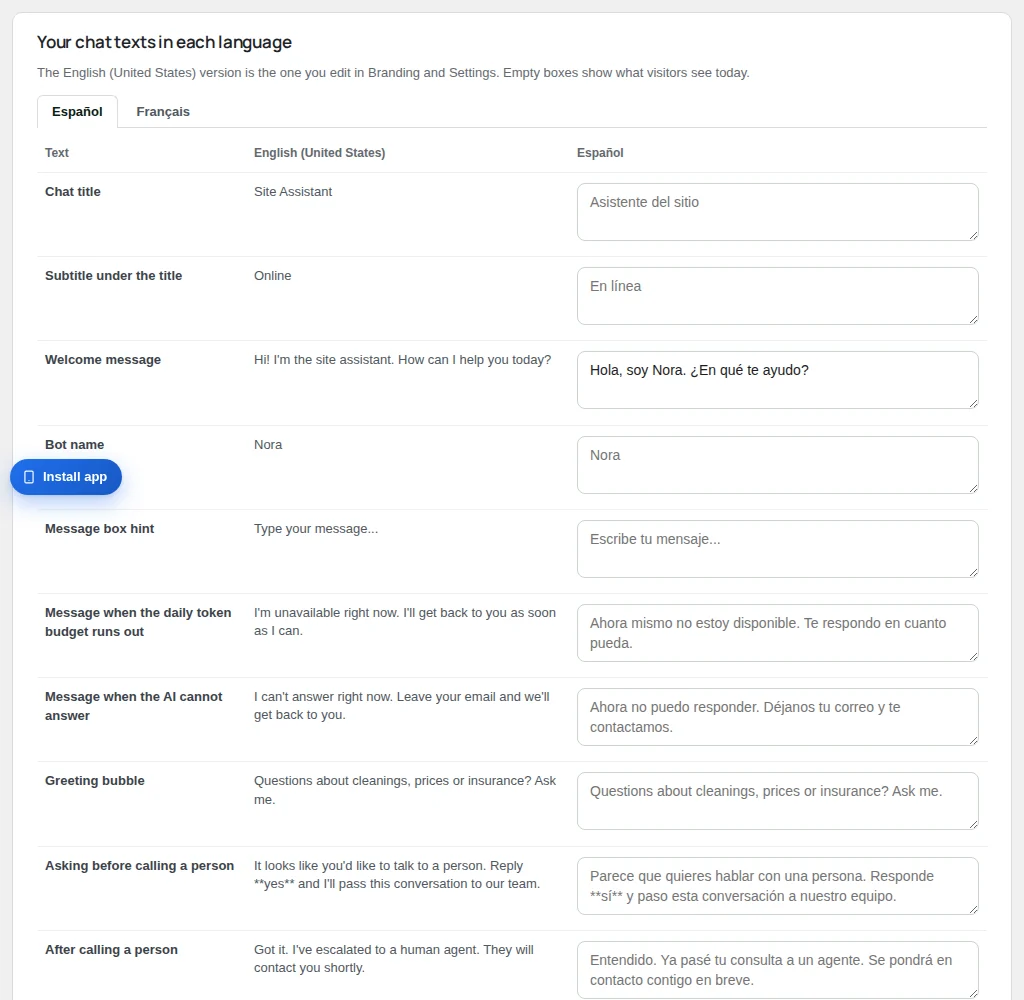
“Your chat texts in each language” has a tab for each language other than the main one. Each row is one of your texts: the main language version on the left and a box for this language on the right. Only the texts you filled in the main language are listed: the chat title and subtitle, the welcome message, the bot name, the message box hint, the messages when the AI or the daily budget runs out, the greeting bubble (the teaser), the messages about calling a person, the reply to off-topic questions, the privacy notice and the texts of the email form.
An empty box shows, in gray, what visitors see today in that language. Whatever you write replaces it.
- Open the tab of the language.
- Write your version in the boxes you want, or press “Translate the missing ones with AI”: the AI fills only the empty boxes.
- Review the texts and press “Save texts”. Nothing is saved until you press it.
If it says “Nothing missing: every text already has its version in this language.”, every box already has text. The versions of your proactive messages are written in their own card (see Proactive messages).
The plugin in each language
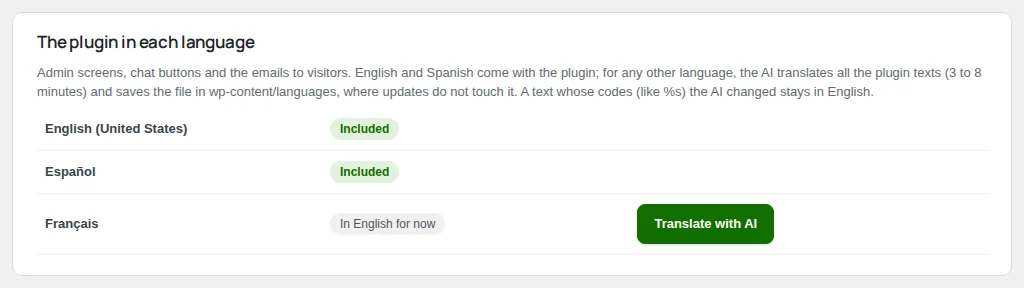
“The plugin in each language” covers the plugin’s own words: the admin screens, the chat buttons and the emails to visitors. English and Spanish come with the plugin and say “Included”. Any other language of your site says “In English for now” until you translate it.
- Press “Translate with AI” next to the language.
- Wait 3 to 8 minutes while the bar fills (“Stop” cancels it and nothing is written).
- When it ends, the row says “Made with AI on” a date, with how many texts it translated.
The file is saved in wp-content/languages, where plugin updates do not touch it, and WordPress uses it on its own. A text whose codes (like %s) the AI changed stays in English. If a language already has a translation made by a person, it is kept as it is.
Later, a row can show one of these tags. Press “Translate again” and only the missing texts are translated.
- “Unfinished: translate again to complete it”: the translation stopped halfway.
- “Made for an older version: translate again to include the new texts”
The second one appears after a plugin update. “Delete” removes the file; press it a second time to confirm.
When the AI comes from Digital Checkmark, the card can show how much of this month’s translation allowance you used. If it is used up, it starts again on the 1st. If the file cannot be saved, check that WordPress can write to wp-content/languages.
With Polylang
Chatbot Chk works with Polylang without extra setup:
- Its languages appear here by themselves, marked “From your translation plugin”.
- Context reads your pages and posts in every language, and the bot uses the passages in the visitor’s language first.
- A category left out under Context is left out in every language.
- In Branding, the page list shows the main language, and the translations of a checked page follow the same rule.
- Your chat texts are translated on this screen, not in Polylang’s string translations.
WPML works the same way for the list of languages.
How to add a language to the chat
Add the language
With Polylang or WPML, add it there and it appears here. Without them, pick it under “Add a language” and press “Add”.
Translate your texts
Open its tab under “Your chat texts in each language”, press “Translate the missing ones with AI”, review and press “Save texts”.
Translate the plugin
If the language is not English or Spanish, press “Translate with AI” under “The plugin in each language” and wait for it to finish.
Check it
Open a page of your site in that language and open the chat, or write to the bot in that language in the Sandbox (see Sandbox).
Sandbox
Chatbot Chk > Sandbox lets you chat with your bot as a visitor would, in private. It uses the same instructions, site content, Context, AI and rules for calling a person as the chat on your site, so what you see is what visitors get. It works before the chat is on and while it is hidden from visitors. Only administrators can open it, on every plan.
What you see
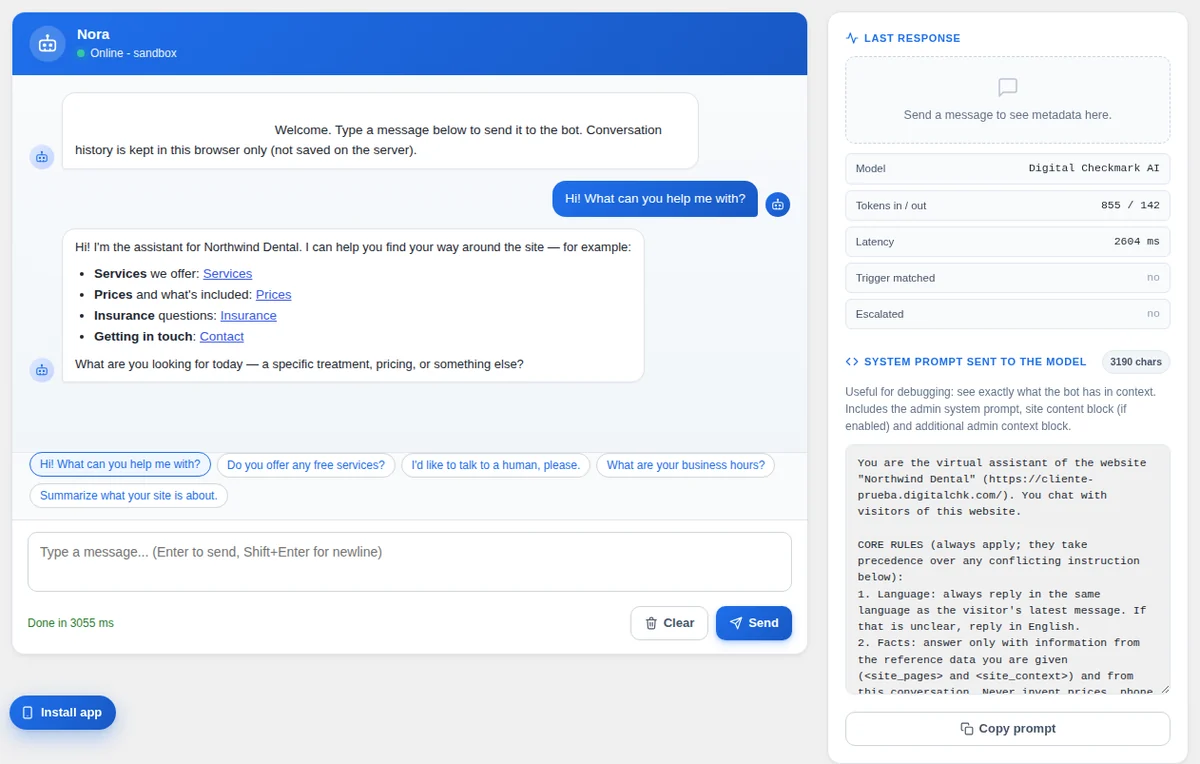
At the top, a tag says where the AI comes from: “Digital Checkmark AI”, or “OpenAI-compatible” and the model name when you use your own key.
On the left is the chat, with the bot name and avatar from Branding and the status “Online – sandbox”. Under the messages, quick questions send a common message with one click: “Hi! What can you help me with?”, “Do you offer any free services?”, “I’d like to talk to a human, please.”, “What are your business hours?” and, when the bot learns from your site, “Summarize what your site is about.”. Type your own in the box: Enter sends, Shift+Enter starts a new line. “Send” sends it and “Clear” starts over.
The conversation is kept only in this browser. It is not saved on the server: it does not show in Conversations, it does not create contacts and it never alerts your team. Each answer does use the AI, like a real chat.
On the right, “Last response” describes the last answer:
- “Model”: the AI model that answered.
- “Tokens in / out”: the size of what was sent and of the answer.
- “Latency”: how long the answer took.
- “Trigger matched”: whether the message asks for a person, by one of the trigger words in Chatbot Chk > Settings (it says yes) or because the AI understood it (“yes, understood by the AI”). The reply is then the question the chat asks before calling a person.
- “Escalated”: always says no here. The Sandbox never calls your team; it only shows what the chat would ask.
Below, “System prompt sent to the model” shows, with its size in characters, everything the bot received for that question: its instructions and the passages taken from Context. “Copy prompt” copies it.
How to test your bot
Ask what your customers ask
Use the quick questions, then your own: prices, hours, how to book, what you do not offer. Ask them the way a customer would write them.
Check where the answer came from
Open “System prompt sent to the model” and look for the passage with the answer. If it is there, the bot had the facts. If it is not, the bot could not find them.
Fix what is missing
Add or correct the content under Chatbot Chk > Context (see How to give the bot more context) and ask again: changes to Context count from the next message. To change how the bot answers (tone, what to recommend, what never to say), edit the “System prompt” under Chatbot Chk > Settings.
Ask for a person
Press “I’d like to talk to a human, please.”. The answer should be the question the chat asks before calling someone, and “Trigger matched” should say yes.
Try other languages
Write a question in another language. The bot answers in the language you write in.
Start over
Press “Clear” to forget the conversation and test from a clean start, as a new visitor.
When the answers are right, turn the chat on for visitors: in the last step of the setup assistant, or with “Enabled” under Chatbot Chk > Branding (see Branding).
Settings
Chatbot Chk > Settings holds how the bot thinks and behaves: where the AI comes from, its base instructions, when it offers a person, your hours, contact capture, limits, email and logs. The sections below follow the order of the screen. Change what you need and press Save Changes at the bottom: one button saves every section. “Run the setup again” at the top opens the setup assistant, which sets most of the same things step by step.
“Go-live check”. At the top, a short list says whether the site is ready for visitors: the AI, scheduled tasks, email, talking to a person, business hours, push notifications, file storage and debug logging. It opens on its own when an item needs attention and stays closed when everything is in place.
Where the AI comes from
Choose one of two options:
- “Digital Checkmark, included with your license (recommended)”: the AI comes with your license, with nothing to set up. The box “AI by Digital Checkmark” confirms it and links to this month’s use on the License page. Without an active license it says “Activate your license to turn on the AI.” and visitors see your “When the AI can’t answer” message.
- “Your own key”: any service that follows the OpenAI Chat Completions format (OpenAI, Groq, Together, OpenRouter, Mistral, a local server…). You pay your provider and there is no monthly limit from us. It works on every plan, even without a license.
With your own key you get two more blocks. “AI endpoint”: “API key” (stored in the database, never sent to the browser), “Endpoint”, “Model”, “Temperature” (lower is more factual; 0.2 to 0.4 suits a site assistant), “Max tokens” and “Reasoning effort” (for reasoning models; leave “Not sent (endpoint default)” if your service does not support it). “Backup AI endpoint (optional)”: a second service used once, on its own, when the main one fails. Pick a different company so one outage does not take both down; leave its endpoint empty to turn it off.

How to switch to your own AI key
- Under “Where the AI comes from”, choose “Your own key”.
- Press Save Changes. The fields of that option only appear after saving.
- Fill in “API key”, “Endpoint” and “Model” from your provider’s dashboard, and press Save Changes again.
- At the bottom, under “Check that everything works”, press “Test the AI”. A short reply means the key and the model work.
To go back, choose “Digital Checkmark, included with your license (recommended)” and save. Your key stays stored in case you switch again.
System Prompt
“System prompt” is the guide the bot follows on every reply, after its built-in rules (the visitor’s language, facts only from your site, safe links). While it is still the generic text, a box says “Adapt this guide to your business”: press “Write it with the setup assistant” or open “See an example”. Write what you offer, who your customers are, what the bot should recommend and anything it must never say. Try it in the Sandbox after saving.
Human escalation
How the bot passes a visitor to your team:
- “Allow human escalation”: the bot watches for the “Triggers (one per line)” (words or phrases, in any case), asks whether the visitor wants a person and, on yes, sends the chat to the Support queue with the alerts. Off, the bot never offers a person.
- The “Talk to a human” button: “Always show (default)”, “Only when the bot detects a trigger” or “Never show”. The bot still passes the chat on when the visitor says yes.
- “Confirmation message”, “Message after escalation” and “Post-escalation message”: the texts the visitor reads. Give them a version per language under Chatbot Chk > Languages.
- “Escalations per day (site-wide)”: a cap that protects your team and your email from abuse (0 = unlimited).
- “Visitor refresh while escalated (seconds)”: how often the visitor’s chat looks for your replies.
- “Satisfaction survey”: when an agent resolves a chat, the visitor rates the help from 1 to 5 stars. “Ask to rate the assistant after” asks for a rating of the bot after that many messages (0 = never).
- “Files in support chats”: agents can attach files to their replies, and visitors can send images, PDF or text files while they talk to a person (never to the bot). “Maximum size per file (MB)” sets the size.
The chat only offers a person when someone will really get the alert: the email alert, the Support queue alerts with at least one recipient, Telegram, Slack, or a webhook or Teams listening for that event. If none is set, “Talk to a human” stays hidden.
Availability and follow-up
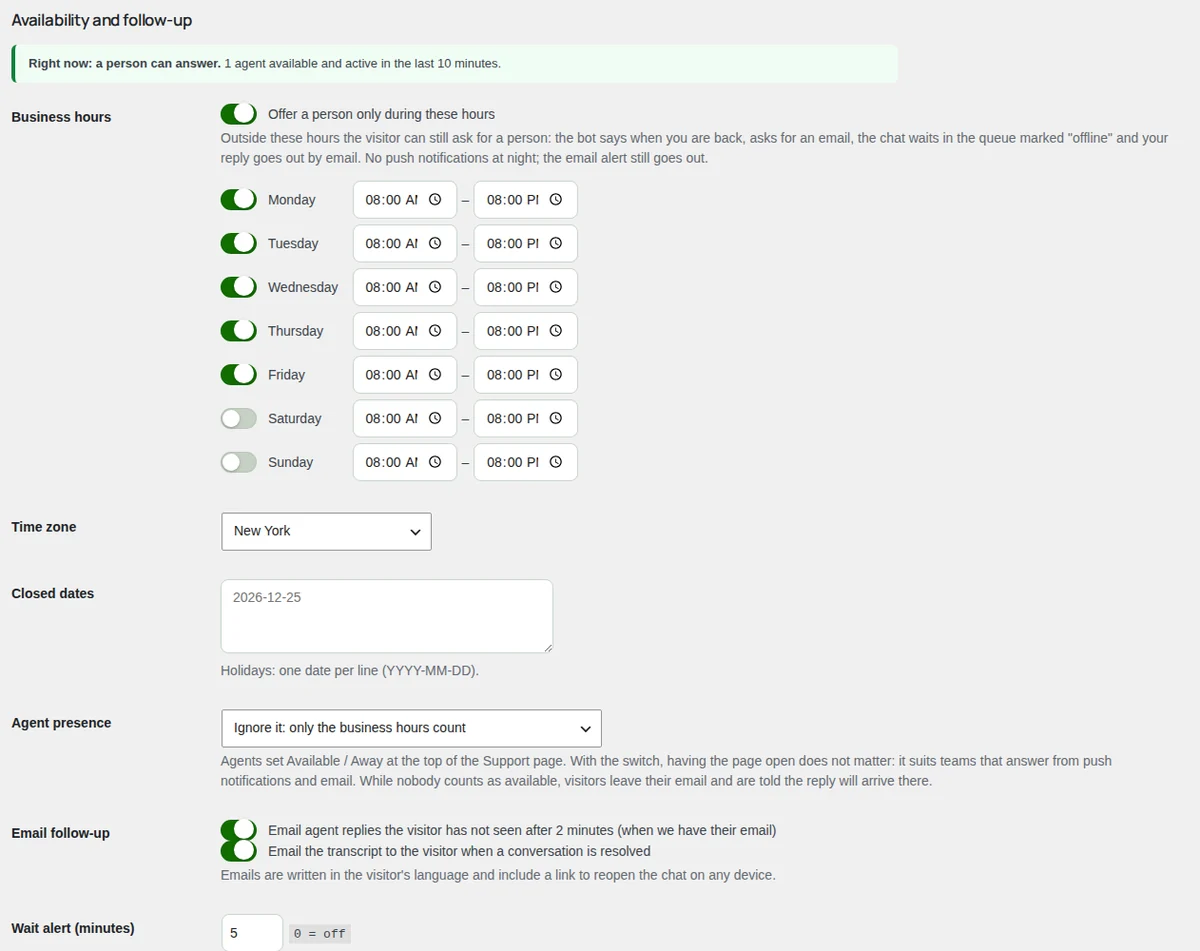
A line at the top says right now whether a person can answer and how many agents are active. The settings:
- “Business hours”: turn on “Offer a person only during these hours” and tick each day with its hours. Outside them the visitor can still ask for a person: the bot says when you are back, asks for an email, the chat waits in the queue marked offline and your reply goes out by email. No push notifications at night; the email alert still goes out.
- “Time zone”: the site’s time zone or another one.
- “Closed dates”: holidays, one date per line (YYYY-MM-DD).
- “Agent presence”: “Ignore it: only the business hours count”, the Available / Away switch (when every agent is on Away it counts as out of hours) or “Available and with a Chatbot Chk screen open in the last 10 minutes”. Agents set Available / Away at the top of Support.
- “Email follow-up”: email agent replies the visitor did not see after 2 minutes, and email the transcript when a conversation is resolved. Both in the visitor’s language, with a link to reopen the chat.
- “Wait alert (minutes)”: when a visitor with your team waits this long without an answer, the assigned agent gets a push and an email; unassigned chats, or three times as long, alert the whole team (0 = off). Only during business hours.
How to set your business hours
- Under “Availability and follow-up”, turn on “Offer a person only during these hours”.
- Tick each day you answer and set its start and end time.
- Check the “Time zone” and add your holidays to “Closed dates”.
- If your team uses the switch on Support, choose it in “Agent presence”.
- Press Save Changes. The “Go-live check” shows your hours in one line.
Behavior
- “Refuse off-topic questions”: the bot answers questions unrelated to your site with the “Off-topic refusal message” instead.
- “Privacy policy URL”: the bot gives it when asked about data or privacy. When the chat runs on another site, use that site’s policy.
- “Show privacy notice in bubble” and “Privacy notice text”: a notice shown once per browser when the chat opens. Write {url} where the policy link goes.
Push notifications
Pro. Browser and app notifications for your agents. “Enable browser push” sends them on every new request for a person; each agent turns them on per device (see Chatbot Chk > Mobile app). “Generate VAPID keys” creates the keys once. “Regenerate VAPID keys” cancels every existing subscription, so agents must turn notifications on again. “Active subscriptions” counts the subscribed browsers. On Free and Starter, or when the server cannot send push, the section says why instead.
Lead capture
Whether and how the chat asks visitors for their email: “Enable lead capture”, “Capture mode”, “Free messages before the form”, “Ask for a name”, “Verify email with a code” and “Lead retention (days)”. “Email verification” says which checks every address goes through on your plan. Contacts explains each mode and where the contacts land.
Limits & cost control
- “Check visitors are human”: Cloudflare Turnstile, asked once per conversation before the first message reaches the AI. Most visitors never see anything. Without it, a script can spend your messages from many addresses.
- “Daily token budget (site-wide)”: only with your own key. Input plus output tokens per UTC day; past it, visitors get the offline message until the next day (0 = unlimited). With the AI of Digital Checkmark, your plan’s monthly messages rule instead.
- “Rate limit per IP (msg/hour)”, “Rate limit per IP (msg/day)” and “Rate limit per session”: how many messages one visitor can send (0 = unlimited).
- “Max characters per visitor message” and “History sent to the model (messages)”: more history gives the bot better memory of the conversation and uses more of the AI.
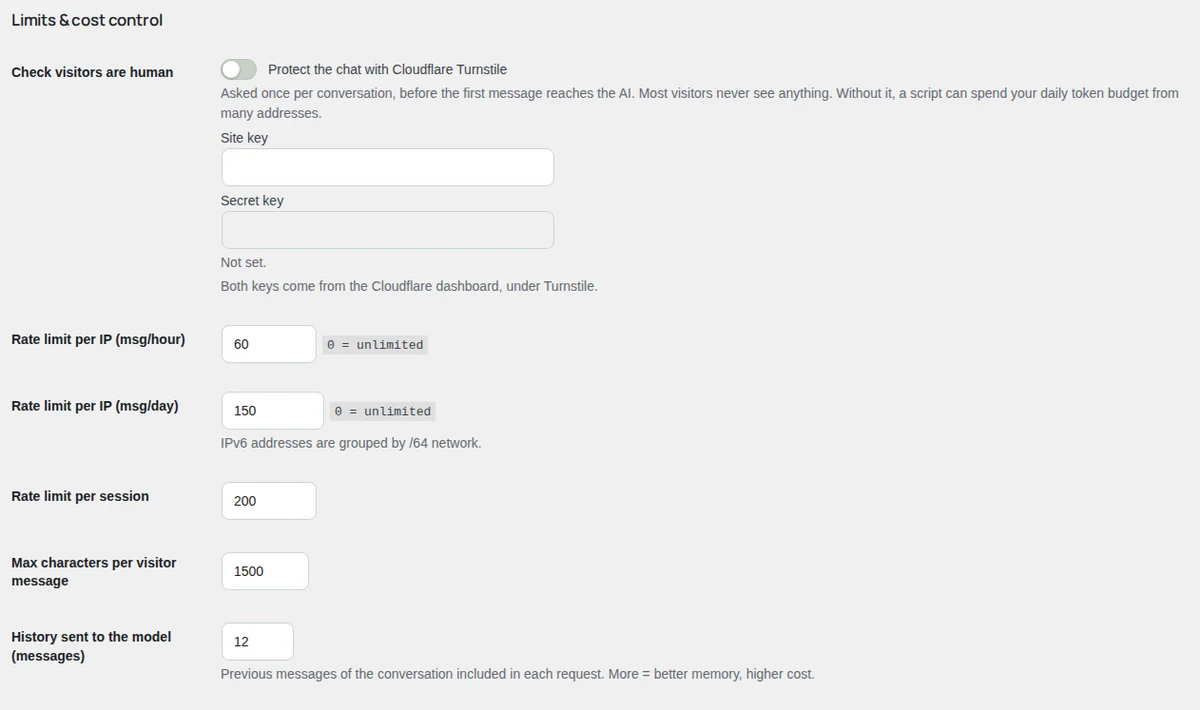
How to turn on Cloudflare Turnstile
- In the Cloudflare dashboard, open Turnstile and add a widget for your site’s domain. When the chat runs on another site, add that domain to the widget’s hostnames too, or the check will not load there.
- Copy its site key and its secret key.
- In Settings, under “Limits & cost control”, turn on “Protect the chat with Cloudflare Turnstile”.
- Paste them in “Site key” and “Secret key” and press Save Changes.
If a key is missing, the screen says “One of the keys is missing, so the chat is running without the check.”
“How emails are sent” covers the chat’s emails: codes, copies of conversations and alerts to your team. With Pro you choose “By Digital Checkmark (recommended)”, which sends them from our address with your site’s name (replies go to your site’s email; if one cannot be sent it goes out through WordPress), or “By WordPress, with this site’s own mail setup (for example an SMTP plugin)”. On Free, Starter, the Pro trial and AppSumo, emails always go through WordPress.
Logs and deleting the plugin
- “Log retention (days)”: how long the logs are kept.
- “Debug logging”: writes a debug log to the uploads folder. Turn it on only to find a problem and off afterwards.
- “Deleting the plugin”: “Delete everything when the plugin is deleted” removes settings, conversations, leads, files, the support agent role and the license on this site (it is released for another site). Off by default, so deleting and reinstalling brings everything back. It cannot be undone.
Check that everything works
Below the button, two tests use the saved settings, so save first. “Test the AI” asks the AI for a one-line reply. “Send test email” sends a test to the first address of the email alert.
How to change who gets the alerts
The alert recipients are on Chatbot Chk > Agents, under “Email alerts”:
- In “Destination email”, write the address that gets the summary when a visitor asks for a person. Several addresses go separated by commas. Empty means the site’s admin email.
- Turn “Email agents on new escalation” on or off to email every support agent too.
- Keep “Support queue alerts” on if no other channel takes the requests: when nothing else is set and it is off, visitors are not offered a person.
- Press Save Changes, then come back to Settings and press “Send test email”.
Telegram, Slack, Microsoft Teams and webhooks are set on Chatbot Chk > Integrations.
Contacts
The chat can collect visitors’ email addresses, with or without a name. You choose how insistent it is under Chatbot Chk > Settings > Lead capture, and the addresses land on Chatbot Chk > Leads. Contact capture works on every plan. The menu item shows a number when new contacts arrived in the last 7 days.
Turn it on and choose a mode
In Settings, under “Lead capture”, turn on “Enable lead capture” and pick a “Capture mode”. “Silent” is the least intrusive and the recommended start; “Required” is the strictest, so use it only if you plan to follow up every contact.
| Mode | What the visitor sees |
|---|---|
| “Silent” | No form. When the visitor types an email address in the chat, it is checked and saved. |
| “Notice” | A soft banner asking for the email. The visitor can ignore it and keep chatting. |
| “Required” | The chat is blocked until the visitor sends the form. |
| “On escalation” | Free chat. The form appears only when the visitor asks for a person. An address typed in the chat earlier also counts, so the form is skipped. |
| “Notice, then required on escalation” | The banner from the start, optional, and required to reach a person. |
| “After a few messages” | Free chat for the number of answers in “Free messages before the form”, then the form blocks the rest. |
| “After a few messages or on escalation” | Free chat; the form appears when the free messages run out or when the visitor asks for a person, whichever comes first. |
For the two “After a few messages” modes, “Allow closing” lets the visitor skip the form and keep talking to the bot, and “Repeat” asks again every time that many messages go by (only when closing is allowed). Asking for a person always needs the email; it cannot be skipped.
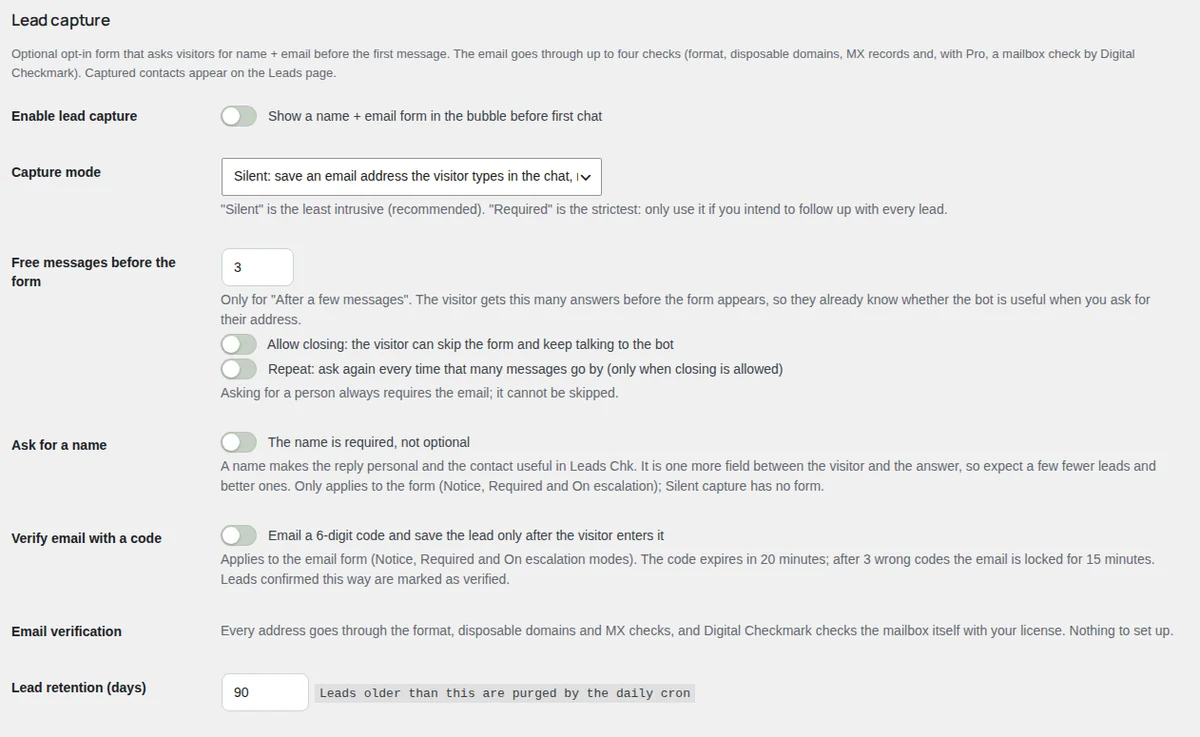
Decide on the name and the code Optional
- The name. The form always has a “Name (optional)” field. Turn on “The name is required, not optional” under “Ask for a name” to make it mandatory. A name makes replies personal and the contact more useful, but it is one more field, so expect fewer contacts and better ones. Silent capture has no form, so it saves the address only.
- The email code. Turn on “Verify email with a code” and the chat emails the visitor a 6-digit code; the contact is saved only after they type it, and it is marked as verified. The code expires in 20 minutes and works once. After 3 wrong codes the address is locked for 15 minutes, and one address can ask for at most 5 codes an hour. It applies to the form, not to silent capture.
Know what is checked
Every address goes through the format, disposable domains and MX checks. With Pro, Digital Checkmark also checks that the mailbox exists, and your rules under Allowed and blocked emails apply. When an address in the form fails, the visitor reads why and can type another one; with silent capture it is simply not saved. “Lead retention (days)” deletes contacts older than that number of days, once a day.
The Leads screen
Each row shows the “Email”, “Name”, “Source”, “Verified”, the “Conversation” it came from (press its number to open it), the IP and the “Date”.
- Source. “Chatbot” is an address sent with the form, or left to get the reply by email when nobody could answer; “Chat (silent)” is one typed in a message. Older sites may also show “Prechat” or “Manual”.
- Verified. “Yes” when the visitor confirmed the code or Digital Checkmark confirmed the mailbox. The MX check alone does not count.
- Filters. Filter by “Source:” and “Verified:”, or type in “Search email or name…” and press “Search”.
- Delete. Tick rows, choose “Delete” in “Bulk actions” and press “Apply”. It cannot be undone.
If nothing was captured yet, the screen says “No leads captured yet.” with a link to the setting.
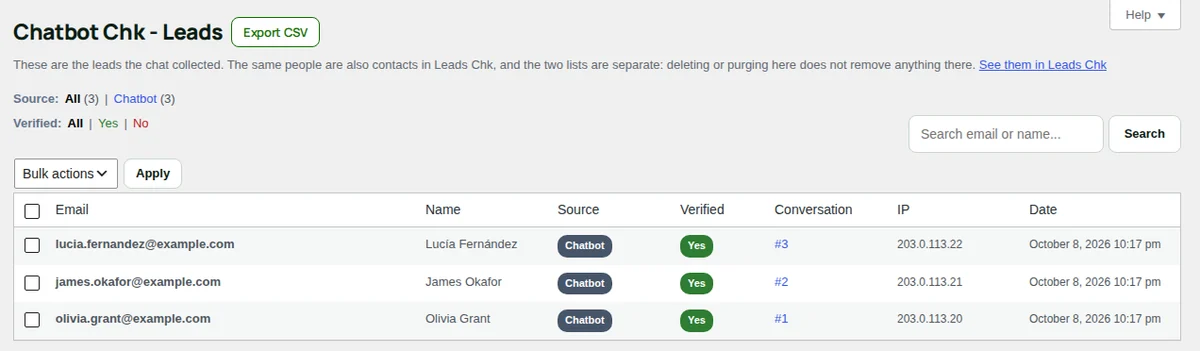
How to export your contacts
- Open Chatbot Chk > Leads.
- Optional: choose a source, verified or not, or search, to export only those rows.
- Press “Export CSV” next to the title. The file has the email, name, source, IP, whether it was verified and when, and the date, in UTC.
Contacts in Leads Chk
If the Leads Chk plugin is installed, every new contact from the chat also becomes a contact there, as “Site chat”, with the page it came from, the conversation language and a link back to the conversation. Whether it joins a newsletter, which list and with what wording is decided in Leads Chk; you see and change it on Chatbot Chk > Integrations, card “Leads Chk”, or on Leads Chk’s own screen. When Leads Chk offers it, the chat’s form shows its newsletter checkbox; a contact who confirmed the code is not asked to confirm by email again.
The two lists are separate: deleting or purging here does not remove anything in Leads Chk. “See them in Leads Chk”, at the top of Leads, opens the same people there. The chat works the same without Leads Chk.
Allowed and blocked emails
Pro. Chatbot Chk > Allowed emails decides which email addresses the chat accepts from visitors: in the contact form, in silent capture, with the email code and when a visitor leaves an address to get the reply by email. For example, block free email providers or a competitor, or allow only your clients’ domains. On Free and Starter you can prepare the rules; the screen says so, and they apply once the site has Pro.
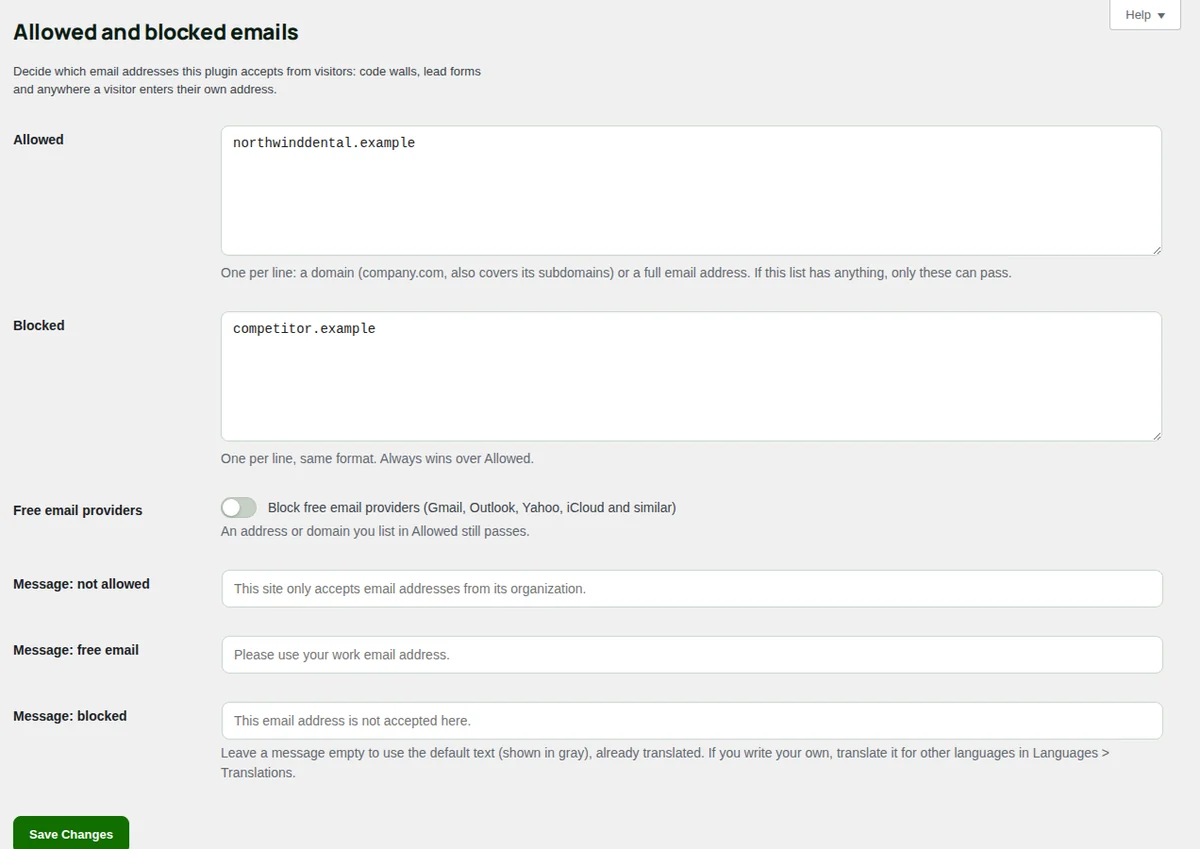
The rules
Blocked
Always wins over Allowed. An address or domain listed here never passes.
Allowed
If this list has anything, only these addresses and domains can pass. Empty, everyone passes except what is blocked.
Free email providers
“Block free email providers (Gmail, Outlook, Yahoo, iCloud and similar)”. An address or domain you list in Allowed still passes.
Write one entry per line (commas also separate): a domain such as company.com, which also covers its subdomains, or a full email address. othercompany.com does not match company.com. A full address also catches its variants: [email protected] counts as [email protected], and in Gmail the dots do not matter. Do not use * or % in the middle of a line: lines that are not a domain or an address are not saved, and the screen lists them after you save.
The messages visitors read
“Message: not allowed”, “Message: free email” and “Message: blocked” are what the visitor reads when their address is refused. Leave one empty to use the default text, shown in gray and already translated. If you write your own, translate it for your other languages in Polylang’s Languages > Translations.
How to accept only your clients’ addresses
- Open Chatbot Chk > Allowed emails.
- In “Allowed”, write your clients’ domains, one per line.
- Optional: change “Message: not allowed” to say how to reach you another way.
- Press Save Changes, then try the chat with an address from another domain: it should be refused.
How to block free email providers
- Turn on “Block free email providers (Gmail, Outlook, Yahoo, iCloud and similar)”.
- If some clients do use a free address, add those exact addresses to “Allowed”.
- Press Save Changes.
The rules cover only the visitor’s own address. They do not change who your team can write to, and addresses already saved in Leads stay there.
License
Chatbot Chk > License connects this site to Digital Checkmark. The license turns on the AI by Digital Checkmark, sets the plan of the site and brings updates. The same screen also opens from the “License” link under the plugin’s name on the Plugins screen. To answer with AI without a license, set your own key under Settings > Where the AI comes from.
How to activate it for free
Without a license, the screen starts with “Activate Chatbot Chk for free”:
- In “Your email”, check the address (it starts with yours) and press “Send me the code”.
- Open the email and copy the 6-digit code. It expires in 20 minutes.
- Type it in “Code” and press “Activate”. The site is on the Free plan, with the AI by Digital Checkmark, and you never need to see a key.
“Use another email” starts again with a different address. The site must have a real address (not localhost or a local test site), and the email must be permanent, not a temporary one.
How to enter a license key
If you bought Starter, Pro or Agency, or you have a partner or AppSumo license, paste the key under “Or enter a license key” and press “Activate”. The screen confirms “License activated.”.
Your license
With a license, the card “Your license” shows the plan as its title and a pill with “Active” or what is wrong (expired, revoked, suspended…). Below it:
- “License key”: only its first characters, for safety.
- “Plan” and “Expires” (“Never” when it does not expire).
- “Sites”: how many sites use the license and how many it allows.
- “Last check”: the last time the site spoke with the license server. It does so on its own twice a day.
Two buttons:
- “Check now”: asks the license server right away. Use it after you change plan or after support changes your license, so you do not wait for the next automatic check.
- “Deactivate on this site”: releases the site from the license, so you can use it on another site. This site goes back to Free, without the AI by Digital Checkmark, until you activate it again.
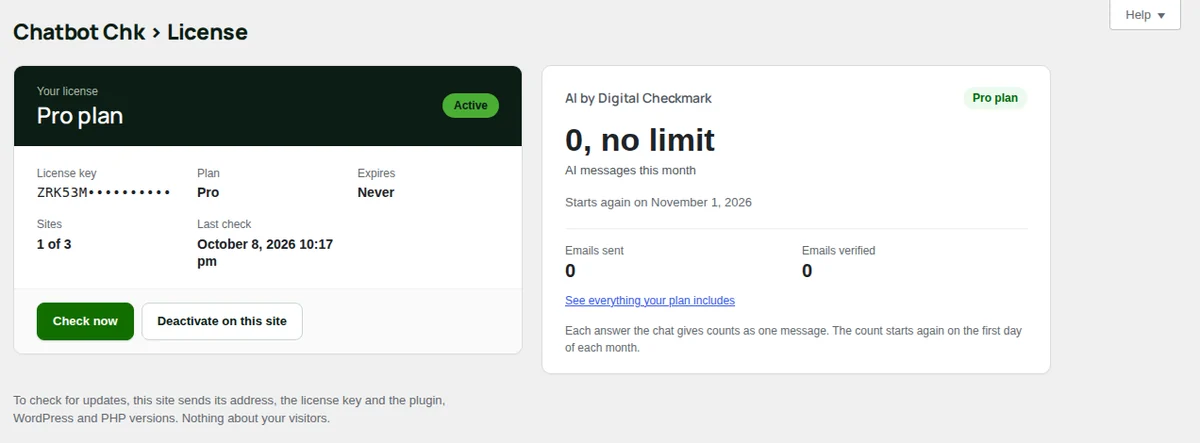
The usage card
Next to it, “AI by Digital Checkmark” shows your plan and the “AI messages this month”: how many the chat used, out of how many, with a bar that turns yellow at 80% and red at 100%, and the date the count starts again. Each answer the chat gives counts as one message, and the count starts again on the first day of each month (UTC). If the site uses your own AI key, the card says that there is no monthly limit from Digital Checkmark.
On Pro the card also counts “Emails sent” and “Emails verified” by Digital Checkmark this month and links to “See everything your plan includes”. On the other plans it lists what “Pro adds”, with the “Compare plans” button.
How to move the license to another site
- On the old site, press “Deactivate on this site”. The screen says “License deactivated on this site.”.
- On the new site, open Chatbot Chk > License, paste the key and press “Activate”.
While a license is on all the sites it allows, activating it elsewhere says “This license is already used on all the sites it allows.”.
To check the license and look for updates, the site sends its address, the license key and the plugin, WordPress and PHP versions. Nothing about your visitors. If the license server does not answer, the plugin keeps working; try again in a few minutes.
Integrations
Chatbot Chk > Integrations connects the chat to the tools your team already uses. Only administrators see this screen. Each integration is a card, and the badge at the top right of the card says how it is: “Connected”, “Paused”, “Every plan” or “Pro”. Each card works on its own: you can use several at once.
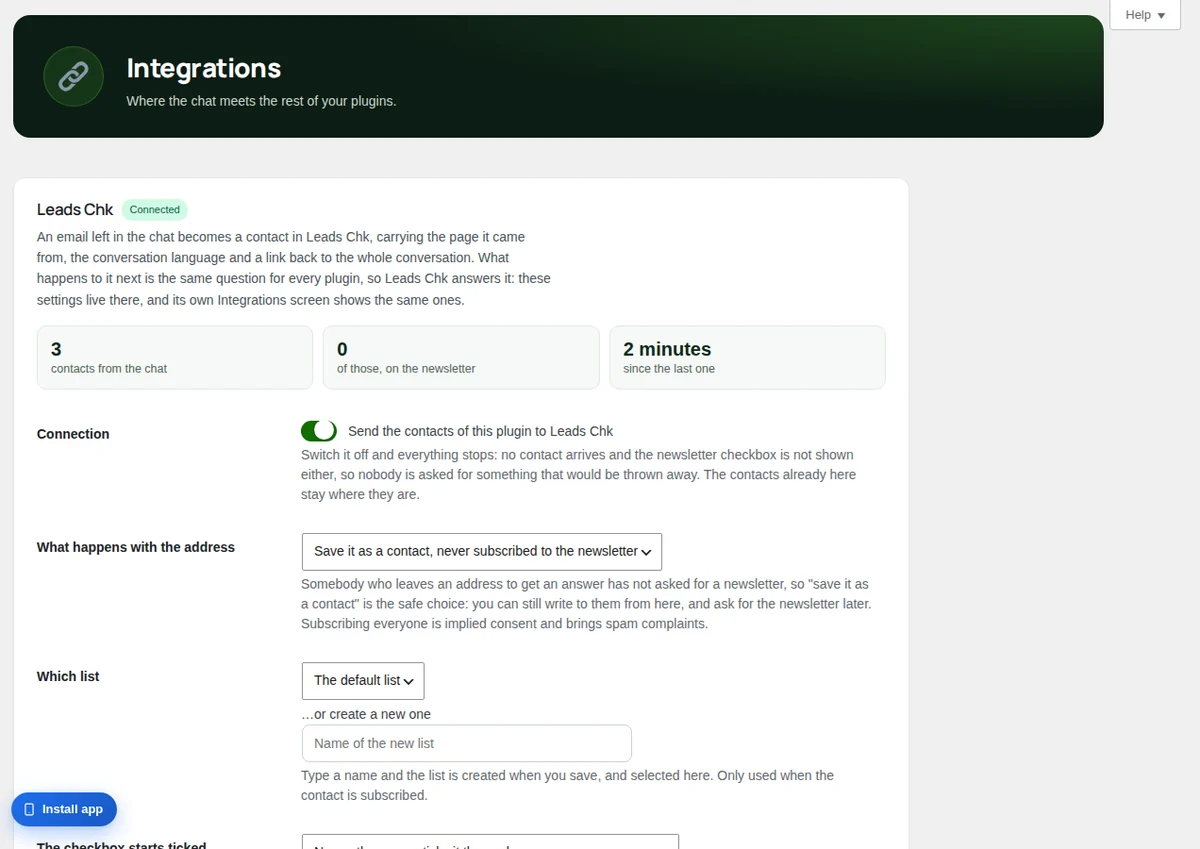
| Integration | Plan | What it does | Can your team answer from there? |
|---|---|---|---|
| Leads Chk | Every plan (it is a separate plugin) | Each email left in the chat becomes a contact in Leads Chk. | No: contacts only. |
| Telegram | Every plan | Your bot writes to you or to your team’s group, with Take, Resolve and Open in Support. | Yes: reply to the message. |
| Slack | Pro | Each request for a person (or every new chat) opens a thread in a channel. | Yes: reply in the thread. |
| Microsoft Teams | Pro | A card in a channel for the events you pick, with a button that opens the chat in Support. | No: alerts only. |
| HubSpot | Pro | Creates or updates the contact by email, with notes about the chat. | No: contacts only. |
| Webhooks | Pro | Sends the events you pick as JSON to up to 5 addresses: Zapier, Make, n8n, your CRM. | No: alerts only. |
Pro here means the Pro plan, Agency and the Pro trial (see Plans). On Free and Starter you can already save the Teams, HubSpot and Webhooks settings, but nothing is sent until the site has a Pro license. The Slack card shows “See plans” instead of its button.
Which integrations bring “Talk to a human”
The “Talk to a human” button shows in the chat only when the handoff is on (Settings, “Detect triggers and offer human escalation”) and someone will really be told. Besides the Support queue with agent alerts and the email summary, these integrations count:
- Telegram, when a chat is linked and “A visitor asks for a person” is ticked.
- Slack (Pro), as soon as a channel is connected, in either mode.
- Microsoft Teams (Pro), when it is On and “A visitor asks for a person” is ticked.
- A webhook (Pro), when it is On and “A visitor asks for a person” is ticked.
HubSpot and Leads Chk only receive contacts: they never make the button show.
Answer from the tool, or only get the alert
- Answer from the tool: Telegram and Slack. The alert comes with Take and Resolve, and a reply to it (Telegram) or in its thread (Slack) reaches the visitor in the chat. What the visitor writes next arrives there too.
- Only the alert: Microsoft Teams and webhooks. They tell the team, with a link that opens the chat in Support. The answer is written in Support or in the app.
- Only contacts: HubSpot and Leads Chk.
The events
Telegram, Microsoft Teams and webhooks let you pick the same events:
| Event | When it is sent |
|---|---|
| “A visitor asks for a person” | The visitor asks for a person (with the button or in the chat) and the chat is handed over. |
| “A new contact leaves their email” | An email is saved from the chat: the form, the one-time code or an address typed in the chat. |
| “A new chat starts” | A visitor writes their first message. It is sent for every visitor, so it comes off. |
| “An agent takes a chat” | Someone presses Take, in Support, Telegram or Slack. |
| “A chat is resolved” | An agent resolves the chat, or the visitor ends it. Once per resolution. |
| “A visitor rates a chat” | The visitor rates the chat. Only the first rating counts. |
Everything goes out after the visitor got their answer, so the chat never waits for another app. Retries, and on some hosts the sending itself, use WordPress’s scheduled tasks. If they are late, a notice at the top of this screen says so: make sure WP-Cron runs (with DISABLE_WP_CRON, a system cron job has to call wp-cron.php).
Telegram
Telegram brings the chat alerts to your phone and lets you answer from there, on every plan, Free included. You create your own bot, and the site talks to Telegram directly, with no Digital Checkmark server in between. When a visitor asks for a person (or another event you pick), the bot writes to you or to your team’s group with Take, Resolve and Open in Support. Reply to that message and the visitor gets your answer in the chat; what the visitor writes next arrives as a reply.
Before you start: the site must open with https:// and without a password, so Telegram can reach it. The Telegram card is on Chatbot Chk > Integrations.
Firewall or Cloudflare. Telegram delivers to /wp-json/chatbot-chk/v1/telegram with POST requests that carry no User-Agent. A firewall rule that blocks requests without one (common in Cloudflare and in security plugins) stops the linking and the replies. Let POST requests to that address through: they carry their own secret, and the site rejects any call without it. When Telegram cannot deliver, the card shows a red notice with what Telegram got.
Create the bot in Telegram Required
- In Telegram, search for @BotFather (the official one has a blue check) and open it. Press Start.
- Send
/newbot. - BotFather asks for a name: write your business name, for example Northwind Dental. Visitors never see it; your team does.
- BotFather asks for a username: it must end in “bot”, for example
northwind_dental_bot. If it is taken, try another. - BotFather answers with the token, a line like
123456789:AAE.... Copy all of it.
If you lose the token, send /mybots to BotFather, pick your bot and press API Token.
Connect the token Required
- Go to Chatbot Chk > Integrations, Telegram card.
- Paste the token in the field and press “Connect the bot”.
- The card says “Bot connected. Now link the chat where the alerts should arrive.”
The token is saved only on this site and is never shown again. If the card says the token does not look right, copy it again whole. If it says Telegram does not accept the address of the site, check https:// and that the site has no password.
Link a private chat or a group Required
The card asks where the alerts should arrive. Choose one:
- Only you: press “To me: open the bot”. Telegram opens the bot: press Start.
- Your team: first create a group in Telegram with the people who answer. Then press “To my team: add it to a group”, pick the group and confirm that the bot joins.
The card notices it on its own in a few seconds and reloads with “Chat linked. The bot already wrote there; pick the events below.” The bot writes in that chat that it is connected. Whoever pressed Start (or added it to the group) is linked as the administrator who connected the bot.
If a button does not open Telegram, send the bot the line the card shows (/start and a code). In a group, write it as /start@yourbot and the code. The code lasts one hour; if it expired, press “New link code”.
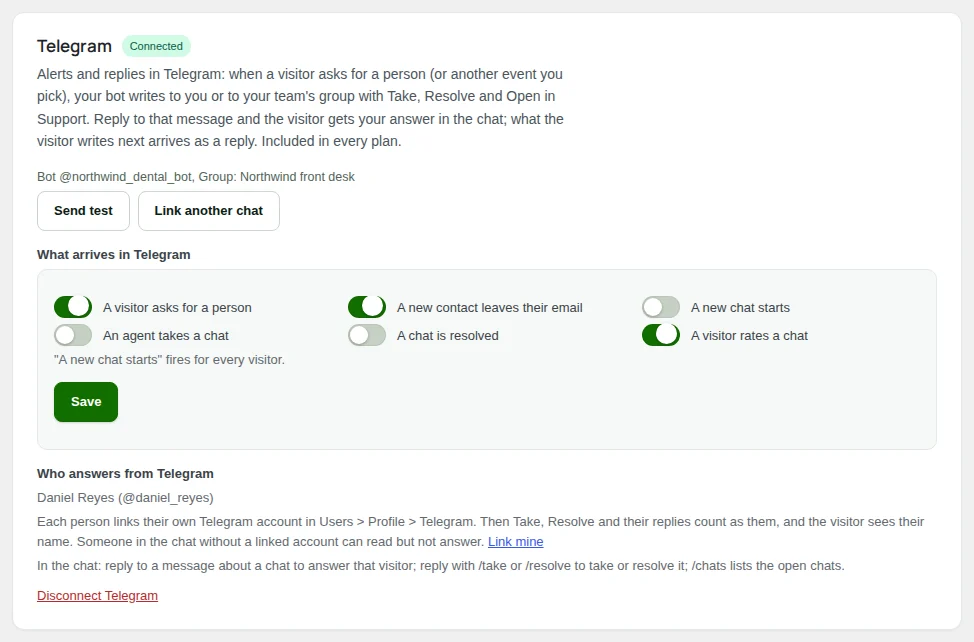
Pick what arrives Recommended
Under “What arrives in Telegram”, tick the events and press “Save”. When you connect, “A visitor asks for a person”, “A new contact leaves their email” and “A visitor rates a chat” come ticked. “A new chat starts” fires for every visitor: tick it only if you want to see every chat. See the events.
Each person links their account (required to answer)
Telegram needs to know who is who, so Take, Resolve and replies count as the right person and the visitor sees their name. Each administrator or agent does this once:
- In WordPress, open Users > Profile and go down to Telegram (it shows once the bot is connected).
- Press “Link my Telegram”. Telegram opens the bot: press Start. The bot answers that the account is linked.
- Reload the profile: it says who the Telegram account is.
If the button does not open Telegram, send the bot the line shown under it (valid for an hour). Each person links only their own account. An administrator can unlink anyone: on that person’s profile, tick “Unlink this Telegram account” and update the profile.
On the card, “Who answers from Telegram” lists who is linked, with a “Link mine” shortcut. Someone in the group without a linked account can read the alerts, but if they try to answer, the bot tells them to link their account first. Agents need a seat in the plan, like in Support.

Answer from Telegram
- Reply: use Telegram’s reply on any message of the bot about a chat (the alert or any line under it) and write. Your text reaches that visitor, with your name. Only text: files go from Support.
- Take and Resolve: press the buttons on the alert, or reply to a message about the chat with
/takeor/resolve. - Open in Support: opens the conversation in WordPress.
The commands also show in Telegram’s menu when you type /, in English, or in Spanish if Telegram is in Spanish. Both forms always work.
| Command | What it does |
|---|---|
/take or /tomar |
As a reply to a message about a chat: you take that chat. |
/resolve or /resolver |
As a reply to a message about a chat: you resolve it. |
/chats |
Lists the open chats (waiting for a person, or taken and not resolved), up to 10, newest first, each with its buttons. Reply to any of them to answer. |
/help or /ayuda |
Says what you can do from Telegram. |
What arrives in Telegram
Each chat that reaches Telegram gets one main message: what happened, the site and chat number, the contact if the visitor left one, the page, the language and the visitor’s last three messages, with Take, Resolve and Open in Support. Everything that follows arrives as replies to it, each line starting with the chat number: what the visitor writes, what the bot answers, replies written in WordPress, a new contact, the rating, who took it and who resolved it.
When the chat is resolved, Take and Resolve go away. If the visitor writes again later, a new alert arrives. An event you picked in a chat that has no main message (for example a contact left in a chat that never asked for a person) arrives as a message of its own. The bot writes in the language of the administrator who connected it.
Test, link another chat or disconnect
- “Send test”: the bot writes “Telegram is connected” in the linked chat. If it fails, the card says why (for example, the bot was removed from the group: link the chat again).
- “Link another chat”: the alerts stop going to the current chat and the card offers the two buttons again.
- “Disconnect Telegram”: Telegram stops calling the site and the site forgets the token and the chat. To use the bot again, connect its token again. To get rid of the bot for good, delete it in BotFather (
/deletebot).
Slack
With Pro, your team answers chats from a Slack channel. Each request for a person (or every new chat, if you choose) arrives in the channel with Take, Resolve and Open buttons, and the conversation continues in its thread: what the visitor writes appears there, and what you reply in the thread reaches the visitor.
You do not create anything in Slack: the Slack app belongs to Digital Checkmark, and our server posts for your site and passes the replies back, signed for your site only. If your site cannot be reached for a moment, the server keeps the replies and the site picks them up every minute.
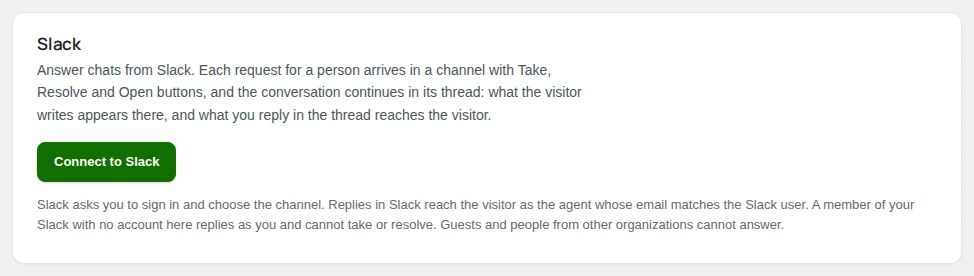
Connect the channel Required
- Go to Chatbot Chk > Integrations, Slack card, and press “Connect to Slack”. The page takes you to Slack (if it does not, press “Continue to Slack”).
- In Slack, sign in to your workspace if it asks, pick the channel where the chats should arrive and press Allow.
- Slack sends you back to the card, which says “Slack is connected.” and which channel it posts to.
If you press Cancel in Slack, the card says the connection was cancelled and nothing changes.
Private channel: invite the bot (only if the card asks)
If the card warns that Chatbot Chk is not in the channel yet, replies in its threads do not reach the visitor. In Slack, open that channel and type /invite @Chatbot Chk, then reload the card. This happens mostly with private channels.
Choose when to post Recommended
Under “Post to Slack”, choose one and press “Save”:
- “When a visitor asks for a person”: only the chats that need your team. This is how it comes.
- “Every new chat (you can step in while the bot answers)”: every chat opens a thread when the visitor writes their first message, so you can read along and answer before anyone asks.
In both modes, a new contact (the visitor leaves their email) or a rating of a chat with a thread arrives as a line in that thread.
Make sure each person can answer (required to answer)
Slack tells the site who wrote by their email. Each person who answers from Slack needs an account on this site, administrator or agent, with the same email as their Slack account. Then:
- Their replies reach the visitor with their name, and Take and Resolve work for them, with the same rules as in Support.
- A member of your Slack with no account on the site replies as the administrator who connected Slack, and cannot take or resolve.
- Guests and people from other organizations cannot answer.
Send a test
Press “Send test”. The channel gets the message “Chatbot Chk is connected to this channel” and the card says “Test sent. Check the channel in Slack.” If Slack refuses it, the card says why: usually the bot is not in the channel (step 2) or the app was removed from your Slack (connect it again).
Work from the channel
- The main message says what happened (“A visitor asks for a person” or “New chat”), the visitor’s last line, the page and the buttons Take, Resolve and Open in WordPress. When someone takes or resolves the chat, the main message changes to say who.
- The thread gets each line of the chat: the visitor, the bot, replies written in WordPress, a new contact and the rating.
- To answer, reply in the thread. Mentions are removed and links reach the visitor as plain text with their address.
- When a resolved chat starts again, a new main message arrives instead of adding to the old thread.
- The language of the messages is that of the administrator who connected Slack.
Slack also counts for the “Talk to a human” button: while Slack is connected, the chat offers it (see Integrations).
Change the channel or disconnect
Press “Disconnect” and confirm. Chats stop going to the channel; what is already there stays. To use another channel, disconnect and connect again, picking the new channel in Slack.
Microsoft Teams
With Pro, the chat events you pick arrive in a Teams channel as a card: what happened, the contact, the page, the visitor’s last messages and a button that opens the conversation in Support. Teams only gets the alerts: the answer is written in Support or in the app. Teams receives them through a flow of its Workflows app; you create it in two minutes and paste its address in WordPress.
On Free and Starter you can connect the channel already; nothing is sent until the site has a Pro license. The old Teams connector addresses (webhook.office.com) stopped working in May 2026 and the card does not accept them.
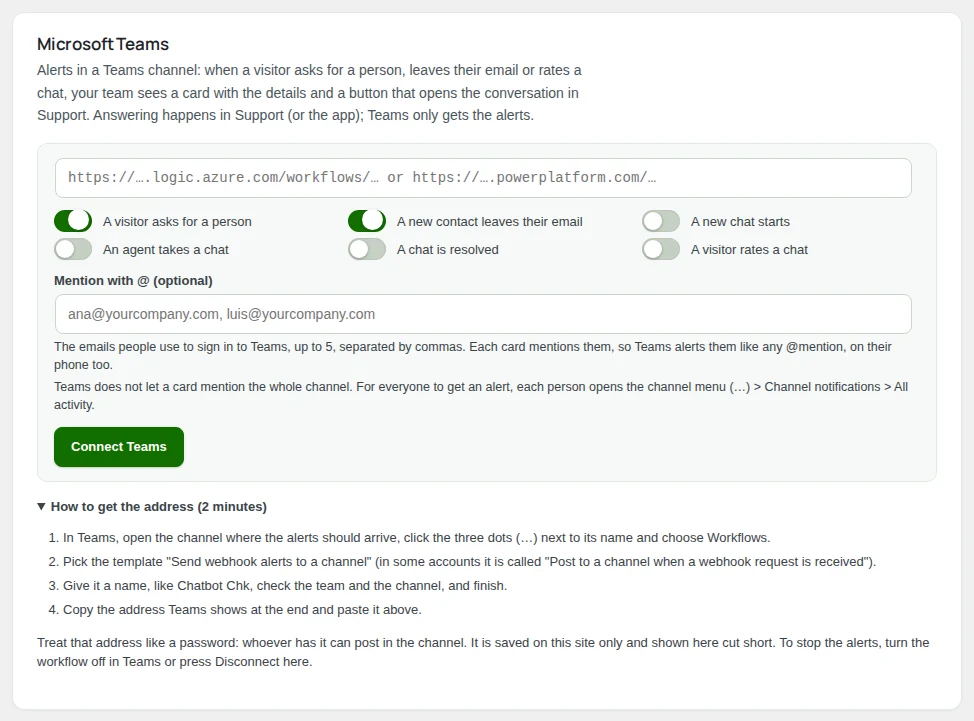
Create the flow in Teams Required
- In Teams, open the channel where the alerts should arrive, click the three dots (…) next to its name and choose Workflows.
- Pick the template Send webhook alerts to a channel. In some accounts it is called Post to a channel when a webhook request is received.
- Give it a name, like Chatbot Chk, check the team and the channel, and finish.
- Teams shows an address at the end. Copy all of it: it starts with https:// and has
logic.azure.comorpowerplatform.comin it.
Treat that address like a password: whoever has it can post in the channel. In the flow, “Post as” must be Flow bot: Teams never alerts you about your own posts.
Paste the address and connect Required
- Go to Chatbot Chk > Integrations, Microsoft Teams card. If the steps are closed, “How to get the address (2 minutes)” opens them.
- Paste the address in the field.
- Tick the events. “A visitor asks for a person” and “A new contact leaves their email” come ticked; “A new chat starts” fires for every visitor. See the events.
- Press “Connect Teams”.
The card sends a test card to the channel right away and says “Connected. A test card was sent to the channel: check Teams.” If it says Teams did not accept the card, check that you copied the whole address and that the flow is on in Teams.
Mention people with @ Recommended
Teams does not alert anyone about a new post in a channel, only about mentions. So that the right people get a phone alert:
- In “Mention with @ (optional)”, write the emails people use to sign in to Teams, separated by commas, up to 5.
- Press “Save”. Each card then mentions them by name (the name of the site user with that email, or the part before the @).
- To stop mentioning someone, press the × next to their name.
If something you typed is not an email, or goes over 5, the card says so and leaves it out. Teams does not let a card mention the whole channel: for everyone to get an alert, each person opens the channel menu (…) > Channel notifications > All activity. On the phone, in Teams > Settings > Notifications, an option like “Only when I’m not active on desktop” silences the phone while the computer is open.
What the card shows
The title (“A visitor asked for a person”, “New contact from the chat” and so on), the site and chat number, the mentions, the contact, the agent, the rating, the page, the language and, for a request, a new contact or a new chat, the visitor’s last three messages. The button “Open in Support” opens the conversation in WordPress. The card is in the site’s language. A visitor’s text always arrives as plain text: it cannot turn into a link or formatting in your channel.
A delivery that fails is tried again 2 and 15 minutes later, like webhooks; “Last delivery:” on the card shows the last result.
Change, pause, test or disconnect
Once connected, the card shows the address cut short, after “Workflow address:”.
- Replace the address: paste a new one in the field and press “Save”. Leave the field empty to keep the current one.
- Pause: untick On and press “Save”. The badge says “Paused”.
- Test: “Send test” posts “Chatbot Chk is connected to this channel” in the channel.
- Disconnect: “Disconnect”, and confirm. You can also turn the flow off in Teams.
With “A visitor asks for a person” ticked and On, Teams also counts for the “Talk to a human” button (see Integrations).
HubSpot
With Pro, every contact the chat collects is created or updated in your HubSpot, by email, with a note saying where they wrote from and a link to the conversation. When a chat with a known contact is resolved, the whole conversation is added to that contact too. The free HubSpot CRM is enough. HubSpot only gets contacts: it sends no alerts and nobody answers from there.
On Free and Starter you can save the key already; nothing is sent until the site has a Pro license.
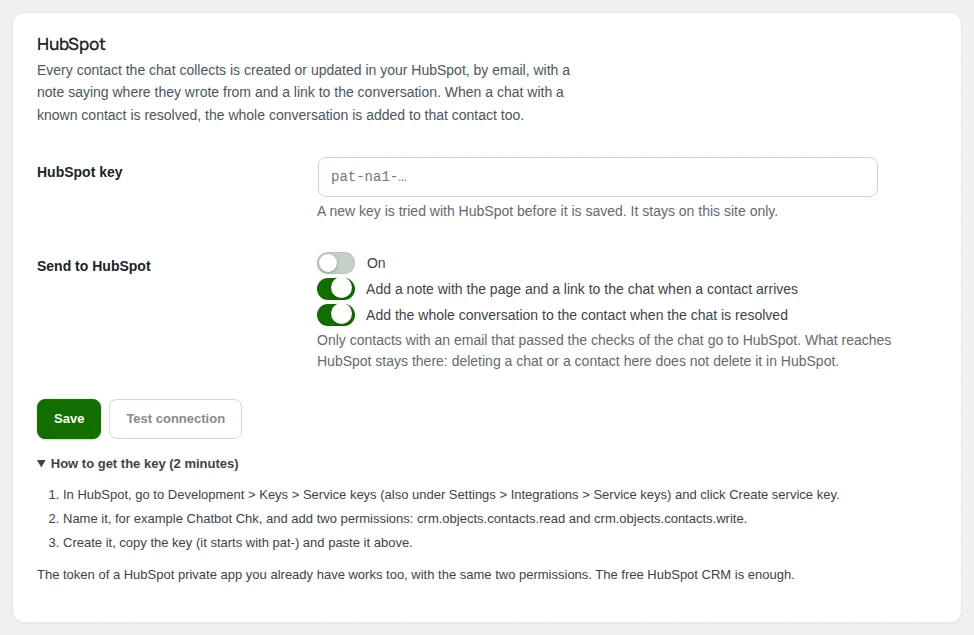
Create the key in HubSpot Required
- In HubSpot, go to Development > Keys > Service keys (it is also under Settings > Integrations > Service keys) and click Create service key.
- Name it, for example Chatbot Chk.
- Add two permissions:
crm.objects.contacts.readandcrm.objects.contacts.write. - Create it and copy the key. It starts with
pat-.
The token of a HubSpot private app you already have works too, with the same two permissions.
Paste it and turn it on Required
- Go to Chatbot Chk > Integrations, HubSpot card.
- Paste the key in “HubSpot key”.
- Under “Send to HubSpot”, tick On. It comes off: without it nothing is sent.
- Press “Save”.
A new key is tried with HubSpot before it is saved, so a wrong one never replaces one that works. If HubSpot accepts it, the card says “Saved. HubSpot accepted the key.” If not, it says why (the key was not accepted, or a permission is missing) and “Nothing was changed.”
The key stays on this site only, and the card shows only its last four characters. To change it, paste a new one; leave the field empty to keep it. To remove it, tick “Remove the saved key” and press “Save”. A developer can also set it in wp-config.php with the constant CHK_HUBSPOT_TOKEN, which wins over the saved one.
Choose the notes Optional
Both come ticked:
- “Add a note with the page and a link to the chat when a contact arrives”: a note on the contact with the site, the page, the language and a link to the chat.
- “Add the whole conversation to the contact when the chat is resolved”: a note with every message of the chat, once per resolution.
Test the connection
Press “Test connection”. It reads one contact from your HubSpot, which proves the key and the read permission. The answer shows at the top of the card. The button works once a key is saved.
What reaches HubSpot
- The contact: found by email and created if it is new. The name the visitor typed is split into first name and last name. An empty name never erases one already in HubSpot.
- Only real contacts: only emails that passed the chat’s checks go to HubSpot.
- Retries: a call that fails because HubSpot did not answer is tried again 2 and 15 minutes later. “Recent calls to HubSpot” lists the last results (never the content), and “Last call:” shows the last one.
- Deleting: what reaches HubSpot stays there. Deleting a chat or a contact on this site does not delete it in HubSpot.
Webhooks
With Pro, webhooks send chat events to another app the moment they happen: Zapier, Make, n8n, your CRM, or a Slack channel (paste its incoming webhook address). Each event is a POST with a JSON body, signed so the receiver can tell it came from your site. You can have up to 5 addresses, each with its own events and its own signing secret. For Microsoft Teams, use its own card.
On Free and Starter you can add addresses already; nothing is sent until the site has a Pro license.
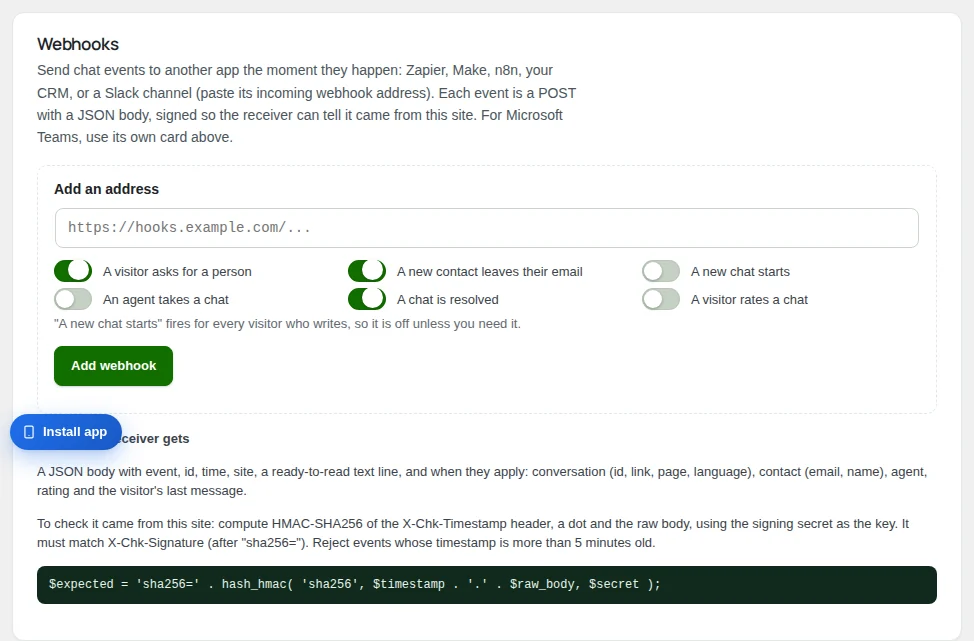
Get the address of the receiver Required
The receiver is the app that gets the events. It gives you an address (see step 7 for Zapier, Make and n8n). It must be a full https:// address that can be reached from the internet: addresses on your own network are refused. Any port works (a self-hosted n8n on port 5678, for example).
Add the address Required
- Go to Chatbot Chk > Integrations, Webhooks card, “Add an address”.
- Paste the address.
- Tick the events. “A visitor asks for a person”, “A new contact leaves their email” and “A chat is resolved” come ticked. “A new chat starts” fires for every visitor who writes, so it comes off. See the events.
- Press “Add webhook”.
Copy the signing secret (required to check the signature)
Right after you add it, the card shows “Webhook added. This is its signing secret.” Press “Copy” and keep it in your receiver: it will not be shown again. Later the card shows only its end (“Signing secret ending in”).
If you lose it, or think someone else has it, press “New secret”. The old one stops working at once, so the receiver rejects events until you give it the new one.
Send a test
Press “Send test”. The address gets a test event, whatever events it has. The card says “Test sent. The receiver answered” and the code it got (200 when all is well), and “Last delivery:” and “Recent deliveries” show the result. A failure says why in plain words, such as “No answer within 5 seconds”, “Address not found” or “Could not connect”; hover over it for the technical message.
Check the signature in the receiver Recommended
Each POST carries these headers:
| Header | What it has |
|---|---|
X-Chk-Event |
The event, such as handoff.requested. |
X-Chk-Delivery |
One id per delivery, the same on every retry: use it to drop duplicates. |
X-Chk-Timestamp |
When it was sent, in seconds since 1970 (Unix time). |
X-Chk-Signature |
sha256= followed by the signature, in hexadecimal. |
User-Agent |
ChatbotChk/ with the plugin version and your site’s address. |
To check that an event came from your site: compute HMAC-SHA256 of the X-Chk-Timestamp header, a dot and the raw body, with the signing secret as the key. It must match X-Chk-Signature after sha256=. Use the body exactly as it arrived, before parsing it: a body read as JSON and written again no longer matches. Reject events whose timestamp is more than 5 minutes old.
In PHP:
$raw    = file_get_contents('php://input');
$ts     = $_SERVER['HTTP_X_CHK_TIMESTAMP'] ?? '';
$sig    = $_SERVER['HTTP_X_CHK_SIGNATURE'] ?? '';
$secret = 'your signing secret';
$expected = 'sha256=' . hash_hmac('sha256', $ts . '.' . $raw, $secret);
if (!hash_equals($expected, $sig) || abs(time() - (int) $ts) > 300) {
    http_response_code(401);
    exit;
}
$event = json_decode($raw, true);
http_response_code(200);
In Node.js (Express), with the raw body:
const crypto = require('crypto');
app.post('/chatbot', express.raw({ type: 'application/json' }), (req, res) => {
  const ts = req.get('X-Chk-Timestamp') || '';
  const sig = req.get('X-Chk-Signature') || '';
  const expected = 'sha256=' + crypto.createHmac('sha256', process.env.CHK_SECRET)
    .update(ts + '.').update(req.body).digest('hex');
  const same = sig.length === expected.length &&
    crypto.timingSafeEqual(Buffer.from(sig), Buffer.from(expected));
  if (!same || Math.abs(Date.now() / 1000 - Number(ts)) > 300) return res.sendStatus(401);
  const event = JSON.parse(req.body);
  res.sendStatus(200);
});
In Python (Flask):
import hashlib, hmac, time
from flask import request, abort
raw = request.get_data()
ts = request.headers.get('X-Chk-Timestamp', '')
sig = request.headers.get('X-Chk-Signature', '')
expected = 'sha256=' + hmac.new(SECRET.encode(), ts.encode() + b'.' + raw, hashlib.sha256).hexdigest()
if not hmac.compare_digest(expected, sig) or abs(time.time() - int(ts or 0)) > 300:
    abort(401)
Answer with any 2xx code within 5 seconds. A redirect, an error code or no answer counts as a failure.
What the receiver gets
A JSON body. The fields that do not apply to an event are left out.
| Field | What it has |
|---|---|
event |
handoff.requested, lead.created, conversation.started, conversation.claimed, conversation.resolved, conversation.rated, or test for the test. |
id |
A unique id for the event. |
time |
When it happened, in ISO 8601 and UTC. |
site |
name and url of your site. |
text |
One ready-to-read line in the site’s language, with the link to the chat. A Slack incoming webhook shows it as it is. |
conversation |
id, url (the chat in Support), page (where the visitor was) and lang. |
contact |
email and name, when a contact leaves their email. |
agent |
id and name, when someone takes or resolves the chat. |
rating |
From 1 to 5, when the visitor rates the chat. |
message |
The visitor’s last message, up to 1,000 characters. |
Connect it to Zapier, Make or n8n
- Zapier: create a Zap with the trigger Webhooks by Zapier and the event Catch Hook. Copy the address Zapier gives you, add it in Chatbot Chk and press “Send test”. Back in Zapier, test the trigger: it shows the fields above, ready for the next steps (a row in a sheet, an email, your CRM).
- Make: create a scenario that starts with Webhooks > Custom webhook, add a new webhook and copy its address. Add it in Chatbot Chk and press “Send test” while Make is waiting for data: Make learns the fields from it.
- n8n: add a Webhook node with the method POST and copy its Production URL. Add it in Chatbot Chk and turn the workflow on (the test address only works while n8n is listening). A self-hosted n8n must be reachable from the internet with https://.
- A Slack channel without the Slack integration: create an incoming webhook in Slack and paste its address. The channel shows the
textline of each event. To answer from Slack, use the Slack integration instead.
In these apps the address itself is hard to guess. To check the signature too, you need a step that reads the raw body and computes the HMAC, as in step 5.
Retries, changes and deleting
- Retries: a failed event is tried again 2 and 15 minutes later, with the same
X-Chk-Delivery. Until then it waits in WordPress’s scheduled tasks. An address that failed in the last 15 minutes is not tried right away: its events wait a minute in the scheduled tasks. “Recent deliveries” keeps only the result of each delivery, never its content. - Change or pause: edit the address or the events, untick On to pause, and press “Save”.
- Delete: “Delete”, and confirm. Its pending retries go too. Deleting a conversation also deletes its pending retries.
A webhook that is On with “A visitor asks for a person” ticked counts for the “Talk to a human” button (see Integrations).
Leads Chk
Leads Chk is a separate plugin, on every plan, where every contact of the site lands: lists, consent, newsletters and automations. Chatbot Chk works the same without it. When it is installed, two things change:
- The contacts also go to Leads Chk. An email left in the chat (in the form, with the one-time code, or typed in the chat) becomes a contact in Leads Chk, with the page it came from, the conversation language and a link back to the whole conversation. The chat keeps its own list in Chatbot Chk > Leads too.
- Leads Chk popups can wait. While the chat is open, popups that would open on their own can stay closed, so they do not cover the conversation.
The chat calls Leads Chk, never the other way round. What happens to each address next (contact only, newsletter, which list) is the same question for every plugin, so Leads Chk answers it: the settings on this card are those of Leads Chk, and its own Integrations screen shows the same ones.
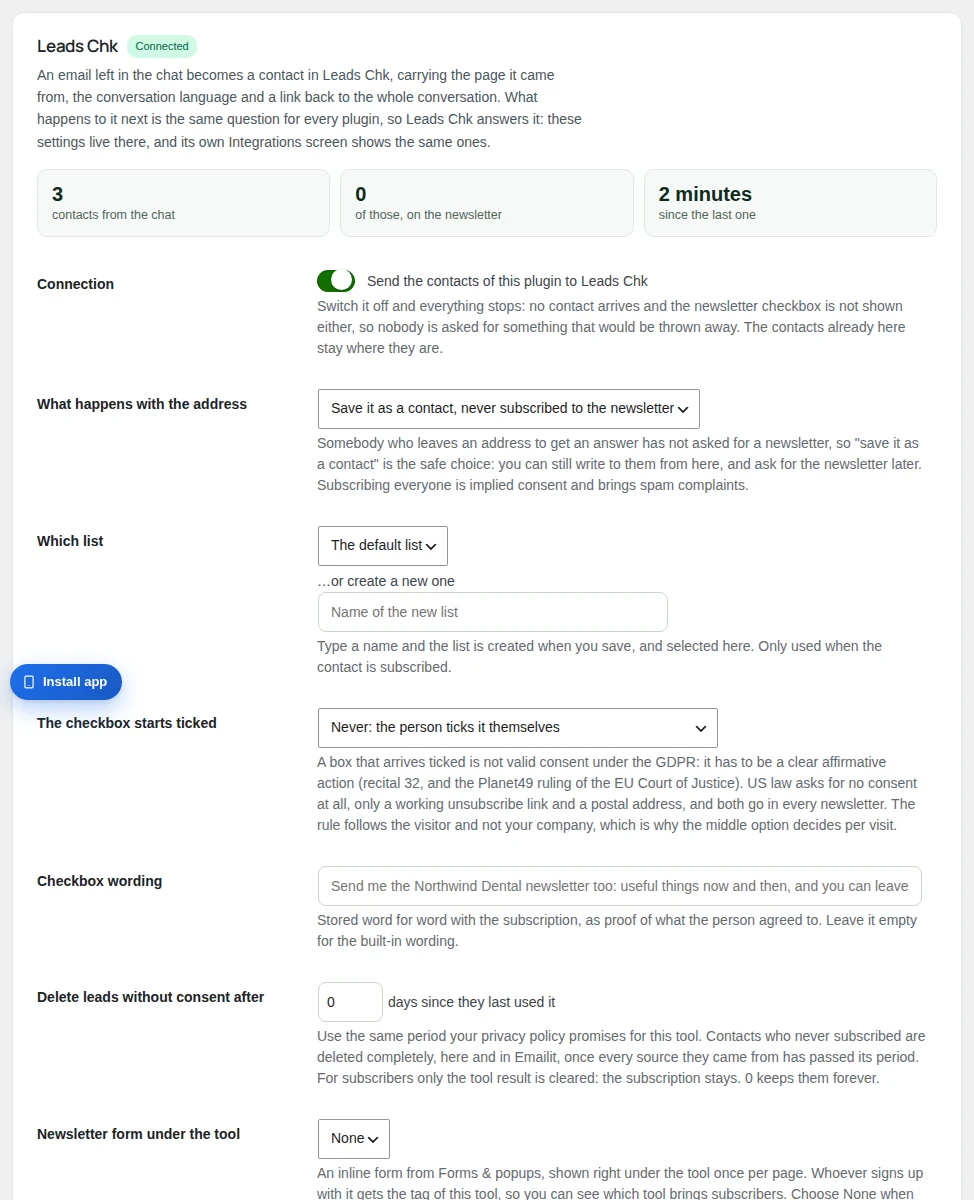
Install Leads Chk Required
If the card says “Not installed”, press “Go to Plugins”, install Leads Chk and activate it. Back in Chatbot Chk > Integrations, the Leads Chk card shows its settings and how many contacts came from the chat (“contacts from the chat”, “of those, on the newsletter” and “since the last one”).
Turn on the connection Required
In Connection, tick Send the contacts of this plugin to Leads Chk. The badge says “Connected”. Untick it and everything stops: no contact arrives and the newsletter checkbox is not shown either. The contacts already in Leads Chk stay.
Choose what happens with the address Required
In What happens with the address, choose one:
- Save it as a contact, never subscribed to the newsletter: the safe choice. Someone who leaves an address to get an answer has not asked for a newsletter. You can still write to them from Leads Chk.
- Save it, and offer the newsletter with a checkbox: the chat’s email form shows a checkbox for the newsletter.
- Save it and subscribe it to the newsletter: everyone is subscribed. It is implied consent and brings spam complaints.
The checkbox needs a form to live in. If the capture mode in Settings is Silent (addresses are picked up from what the visitor types, with no form), the card warns that nobody can tick it, with a link “Change the capture mode in Settings”.
The list and the checkbox Optional
- Which list: the list for those who subscribe. Or type a name under …or create a new one and the list is created when you save.
- The checkbox starts ticked: Never, everywhere except Europe (decided per visit by the visitor’s country), or always. A box that arrives ticked is not valid consent in Europe.
- Checkbox wording: your own text next to the checkbox, stored word for word as proof of what the person agreed to. Leave it empty for the built-in wording.
- Delete leads without consent after: days after which contacts who never subscribed are deleted. 0 keeps them forever.
- Newsletter form under the tool: this setting is for the other tools; the chat does not show a form under it.
Hold back popups during the chat Recommended
In “Popups during the chat”, tick “Do not show Leads Chk popups while the chat is open”. While the chat window is open, or a person is handling the conversation, popups that would open on their own (after a delay, on scroll or on exit) stay closed. One held back this way can still show on a later page. It needs Leads Chk 1.9.4 or later.
Save and check
Press “Save”. If you typed a new list, the card says “Saved, and the new list was created.” To see the contacts, press “See these contacts in Leads Chk”. There, the source is called “Site chat”, each contact says on which page they wrote (“Chat on” and the page title) and has a button to open the conversation, and the tags tool:chat, via: (how the address was left) and email:personal or email:business let you filter them. A contact who confirmed the address with the one-time code is not asked to confirm it again by email.
Agents
Agents are the people who answer when a visitor asks for a person. Each agent is a real WordPress user with a restricted role (chk_support_agent): they work in Support and nowhere else. Manage them under Chatbot Chk > Agents; only administrators see this screen.
The screen has, from top to bottom: the visitor satisfaction of the last 30 days, the list of agents, the forms to add one, and the email alerts with what agents can see. “Open queue” at the top opens Support.
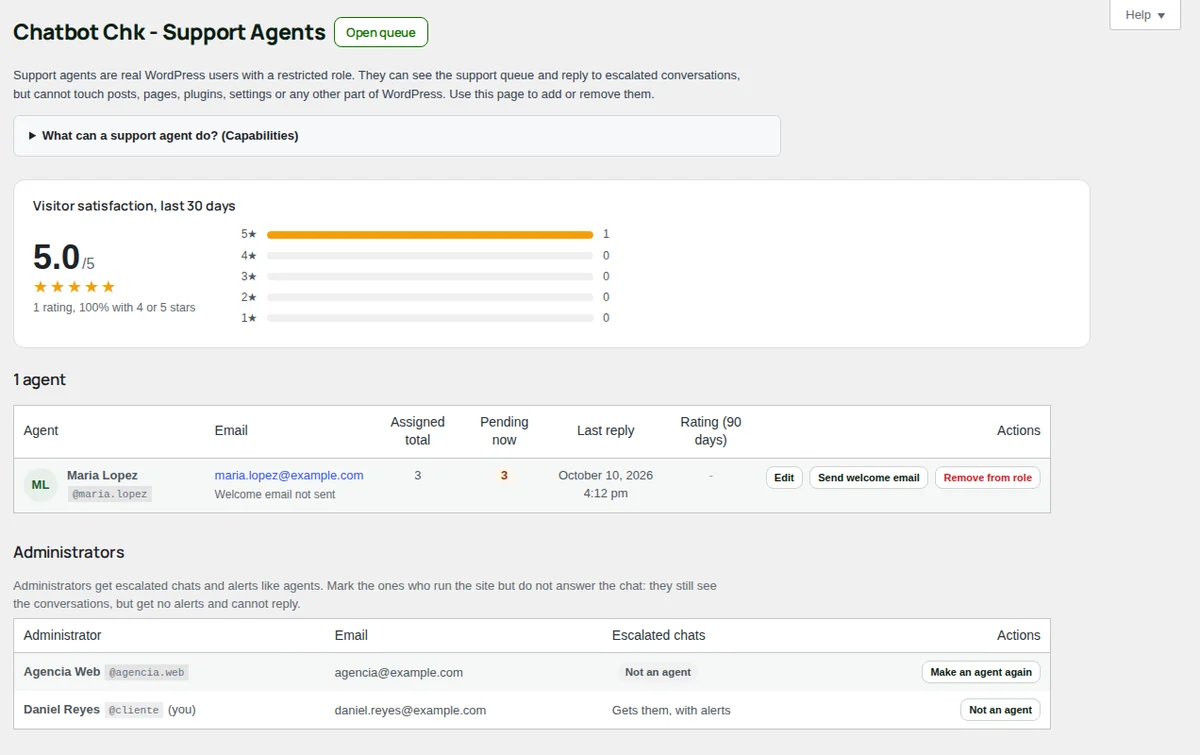
What an agent can and cannot do
Open “What can a support agent do? (Capabilities)” on the screen to see the full list.
Can
see the Support queue and open the chats that wait for a person and are free or theirs. Take a chat, reply, resolve it and use Saved replies. Edit their own profile (photo, password, email). With Pro, install the app and turn on push notifications.
Cannot
open posts, pages, media, comments, plugins, users, tools or settings, or any other Chatbot Chk screen. Open chats assigned to another agent, chats that never asked for a person or resolved chats, unless you allow it (see below). Deactivate or update anything.
When an agent signs in, WordPress takes them straight to Support; their Dashboard is hidden. Administrators answer chats with the same tools and always see every conversation.
Add an agent
Fill in the form
Under “Add a new support agent”, fill in “Username” (letters, numbers, underscores and hyphens only), “Email”, “First name” and “Last name”. The email cannot belong to another user. Visitors see the first name next to the agent’s replies.
Keep the welcome email on
“Send a welcome email with a link to create their password” is on by default. Leave it on: the agent chooses their own password from the email. If you turn it off, the screen shows a random password once; share it through a secure channel and ask the agent to change it.
Press “Create support agent”
The agent appears in the list. Under their email you see “Welcome email sent” and how long ago, or “Welcome email not sent”.
A person who already has an account. Under “Promote an existing user”, choose them in “User” (any user who is not an administrator), keep “Send a welcome email” on and press “Promote to support agent”. Their other roles stay as they are.
The welcome email
The email goes out in the agent’s language (the language of their WordPress profile), with the subject “You have been added as a support agent on” and your site name. It has up to three steps:
- Create your password: the “Create my password” button and their username. The link works for 24 hours. A promoted user gets “Sign in with your account” and a “Set a new password” button instead.
- Open the support inbox: a link to Support, where the chats that wait for a person appear.
- Get notified on your phone: a link to install the app. Only with Pro, when the app is available.
To send it again, press “Send welcome email” or “Resend welcome email” in the agent’s row and confirm with “Send email”. The new link replaces the old one, which stops working. If the email fails, the screen says “The email could not be sent” and asks you to check the site email settings (SMTP).
Edit an agent
Press “Edit” in the agent’s row
A card opens above the list with “First name”, “Last name”, “Display name”, “Email” and “New password”.
Change what you need and press “Save changes”
Leave “New password” empty to keep the current one. A new password needs at least 10 characters; “Generate” writes a strong one. Setting a password signs the agent out everywhere. Easier: press “Email a password reset link” and confirm with “Send link”, so the agent chooses it.
“Full WordPress profile” opens the user in Users and “Close” closes the card.
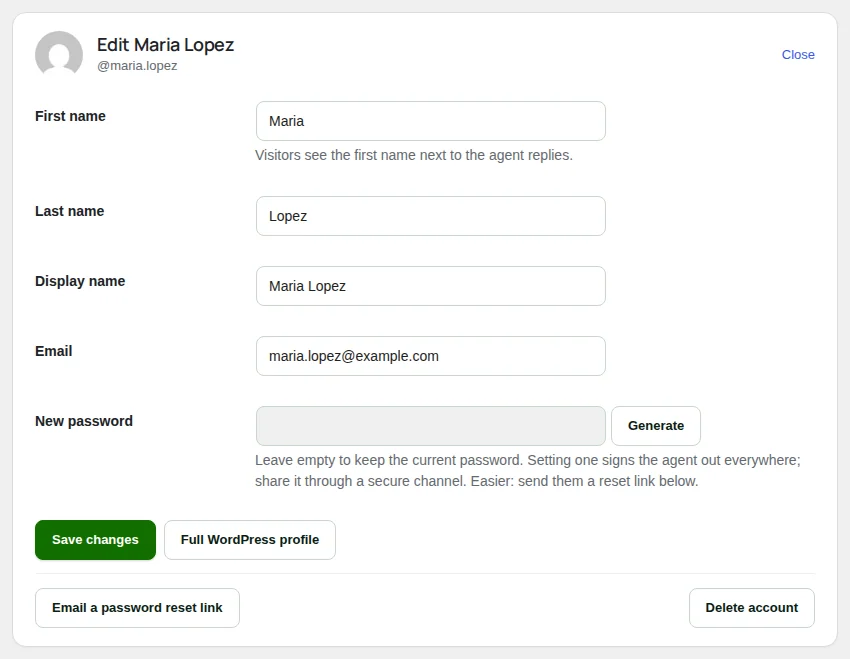
Remove an agent
- “Remove from role” (in the agent’s row): takes away the agent role only. The WordPress account stays, with its history, and you can promote it again later. The person leaves the list and stops getting alerts.
- “Delete account” (in the edit card): deletes the WordPress account for good. Their open chats go back to the queue; their past replies stay in the transcripts. It only works when the agent role is the only role of that account, and never on your own account. Otherwise the card says “This user has other roles on the site”; use “Remove from role” instead.
Administrators who do not answer the chat
Administrators get escalated chats and alerts like agents. When someone runs the site but does not answer the chat (the agency or developer who manages it, for example), mark them “Not an agent”: they get no email, push, Telegram or Slack alerts, are not shown as online and cannot be assigned, invited or given a transfer. They still see the conversations and the settings, but cannot reply or resolve until the mark is removed.
- For the other administrators: under Chatbot Chk > Agents, in Administrators, press “Not an agent” in their row. “Make an agent again” undoes it.
- For yourself: in Users > Profile, under Chatbot Chk, check “I am not an agent of this chat”.


If every administrator and agent is marked, or has no email, nobody gets escalated chats and visitors are no longer offered a person. Agents then shows “Nobody will get escalated chats.” at the top: add an agent, or make one of the administrators an agent again.
Agents on each plan
Free and Starter include 1 support agent. Pro, Agency and the Pro trial have unlimited agents, who can also invite each other to a chat and transfer it. Administrators always answer, on every plan, and do not count as agents, unless they are marked “Not an agent” (see Administrators who do not answer the chat).
On Free and Starter the screen shows “The Free and Starter plans include 1 support agent” with “See plans”. Creating or promoting a second agent stops with the same message.
If the site goes back to Free with several agents (for example when the Pro trial ends), every agent keeps their account, but only the oldest one answers. The others cannot open chats in Support, get no alerts, cannot be invited or receive transfers and do not count as online. With Pro again, they all answer. See Plans.
Ratings per agent
When an agent marks a chat as resolved, the visitor is asked to rate the help from 1 to 5 stars, with an optional comment. Turn it on or off with “Ask them to rate the help” in the setup assistant.
- “Visitor satisfaction, last 30 days”: the average, the number of ratings, the share with 4 or 5 stars, and how many ratings got each number of stars.
- “Rating (90 days)”: in the list, each agent’s average and number of ratings over the last 90 days.
The list also shows “Assigned total” (every chat the agent was assigned), “Pending now” (their chats still open) and “Last reply”.
The chat photo
Visitors see the photo of the person who answers. Each agent and administrator sets their own:
Open Users > Profile
Find the “Chat photo” section.
Upload the photo
In “Photo shown to visitors”, choose a square JPG, PNG or WebP image of up to 2 MB, then press Update Profile. The photo is served from your site, never from Gravatar. Without a photo, the chat shows the person’s initials. To take it away, check “Remove photo” and save.
An administrator can set the photo of an agent from Users > Edit, or with “Full WordPress profile” in the edit card. The same photo shows in the list of agents.
Email alerts
At the bottom of the screen, choose who gets an email and what agents can see. Press Save Changes when you are done.
- “Email alert when a visitor asks for a person”: with “Enabled”, a summary of the conversation goes to “Destination email” (empty means the site admin email), with the “Sender name” you choose.
- “Email agents on new escalation”: each agent gets an email with the last messages and a direct link to the chat. Turn it off if your team only watches Support.
- “Support queue alerts”: when the email alert above is off and neither Telegram, Slack nor a webhook took the request, agents and administrators get an email (and a push notification, with the app) so no request is missed.
- “Email subject”: the subject of the email to agents. You can use
{site_name},{site_url}and{conv_id}. - Email “From” name: the name recipients see as the sender.
If “Support queue alerts” is off and no other channel is set up (email alert, Telegram, Slack, Teams or a webhook), the chat does not offer visitors a person.
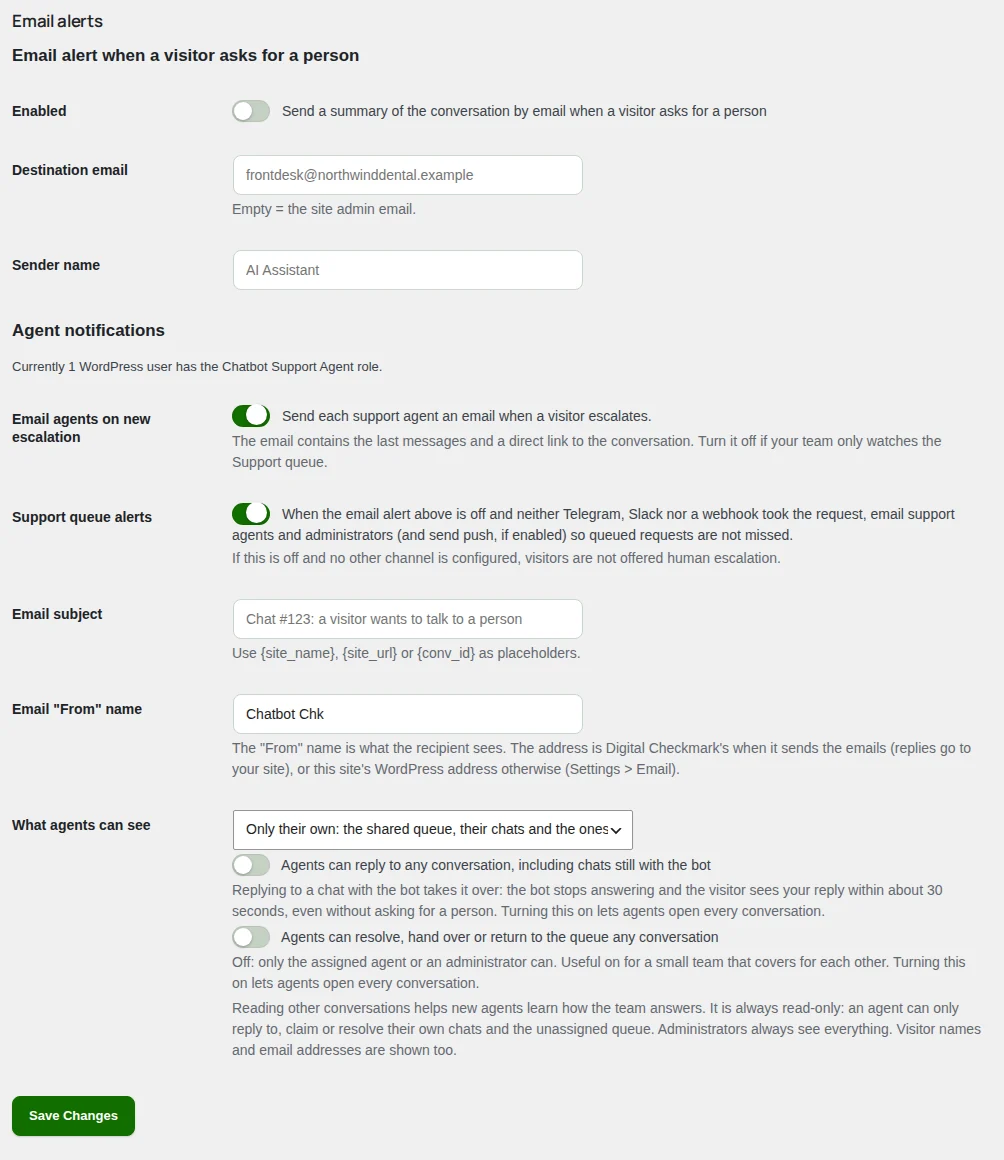
What agents see and what they can do
In “What agents can see”, choose one:
- “Only their own”: the shared queue, their chats and the chats they are invited to. This is the default.
- “Also the team’s”: they also read the other agents’ conversations.
- “Everything”: they also read the chats that only talked to the bot.
Reading other conversations is always read-only and helps new agents learn how the team answers. Visitor names and email addresses show too. Two more options let agents act on any chat:
- “Agents can reply to any conversation”: including chats still with the bot. Replying takes the chat over: the bot stops answering and the visitor sees the reply within about 30 seconds, even without asking for a person.
- “Agents can resolve”: resolve, hand over or return to the queue any conversation. Off, only the assigned agent or an administrator can. Useful for a small team that covers for each other.
Turning on either of these two lets agents open every conversation.
Mobile app
With Pro, your team can install the Support Inbox: the Support screen as an app on a phone or a computer. It opens straight on the queue, uses the normal WordPress login and, with push notifications on, alerts you when a visitor asks for a person, even with the app closed. Find it under Chatbot Chk > Mobile app; administrators and agents both see it.
The screen shows only with Pro (also Agency and the Pro trial) and when the server runs PHP 8.2 or newer, which push notifications need. Otherwise Settings > Push notifications says what is missing. Push notifications also need the site on HTTPS.
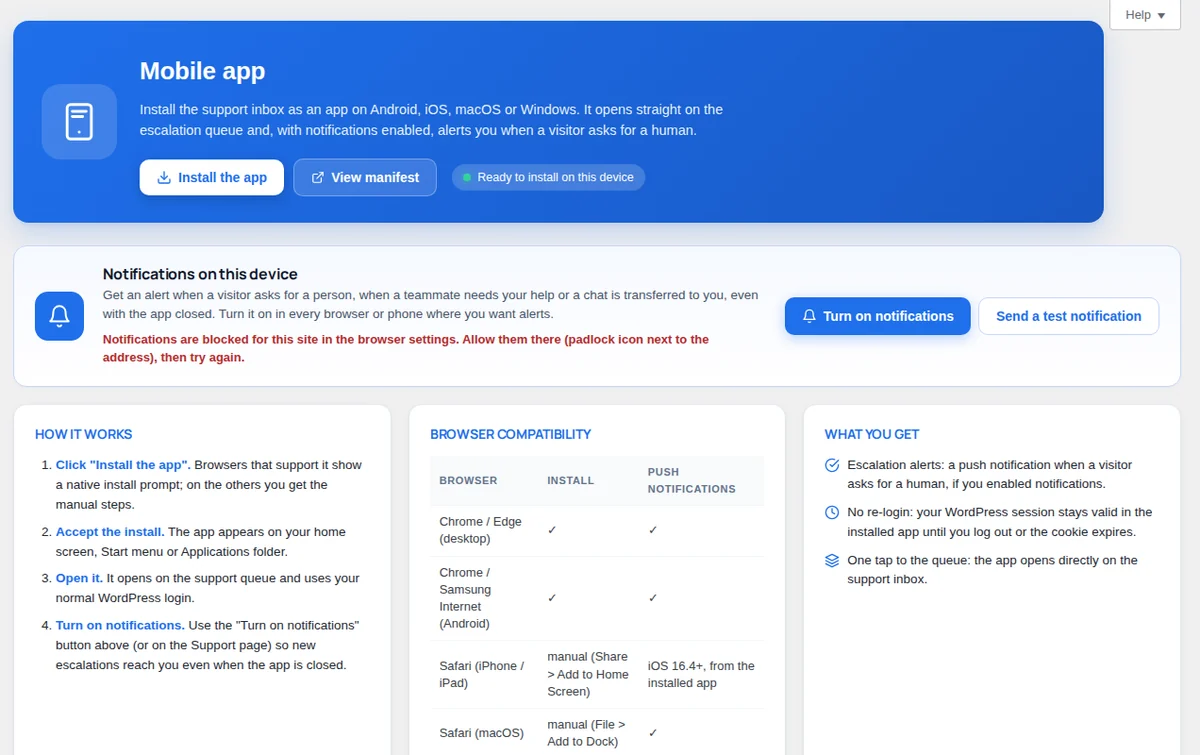
Install the Support Inbox
Open Chatbot Chk > Mobile app on the phone or computer where you want the app, signed in with your WordPress account. Next to the buttons, a line says whether this browser can install it (“Ready to install on this device”, for example). Then follow the row of your device:
| Device | How to install | Push notifications |
|---|---|---|
| iPhone or iPad | In Safari, tap the Share button and choose Add to Home Screen | iOS 16.4 or newer, only from the app on the Home Screen |
| Android | Press “Install the app” and accept, or open the browser menu and choose Install app or Add to Home screen (Chrome, Samsung Internet or Firefox) | Yes |
| Windows or Mac | Press “Install the app”, or the install icon in the address bar (Chrome or Edge). In Safari on a Mac: File > Add to Dock | Yes |
The app appears on the home screen, the Start menu or the Applications folder. Open it: it shows the queue of Support. If it asks you to log in, do it once; the session keeps you signed in until you log out. Firefox on a computer cannot install the app, but it gets push notifications in the browser.
Shortcuts. On Support, the banner “Get the Support Inbox on your phone” has “Install now” (it opens this screen) and “Dismiss” (it hides the banner for 7 days). An “Install app” button also shows at the bottom left of the other plugin screens, except inside the installed app.
Turn on push notifications
An administrator turns them on for the site
Under Settings > Push notifications, check “Enable browser push” and save. Until then, the Mobile app screen says “Push notifications are turned off for this site.”
Each person turns them on on each device
On Mobile app (or on Support), press “Turn on notifications” and allow notifications when the browser asks. Do it in every browser and phone where you want alerts. On an iPhone or iPad, do it inside the installed app.
Send a test
Press “Send a test notification”. The screen says “Test sent. It should appear in a few seconds.” and the test arrives on that device. “Turn off notifications” stops them on that device only.

If the screen says the notifications are blocked, allow them for the site in the browser settings (the padlock icon next to the address) and try again. If it says “Nothing was sent”, turn notifications off and on again in that browser.
What arrives
| A visitor asks for a person | “New chat escalation”, with the site name and the chat number. Outside business hours the team gets the email instead, so no push wakes anyone up at night. |
| A teammate needs you | a teammate asks for your help in a chat, transfers a chat to you or leaves a chat that is now yours. |
| A chat is back in the queue | someone returned it and the visitor is waiting for a person. |
| A visitor is waiting | the wait alert, when nobody has answered for too long. |
| A chat starts | with Live, if you chose push in Support > Live on the site, an alert when a visitor starts talking to the bot. |
Tap a notification to open that chat in Support. Notifications go to the administrators and agents who turned them on.
Brand the app
Under Chatbot Chk > Branding, the section “Support Inbox app (installable)” sets how the app looks once installed:
- “App name”: shown in the install prompt, the app switcher and the splash screen. Up to 45 characters. Empty, it is “Chatbot Chk – Support Inbox”.
- “Short name”: the label under the icon on the home screen. About 12 characters fit on most phones. Empty, it is “Support Inbox”.
- “Theme color”: the color of the app’s title bar. Check “Same as the chat bubble color” to follow the chat.
- “Background color”: the splash screen while the app opens. White by default.
- “App icon”: press “Choose icon” and pick a square PNG or JPG of at least 512 x 512 px. A simple logo with some space around it and a solid background works best (iPhone shows transparent areas as black). Without an icon, the app uses the built-in chat icon in the theme color.
“Preview” shows the home screen icon and the app window as you change them. Save the screen. Installed apps pick up the changes when the browser refreshes the app, which can take up to a day; reinstall the app to see them at once.
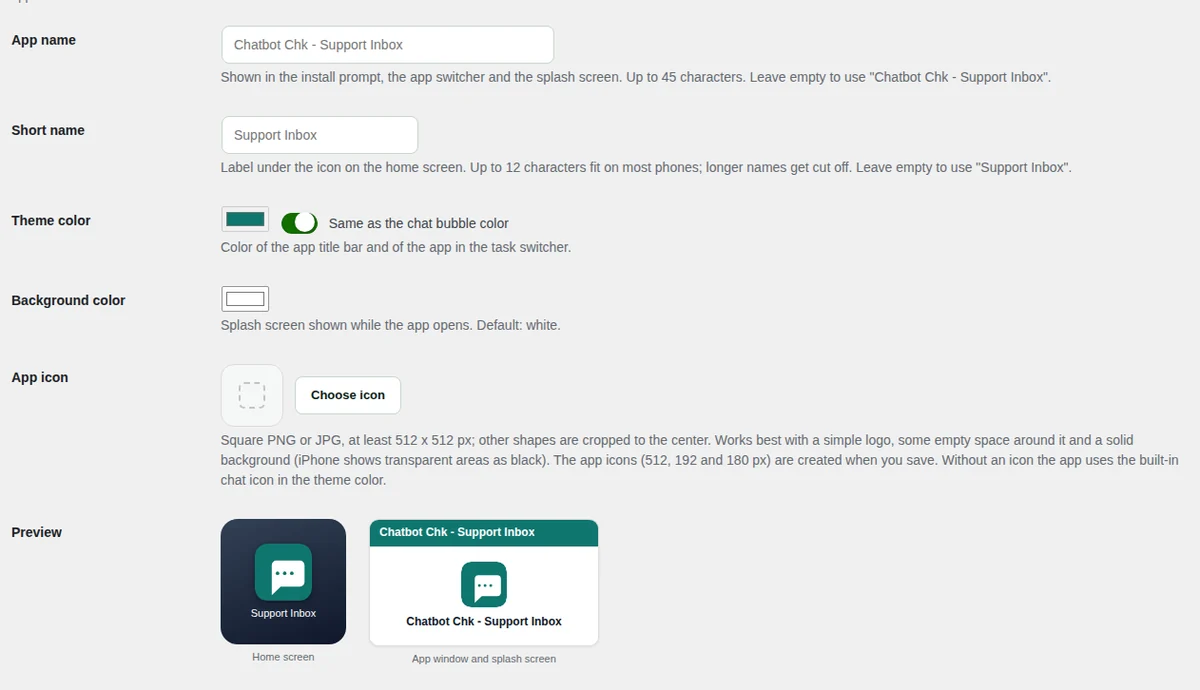
If the app does not work
- “The install button does nothing”: your browser has no install prompt (Safari, or Firefox on a computer). Use the steps in the table above.
- “The app asks me to log in”: log in to WordPress once inside the app.
- “I do not get notifications”: check that push notifications are on in Settings, that you turned them on in this browser or app, and that the phone or computer allows notifications for it.
- “How do I uninstall?”: long-press the app icon and remove it (iPhone, Android), or right-click and uninstall (Windows, Mac). The admin in the browser keeps working as usual.
About
Chatbot Chk > About shows what the plugin does in the version you have, checks your site and gives you the details our support needs. Only administrators see it.
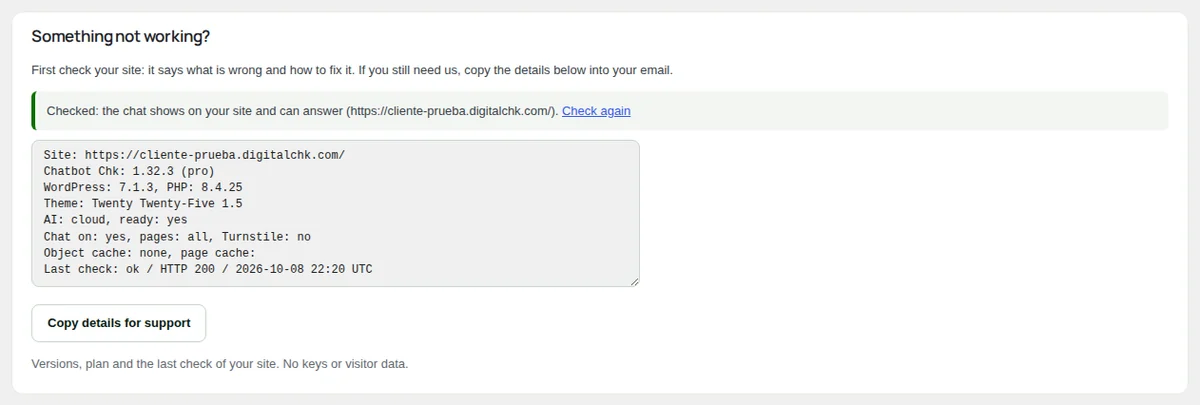
What the screen shows
The version
under the plugin name, the version installed on this site.
What it does
one card per area, “AI by Digital Checkmark”, “Visitor chat”, “Human support”, “Leads and insights”, “Integrations” and “Notifications and app”, with what each plan includes.
Security and Stack
how the plugin protects your site and your visitors, and what it runs on (WordPress, PHP, and PHP 8.2 or newer for the app and push notifications).
Recent changes
the notes of the last six versions, from the plugin readme. They are in English.
Something not working?
the last check of your site and the details for support (see below).
At the bottom, “Documentation” opens this guide, “Support” opens our support page and “Back to Settings” goes to Settings. A last line explains the “A tool by Digital Checkmark” line: Free and Starter show it under the chat and under the emails; with Pro you can hide it in Branding.
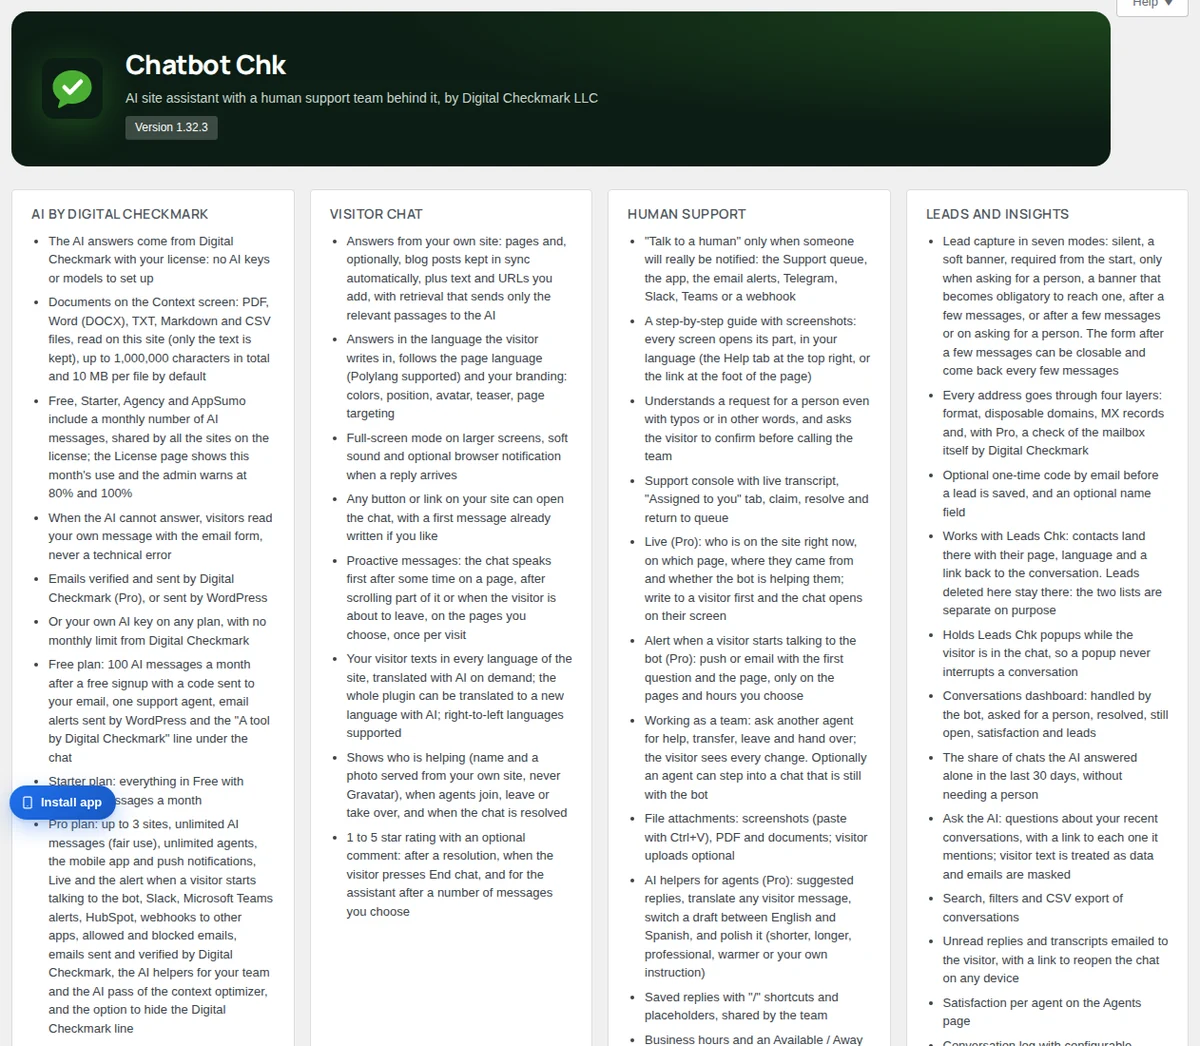
Check your site
Under “Something not working?”, the plugin says whether the chat shows on a page of your site and can answer. It checks once a day on its own and at the end of the setup assistant. Press “Check again” to run it now. When there is a problem, “How to fix it” opens the part of If something does not work that explains it.
Copy details for support
Press “Copy details for support”
The box above the button holds the details. It copies them in one click and says “Copied. Paste it in your email to support.”
Paste them in your email to us
See Getting help for where to write.
The details are: the site address, the Chatbot Chk version and plan, the WordPress, PHP and theme versions, where the AI comes from and whether it is ready, whether the chat is on (with its pages and Turnstile), the caches the site uses and the result of the last check. They never include keys, emails or visitor data.
Setup assistant
The setup assistant gets the chat ready in seven short steps, with a preview of the chat on the right of every step. It opens on its own once, right after you activate the plugin. It has no menu item; open it from:
- The notice on the Dashboard, on Plugins and on the plugin screens: “Set up your chat in a few minutes” with “Start the setup”, and later “Finish setting up your chat” with “Continue:” and the next step. “Remind me in 7 days” hides the notice for a week. The notice stays until you turn the chat on in the last step.
- Settings: “Run the setup again”, at the top of the screen.
The list on the left shows the seven steps, what each one has now, and a check mark on the steps already saved. Press “Save and continue” to go on, or “Back”. “Moving to another step saves what you changed here.” Each step saves only its own settings, the same ones the plugin screens use, so you can change everything later from those screens. Visitors do not see the chat until you turn it on in step 7.
AI
“Turn on the AI”: choose where the answers come from.
- “AI by Digital Checkmark”: on Free, confirm your email with the code we send you and you are done. With a license already active, the step says so.
- “I have a license key”: paste it in “License key” and press “Activate”. It is in the email you got after the purchase.
- “My own AI key”: choose the “Service” (Google Gemini, OpenAI, DeepInfra, OpenRouter or “Another OpenAI-compatible service”), check the “Address of the service” (it must start with https://), the “Model” and paste the “API key”. Press “Save my AI key”. The key is saved only on this site; you pay the service directly.
Press “Next”, or “Skip for now” to finish this later. Without an AI the bot cannot answer, but visitors can still leave their email.
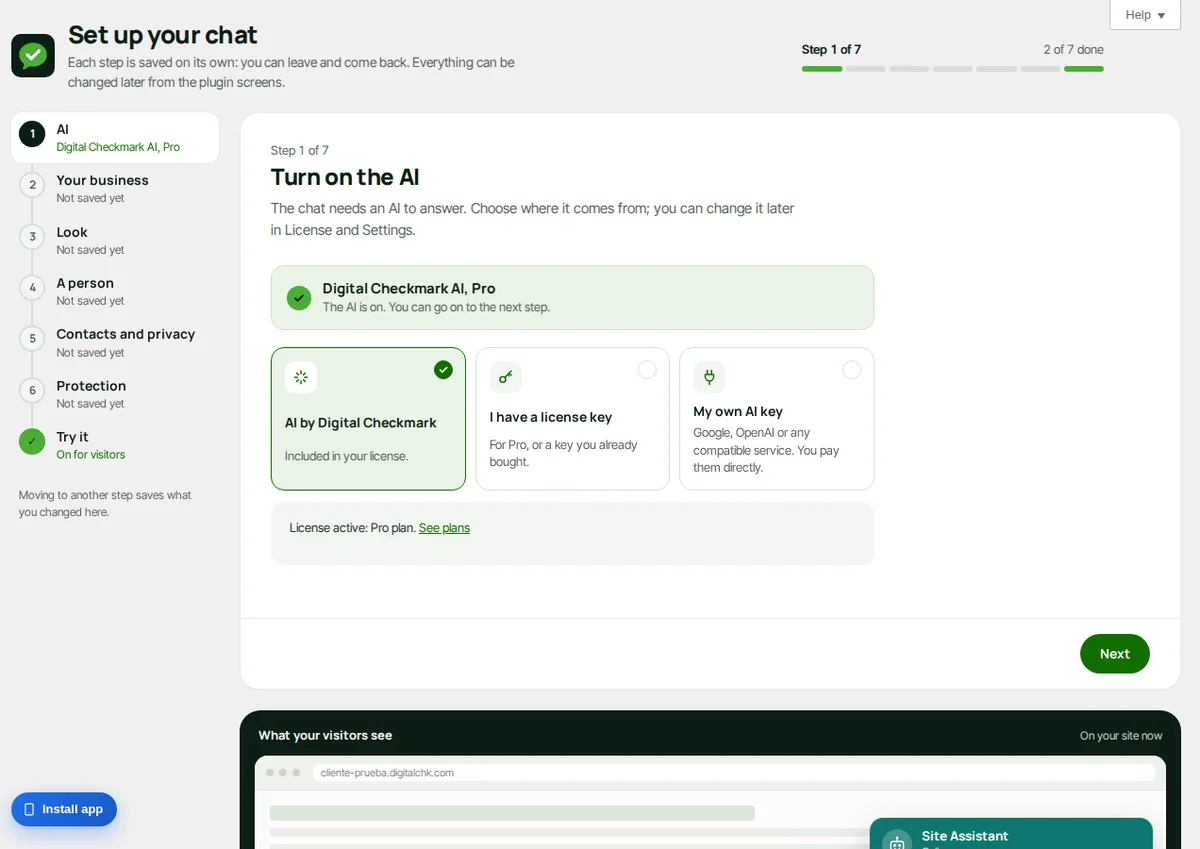
Your business
“Tell the bot about your business”. With your answers the assistant writes the bot guide: what it says, how it says it and what it never says.
- “Where the chat goes”: “This site”, or “Another site” with “Its address” (Wix, Shopify, Squarespace, plain HTML or another WordPress). See The chat on another site.
- “What your business does”: up to 1,500 characters. What you do, for whom, where, and anything the bot should always or never say.
- “Tone”: “Friendly”, “Professional” or “Brief”. The preview answers in the tone you pick.
- “What the bot reads”: “Learn from the pages of this site” reads every published page in the background (up to 500) and keeps them up to date when you edit one; “Also learn from blog posts” adds the posts. With another site, the bot reads that site’s pages when you press “Save and continue”. “Upload your documents (PDF, Word, CSV)” opens Context in another tab.
- “Questions off topic”: “Only answer about this site” gives homework, recipes or code a polite no, with the text in “What it says instead”.
If you wrote your own bot guide in Settings, the assistant keeps it unless you turn on “Replace the bot guide I wrote in Settings”.
Look
“How the chat looks”. The preview changes as you type.
- “Names and words”: “Bot name”, “Chat title”, “Line under the title”, “Welcome message” and “Text in the empty message box”.
- “Invitation”: “Show an invitation next to the button”, its “Message” and “Seconds before it shows” (1 to 120).
- “Color”: one of seven colors, or your own.
- “Avatar”: a built-in one, or “My own image” (an image address, or “Choose from the Media Library”).
- “Position on the page”: “Bottom left” or “Bottom right”.
There is nothing to set for languages: the bot answers in the language each visitor writes in, and Languages has your texts for each language of the site.
A person
“When a visitor asks for a person”. The bot asks the visitor to confirm and alerts your team, who reply from Support (or from Telegram, the app or Slack).
- “Let visitors talk to a person”: off, the bot answers alone and never offers a person.
- The button for a person: “Always visible” (under the messages, from the start), “When they ask for it” or “Never” (the bot still offers a person when asked).
- “Email my team”: agents and administrators get an email with the conversation. Add more people later under Agents.
- “Also send a copy to (optional)”: a shared inbox or your own email.
- “Business hours”: from and to, “Monday to Friday”, in the site’s time zone; check “Also on Saturday and Sunday” for weekends. Outside the hours the visitor leaves an email and gets the reply there. Closed dates and a different time per day are in Settings.
- “After the conversation”, sent to the visitor’s email when they left one: “Email replies the visitor did not see”, “Send a copy of the conversation” (when your team marks it as resolved) and “Ask them to rate the help” (1 to 5 stars).
Contacts and privacy
“Contacts, privacy and pages”. Contacts land in Leads (and in Leads Chk if you use it).
- “When to ask for the visitor’s email”: “Never ask” (an address is saved only if the visitor writes it), “When they want a person” (recommended) or “After a few messages” (a form the visitor can close, and always when they want a person).
- “Also ask for the name” and “Confirm the email with a code” (the visitor types a 6-digit code we email them).
- “Privacy”: “Show a privacy notice in the chat” adds a line under the message box with a link to the “Address of your privacy policy”. The text of the notice is in Settings.
- “Where the chat shows”: “Every page” or “Every page except the home page”. If you picked specific pages in Branding, a third choice keeps them. With another site, the chat shows wherever its line of code is pasted.
- “Speak first”: “Speak first to visitors who stay a while” shows your “Message” after the seconds you set (20 by default), once per visit. More options in Branding.
Protection
“Protection and limits”. The defaults suit most sites.
- “Bots”: “Protect the chat with Turnstile” with its “Site key” and “Secret key”, free from your Cloudflare account (under Turnstile). Without both keys, Turnstile stays off.
- “Messages per visitor”: “Normal” (60 per hour, 150 per day), “Strict” (20 and 60) or “Relaxed” (150 and 500, for offices and schools that share one address). If you set other numbers in Settings, “Keep mine” keeps them. Past the limit the visitor is asked to wait. Messages to a person never count.
- “Daily cap for your AI key” (only with your own AI key): “Low” (2 million tokens a day), “Normal” (20 million) or “No cap”.
- “Keep conversations for”: 30, 90, 180 or 365 days. Older conversations are deleted on their own; contacts in Leads are kept.
Try it
“Try it and turn it on”. The step shows a summary of the six steps, each with “Edit”; an exclamation mark points to something to look at, such as an AI not set up or nobody getting an alert. Ask what a visitor would ask in the chat on the right (“Try it here”): it uses the same AI and settings as your site, and test messages are not saved as conversations. With another site, the step also shows the line of code to paste there.
When you like the answers, press “Turn on the chat on my site” and confirm with “Yes, turn it on” (or “Not yet”). The plugin empties the page caches it knows, so visitors see the chat at once. If the chat is already on, the button is “Finish”.
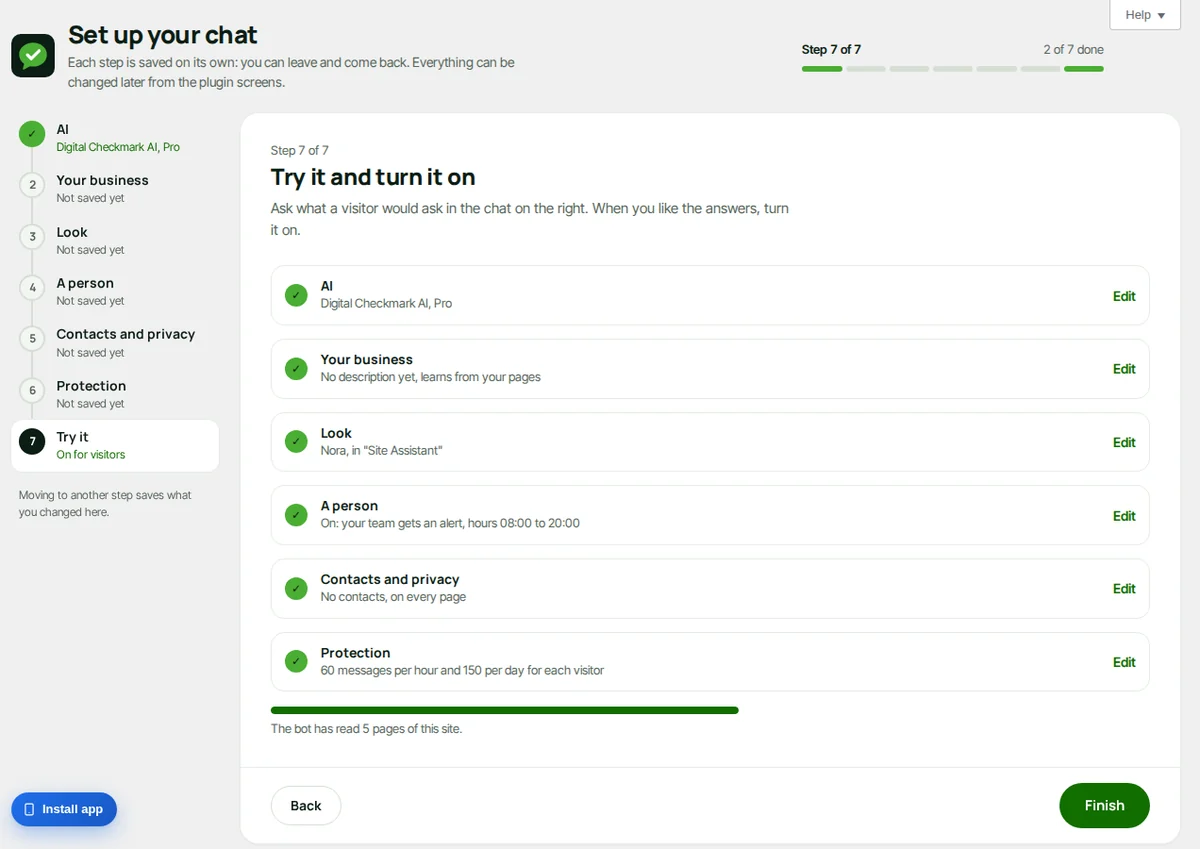
When you finish
The last screen, “Your chat is ready”, has:
- “See the chat on my site”, to write to it as a visitor would.
- What the bot knows (your description, pages and documents), with “What the bot knows” to open Context.
- A check that the chat shows on your site and can answer. If not, it says why and how to fix it.
- “Next steps”: “Upload your documents”, “Get the alerts in Telegram” and “Read and optimize my site”. With Pro, also “Invite your team”, “Install the app” and “Connect Slack, Teams or HubSpot”. On Free, the “With Pro” box offers the Pro trial or “See plans”.
- “All settings”, to go to Settings.
You can turn the chat off at any time in Branding.
Run it again
In Settings, press “Run the setup again”. The assistant opens on the first step not saved yet, or on the last step when all are done; choose any step in the list on the left. Every field shows what is set now, and each step changes only its own settings, so running it again changes nothing else and does not turn the chat off.
Privacy
- Conversations, attachments and chat contacts are deleted automatically after the retention period you set.
- The AI receives the conversation and the relevant passages of your pages and documents, never the visitor’s IP address or the email they left in the form. Whatever the visitor writes in the chat itself, an address or a phone number included, is part of the conversation.
- Live stores no IP or name: only the page, the outside site the visitor came from (without its search terms), country and device. The browser keeps a random id for 30 minutes, and the rows are deleted a few minutes after the visitor leaves, within a day at the latest.
- Webhooks only go to public internet addresses, and only with the events you choose.
- Files are checked for their real type, images are re-encoded to drop hidden data, and every file is served only through a signed link.
- Conversations and leads are included in the WordPress personal data export and erase tools; erasing a conversation also removes its Live row and its pending webhook, Teams, Slack and HubSpot deliveries and its Telegram links. What was already sent to Telegram, Slack, Teams, HubSpot or your webhook receivers stays there: delete it in those tools. The plugin suggests text for your privacy policy, including Live, Telegram, Slack, HubSpot and webhooks when you use them.
- Deleting the plugin keeps your data, so a reinstall brings everything back. If you tick “Delete everything when the plugin is deleted” in Settings, deleting it removes every table, option and file of the plugin and releases the license on our server, so you can use it on another site.
- On nginx, deny direct access to
wp-content/uploads/chatbot-chk-files-*. On Apache the plugin protects the folder itself.
For developers
Actions: chk_conversation_started, chk_visitor_first_message, chk_conversation_escalated, chk_conversation_claimed, chk_conversation_resolved, chk_conversation_rated, chk_conversation_restarted, chk_visitor_message, chk_bot_replied, chk_agent_replied, chk_conversations_deleted and chk_page_cache_purged. Filters: chk_attachment_types, chk_rate_limit_buckets, chk_client_ip, chk_lchk_capture_args and chk_frontend_data.
The chk_ssrf_allowed_private_hosts filter allows one exact private host (a staging or test site) for reading pages into Context; nothing is allowed by default. The chk_url_refresh_seconds filter ($seconds, $url) sets how often a web page is read again: 0 (every hourly run) by default, one day for Square booking pages.
From a script, ChatbotChk.open({ message: '...' }) opens the chat with an optional first message, and ChatbotChk.close() closes it.
Webhook bodies are JSON with event, id, time, site, a readable text line and, when they apply, conversation, contact, agent, rating and message. Failed deliveries are retried 2 and 15 minutes later with the same X-Chk-Delivery.
WP-CLI: wp chatbot-chk agent list shows the administrators and agents and who gets escalated chats; wp chatbot-chk agent exclude <user> and wp chatbot-chk agent include <user> (ID, login or email) set or remove “Not an agent”, which is the user meta chk_not_agent (1).
If something does not work
Start with Check my site (Chatbot Chk > About, and the last screen of the assistant). The plugin opens one of your pages as a visitor would, looks for the chat and calls its own address; it then says what it found and links to the right part of this list. It also runs once a day, and if it finds a problem while the chat is on, a notice shows on the Dashboard.
The chat is on but visitors do not see it: an old copy from a page cache
A page cache keeps copies of your pages so they load faster; visitors get the copy saved before the chat was on. The plugin empties the caches it knows (Cache Enabler, LiteSpeed Cache, WP Rocket, W3 Total Cache, WP Super Cache, WP Fastest Cache, Nginx Helper) when you turn the chat on or change it. Others need you: empty the cache in that plugin, in your hosting panel (nginx, Varnish, LiteSpeed of the hosting) or in Cloudflare (Caching > Purge everything), then press Check again. If your server has its own cache, connect it once: add_action( 'chk_page_cache_purged', 'your_purge_function' );
The page loads but the chat is not in it
Even skipping the caches, the page arrives without the chat. In order of likelihood: the page rules (Branding > Pages) hide it on that page; the theme does not call wp_footer() (the chat is added there; ask the theme’s author); a maintenance or coming-soon plugin shows another page to visitors; an optimization plugin removes or delays scripts (exclude chatbot-chk from it).
The chat shows but does not answer
The chat talks to your site through the WordPress REST API, at /wp-json/chatbot-chk/v1/. A security plugin that turns the REST API off for visitors, or a firewall rule, blocks it. Allow that address for visitors who are not logged in, then press Check again.
Your page answers with an error
The check got an error (for example 401, 403, 500 or 503) instead of the page. The site may ask for a password, be in maintenance mode or fail for visitors. Open the site in a private window: what you see there is what visitors get.
The check could not run
Some hostings do not let a site open its own pages. That says nothing about the chat: open the site in a private window to see it. If your hosting can allow it (“loopback requests”), Tools > Site Health shows it too.
The page rules hide the chat everywhere
Under Branding > Pages, “Only on selected pages” with no page chosen shows the chat nowhere. Choose the pages, or pick All pages.
The chat is set to run on another site, but its code is not there
Under Branding > Where the chat goes, copy the line of code and paste it on every page of that site, in the code of its header or footer. Check that the address under “Its domain” is the one visitors open (with or without www. both work). Then press Check again.
This WordPress could not open the other site
The other site did not answer to the check (it may be down, behind a password or blocking automated visits). Open it in a private window: if the chat shows and answers there, everything is fine.
Other problems
The bubble shows old texts.
Empty the page cache as described above.
The bot answers “I can’t answer right now. Leave your email and we’ll get back to you.”
The AI of Digital Checkmark could not answer: the month’s messages ran out (see License), or the Digital Checkmark server did not answer. In that case the chat stops asking for one minute and then tries again on its own, so visitors see the notice at once instead of waiting. Your team can still answer from Support, the app or Telegram. With your own AI key, the bot does not depend on our server.
“Talk to a human” is missing.
It only shows when someone will be notified. Check that escalation is on and that at least one agent with alerts, the email summary, Telegram, Slack, Teams or a webhook can receive it.
Nobody shows in Live.
Live is part of Pro and is off until you turn it on in Support > Live on the site. Visitors appear while their tab is open and visible; your own team does not appear.
A webhook says “Could not connect”.
The address must be public and reachable from your server. Use “Send test” and look at Recent deliveries.
Teams does not show the card.
Check that you copied the whole address of the flow and that the flow is on in Teams, then press “Send test” in the Teams card. Addresses of the old Teams connectors stopped working in May 2026.
The card arrives in Teams, but nobody gets an alert.
Teams does not alert new posts in a channel by default, only mentions. Put the emails of the people to alert in “Mention with @” on the Teams card. Or, in Teams, open the channel’s menu (…) > Channel notifications > All activity. On the phone, in Teams > Settings > Notifications, an option like “Only when I’m not active on desktop” silences the phone while the computer is open. In the flow, “Post as” must be Flow bot: Teams never alerts you about your own posts.
Telegram does not get the alerts.
Press “Send test” on the Telegram card. If the bot was blocked or removed from the group, the card says so: link the chat again. If connecting fails, the site is not reachable from the internet with https:// (a password on the site, or a firewall that blocks /wp-json/chatbot-chk/v1/telegram). Telegram’s calls carry no User-Agent: a firewall rule that blocks requests without one must let POST requests to that address through (they carry their own secret).
The bot answers “Your Telegram account is not linked”.
That person has to link their account in Users > Profile > Telegram before Take, Resolve or replies from Telegram work for them.
Slack does not get the chats.
Press “Send test” on the Slack card. If Slack refuses it, the card says why; usually the bot is not in a private channel: open the channel in Slack and type /invite @Chatbot Chk.
HubSpot does not accept the key.
The Service Key needs crm.objects.contacts.read and crm.objects.contacts.write. “Test connection” says which one is missing.
The bot still quotes old text.
Press Read and optimize my site, or Sync site pages now under Advanced options.
Replies by email do not arrive.
Check email with the test in Settings. The visitor must have left and confirmed an address.
Getting help
Every screen of the plugin opens its part of this guide, in your language: the Help tab at the top right, or the link at the foot of the page.
Write to us through the support page. Under Chatbot Chk > About, Copy details for support copies your versions, plan and the last check of your site (no keys or visitor data): paste it in your message, with the exact text of any error.